


It is also a healthful bread. I just read in The Village Baker by Joe Ortiz that, according to a baker he met in Germany who describes himself as "an organic grain madman", millet seeds and poppy seeds when eaten together make it easier to digest protein. If all these seeds were not such energy powerhouses, I would have it for breakfast, lunch and dinner, and maybe for a snack in the afternoon too.
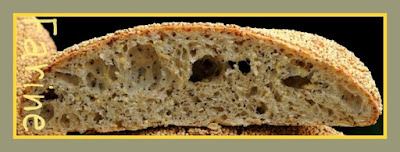
Two pre-ferments go into the making of it, levain and pre-fermented dough (a.k.a. "old dough"). You add to that some flour, some pre-soaked seeds, some yeast, some salt, some water and here you are, with your finished loaves that look almost like golden galettes.
Their shape reminds me of the bérets my grandfather used to wear (so French!) Another reason for me to have a deep affection for this bread...

Ingredients: (for 4 loaves)
For the levain
- 30 g unbleached all-purpose flour
- 30 g water
- 50 g starter 100% hydration
For the pre-fermented dough
- 278 g unbleached all-purpose flour
- 181 g water
- 5.5 g salt
- 1.6 g instant yeast
For the soaker
- 100 g millet seeds (+ more for the top cover)
- 100 g sesame seeds
- 39 g poppy seeds
- 39 g pumpkin seeds
- 109 g water
For the final dough
- 155 g whole wheat flour (I used white whole wheat but regular whole wheat is fine)
- 486 g unbleached all-purpose flour
- 360 g water
- 37 g canola oil
- 74.5 g levain
- 466 g pre-fermented dough
- 2.5 g instant yeast
- 20 g salt
- 326 g soaker

- The day before, mix the pre-fermented dough, leave it at room temperature for one hour or so and put it in the refrigerator for the night
- Also the day before, mix the levain and leave it at room temperature for the night
- Do the same for the soaker
- On the day of the baking, mix the final dough using all the ingredients except the soaker until proper consistency is reached (improved mix)
- When proper consistency is reached, add the soaker and mix at low speed until incorporated
- Transfer the dough to a covered oil container and set it to ferment for 2 hours
- Divide the dough in four pieces and pre-shape each of the pieces in a ball
- Let them rest 30 minutes
- Then flatten each ball into a galette (on both sides) and wet the top

- Dip wet side in millet seeds
- Let proof 1 hour and 30 minutes at room temperature millet side up (a bit longer if the room is cool)

- Score them in a criss-cross pattern
- Bake for 25 minutes at 450 F/232 C (with steam the first 15 minutes).


Yummy, I have to take this workshop, but I guess I am through you and Susans posts!
ReplyDeleteJeremy
I love this bread too! I never though of the loaves looking like berets, but they do, exactly. I wonder if you made other any adjustments to the formula when you omitted the honey, or simply left it out?
ReplyDeleteJeremy, it's a great workshop. You'd love it...
ReplyDeleteSusan, I guess I am genetically programmed to see berets where there are none! Re: the formula. I just recalculated the percentages without the honey.
This looks absolutely wonderful! I love breads full of seeds and grains.
ReplyDeleteSo amazing breads! You froze one - how do you handle it after taking it out from the freezer? What do you recommend is the best way to have frozen bread as almost newly baked? Did you freeze it as whole or in slices?
ReplyDeleteBest regards TiV from Finland
Claire, thank you for stopping by! I just browsed your recipe index. It is mouth-watering... We are having such a wet and foggy few days that I am going to go for the Alpine baguettes this weekend and dream of autumn.
ReplyDeleteTiV, thank you! Re: frozen loaves. I never slice them before freezing but I heard that it works quite well, especially for breads you intend to toast for breakfast as you can pop the still frozen slices directly into the toaster, which is very convenient. If I remember to plan ahead, I like to take the frozen loaf out of the freezer and put it in the fridge overnight (for breakfast) or in the morning for eating in the evening. Then either I slice and toast what we need for breakfast and stick the rest back in the fridge or, if the bread is meant for dinner, I preheat the oven at 350F/177C and when it's hot, I put the bread inside for 12-15 minutes. Then I take it out and it is as good as freshly baked.
Naturally, sometimes I forget to take it out of the freezer ahead of time. Then I stick it still frozen in the 350F/177C oven and I leave it a bit longer (15-20 min). Of course baguettes or ciabatta stay in the oven way less than that. The time indicated is for regular loaves. I tend not to like popping bread straight from the freezer into the oven because I have noticed that sometimes the crust separates from the crumb and I don't like that very much. Also it is important not to store frozen bread for too long as it tends to dry out. I hope this helps. Let me know if it works for you.
I am so glad I found your blog through Susan.
ReplyDeleteSome time ago I bought some millet and used it on "birdseed" muffins and never knew until now what to do with the rest. Will have to try this beautiful bread.
Thanks for the inspiration.
Lucky you and Susan to have the ability to attend the SFBI for classes!
ReplyDeleteIt really does look like the French berets!
Millet is something I keep wanting to try and this looks like a great explore with it. Maybe a while before I can get to it but I do want to try it.
Hi, Laura! Indeed, when I was growing up, millet was always used as birdseed. We didn't know what we were missing out on. It is such a versatile and wholesome grain. I love it in pretty much all shapes and forms.
ReplyDeleteHi, HalfCups (sorry I don't know your first name)! Yes, Susan and I are very lucky to be able to go and study at SFBI. I have taken 3 classes there so far and I know it made a huge difference in my baking.
I hope you both make this bread someday as it is truly an exceptional one.