


I know it's been a while since I promised to do a post on stenciling. Sorry it took me so long! Time-wise I often bite more than I can chew, especially in the summer where I always think I'll finally get to whatever I couldn't do during the rest of the year and of course I never do. Oh, well! Better that than being idle and bored, I guess... Anyway the kids and grandkids are gone, we have a couple of quiet days left here on the river and the time for stencils has come!
Stenciling isn't really difficult and it is a lot of fun as it makes it possible to vary and personalize the appearance of your loaves almost endlessly. If you know how to draw, you can make your own designs, you can also download an image or reproduce one you find in a book. Once you have the design, you transfer it to construction or other sturdy paper and you cut it out, just as I did for this one which I used for the Essential Sweet Perrin:

But I mostly use store-bought stencils which I find at arts & crafts stores such as Michael's or JoAnn:

Sometimes I use cut-out shapes, as can be seen above in the blog's title banner:

Or I use ornaments, for instance this one (found at Michael's)...

...or even decorative odds and ends as with the Lovebird Loaf


 Then I dust the open part of the stencil all over with flour using a small sugar shaker (make sure you use one with tiny tiny holes) ...


I got the stencil below at Ikea. I think it was part of a cupcake decorating kit...
For the above miche, I used a stencil I bought in France in the kids' section of a big stationery store. It came in a set of six and there were many more to choose from...
...but they were almost twice as expensive as the ones available in the US (sturdier too but that's not really necessary), so I only got the fruit set.
If nothing else is available, I just use my hand as in the Double Apple Bread!

And then of course, if you want to write on your bread, you also need a set of letters. I own three or four different alphabets and I am always on the lookout for more as they are more fragile than the stencils and the letters get lost more easily. I buy them in the scrapbook section of arts & crafts stores.

When I was at SFBI last fall, the instructor who teaches German breads told me he always stenciled his breads in the last twenty minutes or so of baking: he takes the loaves out of the oven, sprays them very lightly with water, does the stenciling and puts them back to finish baking.
I do my stenciling just before sliding the loaves in the oven as I find them easier to handle when they are not hot. I do keep his technique in mind though and it has happened once or twice that my stencil got kind of washed out in the oven, either because of the amount of steam or because I hadn't scored the bread in the right places and the dough moved differently from what I had expected. So I took the bread out, redid the stenciling and finished the baking. It worked very nicely. But for this miche, I just used my regular method.
What I do is that I wait until the proofing (the second rise) is done and the oven is ready for baking...
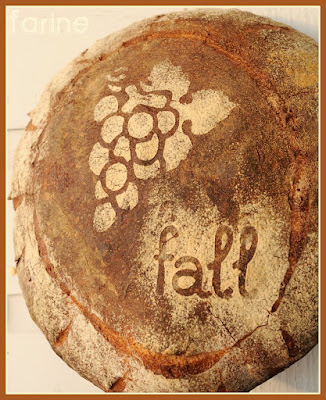
Then I gently transfer the dough (which is upside down in the basket) to a sheet-pan lined with semolina-dusted parchment paper, so that is now right side up. I put the stencil where I want it. Here I put it off-center and high up as I knew I needed space to write something.
I remove the stencil very gently (sometimes it sticks a bit and you don't want to pull hard) and here we are...
Then I select the spot where I am going to write (and it's best to pick the word ahead of time as some words take up a lot of room and you don't want your letters to start climbing down the sides of your loaf).
In this instance, I chose a very short word to go with the grapes. I know we still have one month of summer left but, hey, for I figured, why not go for it and stencil my way to fall. At least this year I won't be dragging behind as I am wont to do. ;-)
Here comes the trickiest part as the letters tend to stick quite a lot (they are made for scrapbooks after all) and it is easy to mess up when you remove them (if you do, just brush off the flour, use the tiniest amount of water to freshen up the surface of the dough and start again), so if you don't have dainty fingers (I don't), it's best to use tweezers.
I use these (which come from my old computer toolkit from the days when I still had a desktop and needed to open it up now and then). It has little edges which make it easier to grasp and hold the letters but I imagine regular tweezers would work too.

And that's all there is to it. You just need to remember not to spray water directly on your bread when you put it in the oven. When baking a stenciled bread, it's usually best to do the steaming from below using a small pan heated up with the oven in which you pour a cup of cold, hot or boiling water (every baker has his/her own opinion as to what the temperature of the water should be. I normally use cold water but for this recipe, I followed the author's advice and used hot. Actually she says to bring the water to a boil but it was too complicated, not to mention dangerous, considering my innate clumsiness. So I used hot water from the tap).
Note that some kinds of bread do not stencil well or at all. I have never seen a stencil on a ciabatta for instance as wet dough just absorbs the flour and the design vanishes.
Now I wasn't going to post the recipe for this bread as the post was really about stenciling and miche has never been my favorite bread but it was my first time making this particular recipe which I found in the revised and updated Amy's Bread by Amy Scherber and Toy Kim Dupree and the miche came out so delicious that I know I will make it over and over from now on. Its taste reminded me once again that the bigger the bread the more intense the flavor.
My firm levain is naturally very tasty since it is fed a mixture of freshly milled grains which still smell like the wind over the fields they come from but some recipes showcase it more than others. This one enhances its complex and rustic fragrance in a way that almost brought tears to my eyes, such was the wave of nostalgia that suddenly swept over me.This is truly a bread from my childhood, from before I even knew how to say "bread" in my own language. For me at least, it is the perfect French peasant bread and so here is the recipe with heartfelt thanks to Amy for bringing me this Proustian moment.
Ingredients:
57 g very warm water (105 to 115º F/41 to 46ºC)
1/2 tsp active dry yeast (I used 2 g of instant yeast instead)
600 g cool water (75 to 78ºF/24 to 26ºC)
165 g firm levain (I used my regular wheat-spelt-rye levain which has an hydration rate of 60%)
635 g organic unbleached flour
200 g organic rye flour (I milled my own right before mixing)
18.5 g salt
medium cornmeal or semolina, for sprinkling
Method: (as adapted from the book)
- Combine the very warm water and the active dry yeast in a measuring cup and stir to dissolve the yeast. Let stand for 3 minutes (since I was using instant yeast, I skipped that part and added the yeast directly to the flour. I added the corresponding amount of water to the dough)
- In the bowl of an electric mixer fitted with a dough hook, combine the cool water and the levain and mix on medium-low speed for 90 seconds to break up the levain
- Add the flours and salt and mix on medium-low speed for 2 minutes, then scrape down the sides of the bowl, increase the speed to medium and continue mixing for another 5 minutes (since my mixer only has one speed, which is pretty low, I just kept going)
- Turn off the mixer, cover the bowl and let the dough rest for 10 minutes
- Mix again for 2 minutes at medium-low speed. The dough will not be fully developed at this point, which is what you want (in other words you stop short of a window-pane)
- Put the dough in an oiled bowl large enough to allow it to almost double, cover it with oiled plastic wrap and allow it to rise for 30 minutes at the end of which it will be slightly puffy and very sticky
- Moisten your hands with cool water or a little oil and give the dough a turn by gently folding it from the sides to the middle to de-gas it, then turn it over so that the smooth bottom side is up, cover it and let it rise again for 30 minutes
- Turn it again and let it rise a third time for 30 minutes. The consistency of the dough will be still soft but it should now be stronger and feel slightly springy
- While the dough is rising the third time, generously flour a banneton or a towel-lined colander. The dough will stick to any unfloured areas, so be sure every inch is heavily coated with flour
- Pour the dough out onto a lightly floured work surface and gently shape it in a round ball, keeping your hands floured or moistened so that they don't stick to the dough. Try not to tear the skin of the dough
- Place the ball seam side up in the prepared banneton or colander, cover it with the oiled plastic wrap again and let it rise until it has almost doubled. This will take an hour or more depending on the temperature of the dough
- Thirty minutes before baking, preheat the oven t 480ºF/249ºC (with a baking stone on the second lowest shelf and an empty metal bowl on the shelf below)
- Sprinkle a parchment-lined half-sheet pan with cornmeal or semolina flour. When the miche is ready, remove the plastic wrap and carefully turn it upside down on the pan.
- Stencil the top of the miche as desired, then score the dough (for this miche, I scored in a circle around the stenciled top, then vertically all around on the sides)
- Open the oven and slide the miche onto the baking stone, still on its paper
- Quickly pour 1 cup of hot water in the metal bowl and close the oven door
- After 3 minutes, add another half-cup of water
- Check the loaf after 20 minutes, rotate it if necessary (a must for me as my oven is much hotter in the back than in the front) and remove the metal bowl from the oven, to make sure there is no residual moisture in the oven
- Reduce the oven temperature to 450ºF/232ºC and bake for a total of 50 to 55 minutes, until the loaf is very dark in color and sounds hollow when tapped on the bottom. The inside temperature should register at least 210ºF/99ºC
- Place on a wire rack and cool completely before cutting into it (it is actually best to wait 12 to 24 hours if possible as the flavor really increases as the bread rests).
- Enjoy!


I have always admired your art of stenciling. So far I tried it once. Your tips encourage me to try it again. Thanks.
ReplyDeleteYour loaf is stunning!! Many thanks for this really great outline of how to stencil. (I recently failed rather miserably because I didn't use heavy enough paper)
ReplyDeleteWell, I have been waiting for this post for a long, long time.... :-)
ReplyDeleteThanks so much! You make it seem very easy, but I know it takes practice and plenty of trial and error rounds.
I am bookmarking this post and intend to work on it during the next few months, should be fun
thanks for the detailed explanations!
Thanks for the tutorial. I've always wondered how you make the wonderful designs on your loaves!
ReplyDeleteLol!! You know that next week YeastSpotting is going to be full of stenciled loaves, right?!
This is a nice technique of dressing up bread. Thanks for the detailed writeup.
ReplyDelete@Anulka, let me know how it goes!
ReplyDelete@Elizabeth, yes, isn't it a pain when the paper starts floating around? Similarly it is impossible to stencil properly when a breeze blows through your kitchen. Here at our camp where cross-ventilation rules, I always have to make sure I close at least one set of windows.
@Sally, sorry to have taxed your patience. I can assure you that stenciling isn't really difficult at all. It is however impossible to do with a flock of toddlers hanging on, poking the loaf, wanting to taste the dough, playing with the stencils, trying to run away with the tweezers, etc... Keep me posted! I am sure you'll be a success at it much faster than you think.
@Mimi, can't wait!
@Bergamot, you're welcome. Stenciling is truly rewarding. Hey, just looking around for stencil ideas is lots of fun.
Brilliant! Welcome: Terike
ReplyDeleteHi, Terike! Glad you enjoyed the post. Let me know if it helps...
ReplyDeleteMerci beaucoup pour ces explications détaillées et qui donnent envie. Je vais d'abord essayer de traduire à ma façon et je me lance !!! bonne journée
ReplyDeleteThanks for the detailed writeup with super pictures. thanks for sharing this.
ReplyDeleteLike Sally, I am going to study this and keep my eye out for stencil material too. I only once tried a stencil, vastly over-ambitious, took me all day to cut it out of paper and then when it came to lifting it off the dough it stuck. Tweezers, of course :) Thanks for this post MC!
ReplyDelete@jojoboop, j'attends avec impatience de savoir ce que ça aura donné.
ReplyDelete@max, you are more than welcome. It'd be fun to see more stenciled breads around.
@Joanna, yes, sometimes it does stick and that's a bummer. Too bad your stencil was so hard to make...Maybe you'll have better luck with a simpler shape.
Bonjour je découvre votre blog par votre nièce MAkanai et je me permet de vous demander si vous voulez bien m'expliquer comment vous faites pour décorer vos pains car je ne suis pas certaine de tout bien comprendre... Mais que c'est beau !!! Merci beaucoup pour vos belles photos !
ReplyDelete(Je n'arrive pas à mettre mes coordonnées, désolé pour le "anonymous"!
ReplyDeleteMadeleine
o.ginieys@free.fr
Pas grave, Madeleine, mais je suis bien contente que vous ayez rajouté votre nom! J'utilise des pochoirs du commerce (ou parfois que je fais moi-même) et je les place sur le pâton juste avant d'enfourner. Je saupoudre de farine, je retire le pochoir et le tour est joué! Mais j'ai vu une fois un boulanger faire la déco en cours de cuisson. Il retirait le pain du four une vingtaine de minutes avant la fin de la cuisson, vaporisait un peu d'eau dessus, mettait le pochoir, saupoudrait de farine, retirait le pochoir et remettait au four. Ça marchait très bien et peut-être que la déco craquelait moins. Mais personnellement je trouve qu'on risque davantage de se brûler et ça ne vaut quand même pas le coup. J'espère que ces détails vont vous aider... Bonne chance et tenez-moi au courant!
Delete