


Most simple breads (those who don't rely for flavor on a bunch of ingredients beyond flour, water, salt, and yeast) turn out tastier, rise better and have a better crumb if they are made over two days instead of being mixed and baked in the space of a few short hours in one single day.
These breads call for a two-step process: a mix of flour, water and yeast (and sometimes salt, as in this recipe) is left to ferment overnight acquiring both depth of flavor and increased leavening power. The day after, this first dough (or preferment) is incorporated into the final dough to which it imparts a distinctive taste and structure depending on its hydration (percentage of water relative to flour), the temperature at which it was kept, the length of its fermentation, the amount of yeast involved, etc.
There are several types of preferments. In this recipe, we will be using what's commonly called "old dough". Some bakers prefer to call it by its French name, pâte fermentée (fermented dough) but "old dough" does the trick for me. It is easier to explain to kids and it reminds me of the hours our grandchildren have spent at our kitchen table playing with salt dough. They cut and folded and shaped and had all manners of fun. I used to put a bit of vegetable oil in their salt dough, so that it remained pliable and whatever was left over could be kept in the fridge from one weekend to the next. If I were teaching them to bake bread now, I would explain the difference between salt dough (which is dead) and bread dough which is alive because it contains yeast and therefore requires a bit more tender loving care.
To get your hands on a piece of old dough, either you use some dough left over from another baking session (which almost never happens in my house as I nearly always forget to set dough aside for the next batch), or if you have baked no bread in the past 48 hours (old dough tends to become more acidic and to lose its leavening power if it sits for too long), you simply mix flour, water, salt and a pinch of yeast until the dough starts to develop, put it in a bowl, cover it, let it ferment slowly overnight at cool room temperature and voilà, you have your old dough!
This loaf is the perfect weekend baking project: you mix the old dough on Friday night, mix and bake the final dough on Saturday and enjoy fresh bread from Saturday night on (which is why the amounts are generous enough to yield two loaves). You may not succeed right away: we ate our share of doorstops over the years but learning is always a process, isn't it? So don't despair if it doesn't turn out exactly the way you want the first time. Plus unless your bread is hopelessly burnt or you forgot the yeast and it baked into a flat stone or you forgot the flour (which happened to me once when I was a child and made a French almond cake for my family. It tasted awfully of canned mushroom - I still can't figure out why - and my doting father is the only one who got a second helping and said it was really good in an interesting way - although decades later he still laughed like a hyena when he told the story) and there was no dough to bake, it will always be appreciably better than supermarket bread...


To make this recipe,
- A large bowl and two medium-size bowls as well as lids or plastic film to keep them covered
- A spatula to scrape the bowls
- A scale (preferably electronic, so that you can switch easily from ounces to grams)
- A dough cutter (or a knife with a wide blade) to divide the dough prior to shaping it
- A clear plastic bag large enough to house the proofing shaped loaf without touching it
- A razor blade or a serrated knife (to slash the loaf before baking)
- An oven
- A pelle or rimless baking sheet to slide the loaves into the oven and get them out when they are baked
- Parchment paper
You might find it convenient to have as well
(Please note that the links are meant to give you an idea of what the equipment looks like and that I am recommending no specific brand or seller)

My oven setup
(Please note that the links are meant to give you an idea of what the equipment looks like and that I am recommending no specific brand or seller)
- A instant-read thermometer
- A plastic proofing container with a lid
- A round proofing basket (or else a round colander lined with a flour sack or other non-stick towel)
- A board and a linen (or other non-stick fabric) towel to proof your shaped loaves (the ones which don't proof in a basket)
- A baking stone (before I had one, I used a rimless metal sheet pan which always stayed in the oven and got preheated when I turned the oven on)
- Some kind of steaming device (I use an old metal dripping pan filled with smooth lava stones which I always leave on the oven bottom shelf)
My oven setup
Bread Tips
- Time can also do a big share of the work for you. My hands and wrists are giving me all kinds of trouble but even though I own two different types of mixers and unless I am baking for a big crowd, I still prefer to mix my doughs by hand. My favorite method is to just incorporate the ingredients (making sure all the flour is hydrated) and then leave the (still very shaggy) dough to rest, covered, for 10 minutes. When I come back, lo and behold, the gluten has developed appreciably. I give the dough a few gentle stretches and folds inside the bowl (the in-bowl mixing method is helpfully illustrated here by Khalid on The Fresh Loaf ), cover it again, and come back again 10 minutes later to do the same. After four or five times, the dough is usually ready for bulk fermentation.
- Temperature matters. Most bakeries are much warmer inside than the average home, at least at our latitudes during the cold months of the year. Depending on the season, the same exact dough may give you different results. The taste may vary (the bacteria which develop in cooler temperature are not identical to those which develop at warmer temperature) and so may the bread structure (in my experience, it is often easier to get a more open crumb with a yeast-leavened dough that has fermented in a warmer environment).
There are ways to keep your dough snug (setting it to rise in the oven with a light or the pilot light on or near a source of heat such as a fireplace or using a makeshift proofer made of a seedling mat and an inverted plastic box, etc.). I have a folding bread proofer but I haven't used it for this recipe as I wanted to reproduce as closely as possible the conditions which might exist in your home if, like me, you have to reckon with the tail end of winter in the Northern United States.
Everything being otherwise equal, I find that an indoor temperature of about 76°/24° is about ideal. But good luck on getting that temperature consistently throughout the year! The little laundry room where I do my mixing and baking is hot in the summer (85-90°F/29°-32°C) and cool in the winter (59-62°F/15-16°C). On very warm days, I set the dough to ferment -well covered- on the floor of the garage and on very cold ones, on the countertop next to the washer on the side opposite to the window, where temperature is a couple of degrees warmer. I have learned to enjoy the slow fermentations of winter (which give me a lot of time to do other things) as well as the bouncy eagerness of summer doughs (which sometimes require to be tempered in the fridge as a quickly risen dough seldom yields satisfactory results).
Of course when a dough needs to be slowly fermented over a long period of time (as is often the case for doughs leavened with a natural starter instead of commercial yeast), it can only be kept at cozy room temperature if the process is strictly controlled and watched over (as it is for instance by Gérard Rubaud in his Vermont bakery). For the home baker who enjoys sleeping through the night, the only solution is often to find a really cool place (sometimes the fridge) to let the dough rise slowly overnight.
It is considered optimal for a dough to have an internal temperature of about 76-78°/24°-26°C at the end of the mixing. One way to achieve this is to modulate the temperature of the water you add to the flour at the time of the mixing, using warmer water when the room and the ingredients are cold and colder water when they are warm. For this loaf, I used warmish water from the tap. I didn't measure the temperature but made sure it was one step above lukewarm. Never use hot water as it would kill the yeast. For a very helpful and detailed description of the way to obtain a specific desired dough temperature (DDT), please refer to this page of Susan's Wild Yeast blog (a blog I most fervently recommend to anyone who is interested in becoming a serious home baker); - The amount of water you use makes a big difference in the type of bread you end up with and it is nearly impossible for any recipe to give you an exact indication of the hydration rate. There are too many variables, the first of which is the flour you are using which is most probably not from the same brand and the same batch as the ones used to make the featured recipe. Even if you are used to working with one specific brand and one type of flour, you will find that you may need to increase or decrease water with each new batch. Which means that you need to develop a feel for the dough consistency that gives you the best results. That may be the toughest part of learning to be a baker but it is also the most rewarding because one day you'll just know and you will never forget (a bit like riding a bike).
A good rule of thumb is to reserve at the start about 10% to 15% of the total water amount indicated in the recipe in order to add it later on in the mixing process as/if needed. You may end up not using it or you may have to add even more. It will be for you to determine but once you know, it is useful to make a note of it for the following time. I often find I have to use more water than indicated in a recipe; - Which brings me to this: keep a log book. If you intend to start baking regularly, for each bread you make, write down which recipe you used, what was the room temperature, how much water you ended up using, how long you preheated the oven, how long you baked the loaf and at what temperature(s), how open or dense the crumb was, whether or not you liked the bread, how was the flavor, what you would like to change if anything, etc. Take pictures of the bread and of its crumb and save them. Your log book will quickly become a reference tool which will save you time and effort down the road.


Ingredients (for one boule and one curlicue)
Old dough
- 210 g all-purpose flour, unbleached
- 137 g water
- 4 g salt
- A scant pinch of instant yeast
OR:
- A 350 g piece of dough saved from a previous mix
Final dough
- 631 g all-purpose flour, unbleached
- 70 g wholegrain rye flour (also called dark rye flour) (I use rye because I like the flavor and the slightly darker color it imparts to the bread. I also like the tiny specks of rye bran in the crumb)
- 484 g water
- 14 g salt
- A pinch of instant yeast
- All of the old dough (about 350 g)
Method
- Whisk all the dry ingredients together in the medium size bowl, add water and mix by hand until the flour is well hydrated and incorporated
- Let rest 10 minutes, covered
- Leaving the dough in the bowl, pull it on one side and fold it towards the center, turn the bowl slightly and repeat, repeat until you are back where you started. Cover the bowl again and let the dough rest
- Repeat four or five times
- Let ferment, tightly covered (I use plastic film) until morning at room temperature (if room temperature is cool). If room temperature is warm, let it ferment about four hours, then put it in the fridge overnight. In the morning, take it out of the fridge and leave it at room temperature for one or two hours before mixing

Old dough in the evening

Old dough the following morning
Final dough (to be mixed on the day of the bake)
- The old dough should have inflated a bit and smell slightly fermented
- Divide it in several little chunks for easier incorporation with the other ingredients
- Pour most of the water (set aside 10 to 15%) into the large bowl
- Whisk together the flours, yeast and salt in a medium-sized bowl and add them to the large bowl
- Add the chunks of old dough
- Mix until incorporated. You shouldn't see any dry flour. If you do, add some of the reserved water. If you still do afterwards, add more water from the tap by very small increments (matching the temperature of the water you previously used)
- The dough will be shaggy but pliable. Cover it and let it rest 10 minutes
- Leaving the dough in the bowl, pull it on one side until it is stretched and fold it towards the center, turn the bowl slightly and repeat, repeat until you are back where you started. Cover the bowl again and let rest
- Repeat four or five times at 10 minutes interval. Each time you come back to the dough, it should have changed, become smoother, shinier and easier to handle
- Transfer the dough to a lightly oiled proofing container and cover tightly
- After 20 minutes, fold the dough inside the bowl (see this useful video by Amy at 0:26 to 0:46 min. Amy from Amy's Bread is a wonderful New York City baker whom I had the pleasure to meet last year at WheatStalk. Her Italian dough is much wetter and softer than our Learning Loaf dough but the folding method is still the same )
- Repeat twice at 20 minute-intervals
- Let rise as long as needed for the dough to show a dent that doesn't bounce back right away when you palpate it with your fingertips
- Transfer the dough to a floured tabletop and pat it gently into a rectangle
- Using the dough cutter or a knife with a wide blade, cut the dough in two pieces, roughly two-thirds, one third (you could weigh each piece of dough and make it scientific but you don't really need to). (Alternatively if you'd like to make two identical boules, cut the dough in half instead)
- Loosely pre-shape the big chunk of dough into a boule and let it rest, covered, on the floured counter
- Do the same with the smaller piece, except that you flatten it a bit, then roll it loosely into a sausage. Let it rest next to the boule
- After 10 minutes or so, the dough will probably have relaxed enough for you to proceed with the shaping: please refer to Amy's video at 2:45 min to learn how to shape a boule, at 3:28 min to learn how to shape a batard (elongated bread) you can curve into a curlicue if desired or leave as is
- Place the shaped boule inside a floured proofing basket such as this one or a round colander lined with a flour sack towel (I suppose a towel-lined bowl might do in a pinch but from what I read it is better for the dough to be able to breathe on all sides as it rises) or just set it on a flour-dusted parchment paper-lined board (if not contained the loaf might expand a bit laterally and don't give you as much of a rise: it will still taste fine though)
- Place the shaped curlicue on the same board (about 4 or 5 inches away from the free-rising boule if not using the basket) and slip the whole thing inside a large clear plastic bag
- Tie the bag closed making sure to trap enough air in it for the plastic not to touch the dough
- Let the boule and the curlicue proof until doubled in size (at cool room temperature it may take 45 minutes to one hour)
- Meanwhile pre-heat the oven to 475°F/246°C with both the baking stone (or rimless metal half-sheet pan) and the metal pan inside, the stone or sheet pan on the middle shelf and the dripping pan (for steaming) on the bottom one
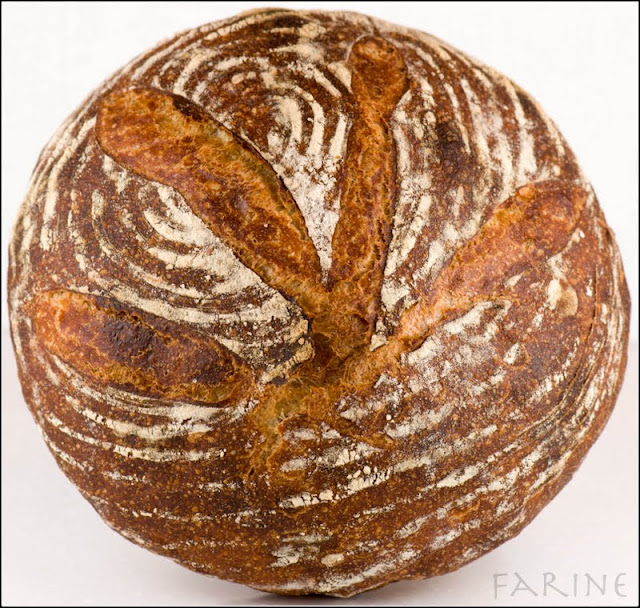
- When the loaves have doubled in size, take them out of the plastic bag, gently invert the boule on a parchment paper-lined rimless sheet pan, dust it with flour (I use a fine mesh shaker) and holding the razor blade or the serrated knife at a slight angle, slash it a few times on top (for this boule, I slashed the dough four times in a fan pattern)
- (If you have room enough for the curlicue to bake in the oven at the same time as the boule, transfer it to the sheet pan, dust it with flour as well and slash it a few times. If your oven isn't large enough (mine isn't), tie the bag closed again with the curlicue inside and set it to wait in a cool place
- Quickly transfer the boule into the oven by sliding it off the sheet pan and onto the preheated stone (it stays on the parchment paper)
- Pour one cupful of warm water onto the lava stones (watch out as a lot of steam will suddenly shoot up) and close the oven door quickly
- After five minutes, turn the oven down to 450°F/232°C and let the bread bake for about 35 more minutes
- When ready it will sound hollow when tapped on the bottom
- Repeat with the curlicue (except that it will bake a bit quicker, maybe 30 to 35 minutes total)
- I find it useful to turn the oven light on and check on the breads as they bake. If I see they are turning a bit dark, I tent them with aluminum foil (taking care that the foil doesn't touch the bread). You may also need at this point to slightly lower the temperature of your oven. Ovens are like flours: they are all different. My 450° may be you 430° or vice-versa.
- Once the bread is baked, set it to cool on a wire rack and wait for it to have cooled completely to slice it open
- Enjoy!


Great write-up, Farine!
ReplyDeleteI am sure lots of your readers will jump on this and make bread right away this weekend! You are right about the skills - the bycicle thing - so true! The more you bake, the more you "feel" what is it that the dough needs. Almost never more flour... :-)
Me thinks Pate fermentee' has a lot more charm than old dough, but what can I say? I have a soft spot for French, mon amie... ;-)
Ah, moi aussi! But "pâte fermentée" isn't that easy to pronounce for non-French speakers...
DeleteThanks for putting this up for us; I'm still going to have a crack at the rye first, if I can obtain all of the ingredients.
ReplyDeleteKeep me posted. Where I live it is hard to get the cracked rye and to avoid shipping charges, I am going to try and see if I can crack my own in my little mill.
DeleteI used whole rye grains. After soaking they seemed palatable...let's see. The dough is made in the tins and waiting to rise. I also substituted malt barley powder which I made into a syrup... Lot's of those ingredients are somewhat esoteric; we do have some homemade bread shops but they are far away from me. Will keep you posted.
DeleteSuch detail is so great. You are a good teacher.
ReplyDeleteMC,
ReplyDeleteWow, it looks so, so delicious. It also looks like a lot of work!
Someday I am going to try this. It may take me a few attempts. I should take pictures and send them to you so you can get a good laugh!
Thinking of you always,
Megan in MN
MC,
ReplyDeleteMy daughter and I will be trying our first bread baking experience this weekend in honor of Noah. Thank you for the recipe and as always you and yours are in my heart and prayers.
God Bless
It makes me happy to hear it. Please keep me posted!
DeleteI can't wait to try this out!!! Thank you so much for taking the time to write all this out!!
ReplyDeleteYou are welcome. Please keep me posted!
DeleteChe meraviglia le sue ricette di pane Signora MC. Io sono italiana e dalle mie parte in Calabria fanno un ottimo pane. Più di tutto mi piacerebbe farle conoscere il pane di Pasqua ... conosce qualche ricetta di pane italiano o del sud Italia (Calabria)?.......se ci riesco le mando una mail. Intanto i miei complimenti sia le ricette che la sua paziente spiegazione e anche le foto sono tutte fantastiche!!! ps: porto Noah sempre nel cuore <3
ReplyDeleteil sito del famoso panificio del mio paese (Rogliano) : www.panificiodicuti.it
ReplyDeleteBeautiful breads!
ReplyDeleteI make almost all my breads with long fermentation, even white doughs taste so much better. When I started out with making my own breads, I always kept a piece of dough as starter for the next loaf (had that advice from a French cookbook.)
Hanseata, you are so organized! I admire you. I too always make my breads with long fermentation. The bread tastes and keeps so much better that way, doesn't it?
DeleteAWESOME!!! Thank you for that very patient, complete, and nice lesson. I have been baking breads (better luck with challahs, pitas, pizza dough and basic Italian loaves) for a few years, but these types of artisan breads have astounded me. Your shaping pictures are great because they are sort of wrinkly and look like mine. I still don't have a clue how to slice the top, but I will read-re-read your instructions and get to work.
ReplyDeleteI am curious--that recommendation to save some dough from this dough for the next one--is that similar to the whole notion of sourdough cultures? That is another one of those things that confuses me. And how long do you save the dough?
Finally--is your "preferment" the same thing as a "biga" or a "sponge"?
Thanks so much for the wonderful lesson.
Hello Alan,
DeleteThere is no commercial yeast in sourdough, no salt in biga and more water in poolish... All are preferments. For more info on yeasted preferments, you may want to check out this article by baker extraordinaire Didier Rosada: http://www.bakerconnection.com/artisanbaker/article_04.htm
In time I hope to post a learning loaf for each preferment. :)
This is wonderful! I can not wait to get started. Thank you for all of this detail. I am confident even I can do this. My daughter is so excited, she keeps asking me when we can start. My husband will be so impressed if I can pull this off. Thank you for the pictures, that helps me tremendously. You are so kind to take the time to do this. Thanks again, HM
ReplyDeleteThank you, HM, and please keep me posted!
DeleteWow... this looks like a project, but one that'll be worth it in the end. I'm short a few of the necessities, but once I get my kitchen up to par, I'm going to give this one a whirl. Thank you so much for sharing!
ReplyDeleteMany hugs,
Kim
It is only a project because I had to write everything down but really most of the work is done by the dough itself and the more you make bread the more it becomes second nature. Please keep me posted as to it turns out if you get around to making this loaf.
DeleteI absolutely will! There is almost nothing in the world that smells better than baking bread. :D
DeleteMC, just wanted to let you know that I just placed my "learning loaf" in the oven. I also wanted to thank you for the impact you have recently had on my life. I know that we have never met, probably never will, but you have taught me so much from love to bread. I now have a new super hero in my life. THANK YOU, THANK YOU, THANK YOU.
ReplyDeleteWell, remember the Doorstops you mentioned earlier? I now have two nice decorative ones. I think that where I messed up is just trying to rush the process. I do not like defeat, so I will try again next weekend. I did save some dough
Deletekinda expecting what I got. It only took me 20 years to master homemade biscuits and pie crust. Flour DOES NOT like me and makes me work extra hard for everything I get out of it. With love...
Sorry to hear that, Anonymous! I really don't think flour doesn't like you. It is just that real bread is slow food, no two ways around that... But the good part is that most of the time the dough works for you while you can do something else. Fermentation is really key.
DeleteI wouldn't use old dough that's more than 48 hours-old. It will be too weak to leaven your next bread and it might also be way too acidic. I would just make another little batch. Please let me know how the next one goes...
MC, thank you so much for this post. I haven't been quite sure where to get started here at this fabulous resource that is your blog - but this is just perfect. Have been wanting to make a gorgeous artisan loaf at home now for far too long. Thank you so much!
ReplyDeleteI made two Learning Loaf batardes over the weekend, and they were a complete success! I followed your instructions pretty closely, MC, but I didn't have instant yeast so I used two pinches (instead of one) of dry yeast, and that seemed to be OK. I couldn't figure out a good way to keep the shaped loaves in a closed container, so I covered them with floured plastic film and a dishtowel to keep the film from gaping. Next time I might put them in the microwave. In the oven, I put the loaves on a pizza stone, and I poured boiling water into a pan below (without the lava rocks). I'm a novice, but I was pleased with the crust and the interior, and the flavor was good, if rather milder than I might like. I intend to make it again several times so that I can get a good sense of how the dough should feel. Thanks, MC! I'm glad to have a specific recipe to start with, rather than a chart of proportions, which is kind of daunting. I'm pretty proud of myself!
ReplyDeleteWow, congratulations, Anonymous! I remember using the microwave too a few years back, keeping it off and closed of course and with a cup of boiling water next to the dough. It did work, although I had to replace the hot water a few times. I am so happy the Learning Loaf worked out well for you. The flavor must have been a bit milder because you used spelt instead of rye (if I remember correctly). Next time maybe you could try a mixture of both. Rye adds a wonderful flavor to white bread and complements spelt really well. Happy baking and thank you for keeping us posted!
ReplyDeleteMC, I made a trip to the grocery store last night to make sure that I had everything I needed for my next attempt at bread this weekend. Picked up several bags of extra food to be dropped off at one of our community food banks. The 14th of every month will always hold special for me and I always promise to do a good deed on this date every month for the rest of my earthly life.
ReplyDeleteLOVE, LOVE, LOVE. If we can't accomplish anything else LOVE is alot.
Actually, MC, I used mostly rye and just a very very small amount of spelt, perhaps a quarter cup or less. What do you think spelt does in Gerard Rubaud's bread? I'm the March 13 Anonymous, by the way.
ReplyDeleteFarine, when you want to add "old dough" to a recipe (which does not call for it,) what percentage do you need to take off the flour called for in the recipe? I hope you understand what it is that I'm trying to say, thanks.
ReplyDeleteThanks for this blog, I was looking for this technique as it was being used by the bakers in my homeland (old dough from yesterday) and it gives the bread a specific taste i couldn't reproduce. Now, a question: do you think the old dough can be frozen? if so, do you think it better to freeze it right away or the morning of the next day? reason for this is that I am not baking every day - more like once a week.
ReplyDeleteHello anonymous, I have never used frozen old dough. My advice would be to try it both ways and see which ones yields the better bread. Please keep me posted as to the result! That is a very interesting question and one that many home bakers would probably like to know the answer to.
Deletewill do! I think it makes more sense to freeze it "fresh" and let it defrost and revive 24h before baking.
Delete