Home About Recipes Artisans Blog Notes Resources
Showing posts with label BBGA. Show all posts

Monday, February 24, 2014

Ancient Grain Ciabatta

Related posts:
All About Ciabatta: notes from a class
Chocolate Ciabatta with Dried Cherries and Roasted Hazelnuts
Of Bread and Bridges: a baking weekend in San Antonio

As mentioned in All About Ciabatta, we made several different ciabattas during the class last May. The formulas have all been posted on the Bread Bakers' Guild of America's website but they are only available to BBGA members. We are authorized to post the ones we make at home provided we also post the following note (and I quote): "The mission of The Bread Bakers Guild of America is to shape the knowledge and skills of the artisan baking community through education.  Guild members have access to many other innovative professional formulas, both online and in the Guild’s magazine, Bread Lines. For more information about membership, please visit www.bbga.org."
I have been a Guild member for over five years now and, between you and me, I never regretted joining. Not only do I look forward to getting the magazine every quarter but I enjoy having access to the archives, to a zillion tested formulas, to the lively online forum, to the classes taught by the Guild, etc. BBGA describes itself on its website as "an independent and creative group of professional bakers, farmers, millers, suppliers, educators, students, home bakers, technical experts, and bakery owners and managers." But to me, it is a big family centered around the craft of making bread and I really like it. And just so that you know, nobody is twisting my arm or promising me a free membership!
That being said, eighty-five dollars a year - for an individual - isn't exactly peanuts and while BBGA isn't in the money-making business (it is an educational non-profit and mostly run by volunteers), only you can say if joining it is worth your while...
Now on to ciabatta. Why make this particular one? Well, we both happen to love teff (and to have some in the pantry) and while I am not a huge fan of amaranth, I have some on hand which is desperately calling for attention. Besides, we saw amaranth plants at the Botanical Garden in Montreal a few years back and I can't resist the idea of baking some of these colors into our diet (never mind the fact that, when all is said and done, amaranth flour is made from the seed, not the flower and it is, well, flour-colored)...


Ingredients

For those of you who are using BreadStorm (including the free version), please click on this link to import the formula.  For more on BreadStorm, you may want to read this post.

Tips
A bit of care needs to be taken with this ciabatta because the protein in ancient flours is soluble in water and has no gluten, which means in practical terms:
  • A shorter mixing time
  • A very low fermentation tolerance: if the oven isn't ready when the dough is, put it in the fridge for 20 to 30 minutes
  • Variable water absorption: you may need to add water until you get the right consistency.
  • A possible fold: if you find that the dough is very extensible and has no elasticity, then you will need to do one fold

Ancient grain ciabatta dough as it came out of the mixer during class
 Method

The night before the bake
  1. Mix the amaranth poolish, cover it loosely and let it ferment overnight (12 hours) at 73°F/23°C
  2. Mix the teff sponge, cover it loosely and let it ferment overnight (12 hours) at 73°F/23°C
On baking day
Desired dough temperature (DDT): 73°F/23°C to 76°FF/24°C
(Depending on the room and the flour temperatures, you will need to use cooler or warmer water in the final dough to obtain the DDT at the end of the mixing process)
  1. Scale the flour, yeast and salt. Whisk yeast and salt into the flour and reserve
  2. Place the poolish, the sponge, the dry mix (flour + yeast + salt) and water 1 in the bowl of the mixer
  3. Mix on first speed (on a spiral mixer) or speed 4 (on a Kitchen Aid) for 4 or 5 minutes
  4. Mix on second speed (on a spiral mixer) or speed 8 (on a Kitchen Aid) for 2-3 minutes
  5. Check gluten development. When gluten is 80% developed, add water 2 by increments on first speed (4 on Kitchen Aid) and mix for about 3 minutes
  6. Transfer to oiled dough tub, cover and let ferment at 73°F/23°C - 76°FF/24°C for 2 hours and 30 minutes
  7. Transfer the dough to a generously floured surface (see relevant video in All About Ciabatta: Notes from a Class), taking care not to let it fold over itself and going easy with the stretching as the dough will be fragile
  8. Divide and scale at 500 g (you should have four ciabattas)
  9. Proof on floured linen, top down, for one hour (or 30 to 40 minutes if room temperature is warm)
  10. Dust with a mixture of teff, amaranth and white flours
  11. Bake with steam on a baking stone in a 420°F - 216°C oven for 30 minutes (turning oven down to 400°F-204°C after 10 minutes, tenting with foil if over browning after 20 minutes and propping the oven door open (with a wooden spoon) for the last five minutes
  12. Cool on a rack
  13. Enjoy!
During the class, someone asked Didier about changing the percentage of ancient grain in the formula and here is what he said in response: "Twenty to twenty-five percent total ancient grain compared to total flour is optimal for flavor, structure and volume."

Friday, February 7, 2014

All About Ciabatta: notes from a class

Ever since last May when I attended All About Ciabatta, a Bread Bakers' Guild of America's (BBGA) class taught by Master Baker Didier Rosada (see Of Bread and Bridges: A Baking Weekend in San Antonio), I have been meaning to share what I learned as well as some photos and videos but most annoyingly, life intervened, notably in the shape of a shattered wrist, and I didn't get around to it. Since I owe an eternal debt of gratitude to the Italian bakers who invented ciabattas (the only bread I was able to tackle one-handed last summer because it requires no shaping) and to Didier for teaching me how to make it without fuss or fear, I am more than happy to pick up the slack today. As my indulgent mom used to say, better late than never! Except where otherwise indicated, all the information below comes from the notes I took during the class. 

Tools
  • All the doughs were mixed using a spiral mixer
  • At home, I use a 6-quart mixer with a dough hook
Flour
  • The bread flour used during the class was hard red winter wheat (11%-11.5% protein)
Preferments: a recap

What's a preferment?
"A preferment is a dough or batter prepared prior to mixing the final dough and composed of a portion of the total formula's water, yeast (natural or commercial) and sometimes salt. The dough (or batter) is allowed to ferment for a controlled period of time and then added to the final dough."
From Didier Rosada, Your Guide to Preferments, an online article I recommend reading for a better understanding of the various preferments and their applications

Old dough
Old dough can be used as a preferment for ciabatta. A good average is 40 to 50% of total flour. Using old dough is an easy way to have a quick preferment. But old dough has already been mixed fully once, which means it should be added at the end of the mixing time (so that it doesn’t get mixed again). Which is NOT the case for biga.

Biga
Biga is a very stiff preferment which came originally from Italy. If you choose biga, use 1% of yeast and let the biga ferment for 18 hours at 60°F. Remember to watch the water percentage in the final dough: hydration may need to be adjusted. If necessary, you can keep biga at 45°F (just up the yeast a little bit). As a preferment, it is more strongly flavored and more acidic than poolish.

Poolish
Poolish was invented by Polish bakers and brought to France by Austrians. A transition between sourdough and commercial yeast, it is one of the first preferments made with the latter. It has a sweet nutty flavor profile. A poolish is ready when it shows lots of bubbles and crevices and offers some resistance.

The amount of yeast to use in the poolish depends on the length of the fermentation. In the table below, please note that "total flour" refers to the total flour used in the poolish.
If you choose to let your poolish ferment overnight, always add to it 0.1% salt (1 g of salt for 1000 g of flour) as it will help you control the fermentation much better.
For reasons of personal convenience, I have always let my poolish ferment overnight. Ever since I took Didier's class, I have been systematically using in it 0.1% yeast and 0.1% salt and I am delighted with the results: no more overripe and defeated poolish!

Sponge
Sponge was invented by the British. Hydrated at 60%, it ferments overnight at the same temperature as the poolish.

Gluten development
  • When the gluten is 100% developed, the gluten window is transparent. The finer the veins on the window, the more developed the gluten
  • Always relate dough temperature to gluten development: if your recipe calls for full development of the gluten, use a lower water temperature
  • Adequate dough consistency, gluten development and dough temperature will give the process a good start. If careful thought isn't given to all three, troubleshooting will be necessary 

Ciabatta: a historical perspective
  • In the old days, Italian wheat was very weak and a very stiff preferment was needed to reinforce the dough. Accordingly ciabatta dough was traditionally leavened with biga, then set to ferment overnight at low temperature. A long fermentation at low temperature produced acidity which made the dough stronger. One can still see biga cellars in old Italian bakeries
  • Most of the wheat in Italy now comes from France and Germany and is low in protein (10 to 10.5%). It is stronger than the old Italian wheat, which means that biga is no longer the preferment of choice for ciabatta: it makes the dough too strong
  • Even though today's Italian bakers still call most preferments biga, they generally use poolish in their ciabatta. (In the United States, the term biga is often preferred for marketing reasons: it sounds more romantic than old dough!)
  • Today in Italy, ciabatta is often made with straight dough and therefore less flavorful
Ciabatta: basic concept
  • Today's preferment of choice: a poolish using 30% of the total flour in the recipe
  • Ciabattas require no shaping although some people like to give the dough a fold to make it fluffier
  • Ciabattas are proofed top down on floured linen
  • They are baked flour side up without any scoring
  • Do NOT dimple the top of the ciabatta
Double hydration technique
  • The baker adds enough water at the beginning to get the consistency of baguette dough; develops gluten to about 80%; then adds rest of water (always in increments)
  • The dough no longer sticks to the sides of the bowl when mixing is done
Retarding ciabattas: tips
  • Retarding is only for convenience. Longer in the cooler doesn’t necessarily mean better. You will never get as complex a flavor as with a room temperature fermentation
  • If you plan to retard your ciabatta, choose a stiffer preferment (for instance a biga or a sponge), increase the amount of yeast in the preferment, shorten the preferment fermentation time (5 to 6 hours instead of overnight) and increase the amount of preferment in the final dough
  • Use the double hydration technique (see above)
  • Use olive oil
  • Increase mixing time to give the dough more strength: mix to improved (gluten at 90%) before adding the second water
  • Shorten the first fermentation before putting the dough in the retarder: 30 minutes, one fold, then into the retarder. Next day: take the dough out, divide it, proof and bake (right out of the retarder) OR: take the dough out, wait for one hour, then dump it on the  table, wait 30 minutes then divide and bake
 Miscellaneous tips
  • Always adding a bit of salt to a preferment is a safety: it will slightly penalize  the flavor of said preferment but it will ensure that it works
  • It is important not to put too much water at the beginning of the mixing: start at 68-70% if the formula calls for no oil (65% or a bit less if using oil)
  • Always put the liquid ingredients in the bowl first
  • Always add yeast and salt to the flour. Especially important if using cold water, so that the yeast doesn't come in contact with the cold water
  • Be very careful when dumping ciabatta dough on bench for scaling, you want to avoid any accidental folding
  • When scaling ciabatta, add scraps on top. Since ciabatta proofs wrong side up, the scraps won’t show in the final product (see photo immediately below)

  • You can add 10% natural starter to the formula for added flavor and longer shelf life
  • Steam is very important as ciabatta will always turn out better with steam. But only at the beginning of the bake. It is actually important to vent the oven towards the end of the baking because ciabatta can get soggy (in my house, I use the handle of a wooden spoon to keep the oven door ajar for the last five minutes of baking)
  • If the dough is too cold when done, increase the fermentation time
  • Milk makes ciabatta a bit more tender
Videos

Mixing ciabatta dough
(The sound is quite poor at the beginning but the video is still worth watching because it gives you an idea of the soft consistency and high gluten development Didier was looking for in that particular dough.)

Folding ciabatta dough
(For very wet doughs: soupy consistency and underdeveloped gluten)

"Shaping" ciabatta

Another ciabatta "shaping" (or rather, dividing) video

Ciabatta: loading the oven


What we made

We made nine different ciabatta doughs during the class, covering various techniques, preferments and grains. For all, except the first one, Didier used the double hydration technique.
  • Ciabatta with poolish (short-mix technique): the dough is mixed until all the ingredients are just incorporated and the gluten is developed by a series of folds during fermentation. This technique is the most traditional
  • Ciabatta for retardingwith sponge: allows for more flexibility in the baker's production schedule 
  • Ciabatta with biga: this version uses the most traditional preferment
  • Ciabatta with poolish: more modern version
  • Multigrain ciabatta with whole wheat poolish and multigrain soaker: higher nutritional value
  • Ancient grain ciabatta (with teff sponge and amaranth poolish): a functional bread*
  • Ciabatta integrale (with sponge and cracked wheat soaker): 20% of the bread flour is replaced with whole wheat flour and a soaker is added for higher nutritional value
  • Ciabatta with whole wheat poolish and flax soaker: a functional bread
  • Breakfast ciabatta with poolish and chocolate pieces: plain yummy!
* The functional movement started in Japan: it centers on the idea that certain foods can improve the functioning of the body (ex: oats help control cholesteral, flax seeds add omega 3, etc.) and help prevent or cure diseases.


When time came to taste the ciabattas we made, we were hard put to choose and opinions differed wildly. For what it's worth, my three favorites were the plain one with poolish (which I found more delicately flavored and more interesting than the biga one), the functional one with whole wheat poolish and flax soaker and the one with candied orange and chocolate pieces.

Related Posts:
Ancient Grain Ciabatta (coming up)
Chocolate ciabatta with dried cherries and roasted hazelnuts

Wednesday, September 11, 2013

BreadStorm

Related post: BreadStorm, a quick update on the free version

You can't escape your childhood. Ain't that the sad truth! The fact came back to bite me when I got introduced to baker's math back in January 2009 during my first Artisan bread class at the San Francisco Baking Institute (SFBI). Oh, don't get me wrong, I loved the class and completely understood the point of sharing formulas (what we home bakers call recipes) in percentages instead of weights. Baker's math makes it easier, among other things, to adjust dough size according to the amount of bread desired, to compare different breads and to troubleshoot problems. But even though baker's math could be more aptly described as a common language for bakers rather than real math, mastering it is still an uphill battle for someone who is number-challenged. And that's where childhood comes in: I have been number-challenged all my life. In my days, it wasn't called a disability. At least not in France. But that's what it was.
Don't you go thinking I was slouching during math classes, however! No, sirree! Never one to waste time, I took the opportunity offered by these otherwise excruciatingly boring hours to practice writing with my left hand. (To this day I can write with both hands - not as fast or as legibly with the left as with the right but still, well enough - or at least I could before I broke my wrist. Not sure I'll still be able to do it when I get my wrist back...)
As an aside and just in case you are wondering, homework was never a problem: my mom had been a math teacher and being a sweet and trusting soul, she always "explained" my math homework to me until it was entirely done and done right. My teachers never really understood how I could be such an assiduous student (appearing to write down their every word in class and always handing in perfectly completed homework on time) and still do so poorly on tests. How could I have ever guessed that one day I'd be a baker and that I'd bitterly regret not possessing the most basic math skills?
Of course you don't have to use formulas to be a baker. There are bakers out there (and I know quite a few of them) who wouldn't touch a formula with a ten-foot pole. They come up with their own recipes, do their own math and they are perfectly fine, especially if they mostly stick to the same breads and don't have to redo their calculations every day to adjust to a fluctuating market.
But the fact is that more and more, bakers are exchanging formulas, not recipes. If you take artisan bread classes, chance are you'll go home with a handful of formulas. You see formulas on the Web (there are some on The Fresh Loaf, on this tentalizing and instructive blog for instance ), on the Bread Baker's Guild of America's website or in industry publications. Knowing how do the math is really convenient if you are looking to diversify your production, whether you are a home baker or a professional.
Granted, the whole baker's math concept is simple and even I grasp it: flour is always 100% and the proportion of every other ingredient is indicated relative to flour as in the formula below:
If the baker decides to use two different kinds of flour, the same formula looks like this:
See how the total flour percentage remains 100 even when two different flours are used? Truth be told, the word "percentage" is a misnomer. It'd be way less confusing to say "unit". In both these simple formulas, for 100 units of flour, you need to use 65 units of water, 2 units of salt and 1 unit of yeast. But still the convention is to use the word "percentage" and since we are trying to speak a common language, we better adopt a common vocabulary as well.  (Sigh...)
Should you actually want to bake from either of these formulas, you first need to decide how much dough you want. If your goal is to make two 500g-loaves, your calculations need to yield one kilogram (1,000 g) of dough. Using this number as a basis, the same two formulas look like this expressed in weights:

For people who are not number-challenged, the calculation is pretty straightforward. A simple rule of three does the trick. Indeed, at each baking class or event I attend, I see fingers flying on calculators and I hear numbers called out as fast as I can jot them down. I get there too but it takes me a while and when the formula gets more complex (when a pre-ferment such as a levain or a poolish or both and/or a soaker needs to be factored in), the process becomes painfully slow. The possibility of a mistake rises exponentially and I often get discouraged.
Friends and family members have tried to teach me how to use a spreadsheet instead of a calculator but to no avail: as soon as the program opens up on the screen, my eyes glaze over and as much as I will myself to listen carefully, my mind invariably logs out.
Enter BreadStorm, a superb tool for bakers developed by Jacqueline and Dado Colussi (more on them in an upcoming Meet the Bakers post). I have been a BreadStorm tester for months and I bought it as soon as it came out of beta, a few weeks ago. Why? Because BreadStorm does all the calculations for me, and in a split second too.  For the first time in my baking life, I can tackle any formula that comes my way and that, my friends, is pretty sweet. It goes a long way towards assuaging any regrets I might still harbor regarding math classes!
Jacqueline and Dado are passionate bread bakers and they love people. In fact they welcome dialogue. They have been very helpful during the testing months and just as supportive after I bought the program. I felt they were there for me and didn't let go of my hand until I was on firm ground. Because, needless to say, the first time I opened the software (still in beta, with no tutorial available yet), my brain froze instantly and the familiar glazing sensation came over my eyes. BreadStorm looked like it might morph into a spreadsheet any minute. I was paralyzed. All I managed to figure out was how to enter ingredients. But it got better. With the developers' help my mind gradually thawed and things started to make sense.
Now that I have more or less mastered BreadStorm, I use it all the time to enter favorite recipes, including from bread books I have had for years or to create my own, starting with the percentages of flour, water, levain and other ingredients I am planning to use. I can adjust any number at any time and weights and percentages are immediately recalculated for me. For someone who had trouble figuring out hydration before (unless it was 100%), believe me, it is a dream come true. A learning disability made irrelevant... Wow!

Apple-Buckwheat Boule - a bread I baked last week from a BBGA formula entered in BreadStorm
If you are still with me at this point, you are probably curious to see how BreadStorm works. Jacqueline kindly agreed to put together a tutorial for Farine readers. It is copiously illustrated and self-explanatory. On the technical side, please note that BreadStorm has been designed for Mac users (OS X.10.6+). An iPhone version is currently being beta-tested. It makes it possible to scale formulas on the fly if you are away from your computer. It looks pretty neat.
In the interest of full disclosure, you should know that I purchased the software at the full price and with my own money. I am not being paid for this review and I will not make a penny off future sales. BreadStorm belongs to Jacqueline and Dado Colussi and to them alone. I just happen to love it!
If you like it, you can either buy the full version as I did or download the free one which enables you to read and scale any BreadStorm formula but not to edit it nor to create your own.

Thursday, May 23, 2013

Of bread and bridges: a baking weekend in San Antonio

The Bread Bakers Guild of America (BBGA) held another of its outstanding regional events this past weekend in San Antonio, Texas, and I was lucky enough to be able to attend it. The topic was "All About Ciabatta." I already knew the instructor, Didier Rosada, for having taken a couple of memorable classes with him at the San Francisco Baking Institute, a few years back.
I had seen how simple mixtures of flour, salt, yeast and water morph under his care into voluptuously silky and bubbling organisms that almost seem to purr as they spring to life. I knew him for a natural born teacher whose knowledge of dough chemistry and physics and all things bread is encyclopedic.  I fondly remembered his sunny Southwestern-France accent and his easy laughter, not to mention his gift for languages (Didier switches effortlessly from English to French to Spanish and back) and I knew the class was going to be a unique experience. I wasn't disappointed.
We did indeed learn all about ciabatta and made several different ones, using various preferments and methods. My two favorites were probably the poolish-based one with double hydration (the first one I will try to make when I get back home) and the power ciabatta (loaded with "good for you" nutrients) which we loosely shaped and baked into twists. I am usually not a huge fan of commercial yeast: I like the taste of levain, especially when it is both mild and complex but the class convinced that with proper pre-fermentation one can indeed make wondrously tasty breads using instant yeast. The Man's pick was the breakfast ciabatta, also poolish-based and studded with dark chocolate chunks and pieces of candied orange peel. The formula includes eggs and butter, everything he loves and is supposed to eat only exceptionally. Luckily his birthday is right around the corner...
We had arrived one day early to take in the sights, mostly the Alamo, the cathedral, the Mexican market and the River Walk. Coming from 58°F and overcast skies in Seattle however, the 97°F Texas weather was a bit of a shock. We baked in more way than one all weekend and didn't get to see or do all we had planned but we still fell under the spell of the city, its winding river and its many bridges.
Although we took back with us the best ciabattas of our lives, I am under no illusion that I will be able to emulate Didier's talent anytime soon, if ever. But I'll certainly do my best to apply what he taught us and share it on this blog. I just need to find out first how much time and energy I will have for baking and blogging once my treatment for breast cancer starts in earnest (we are still waiting for some test results), and get organized.
Didier's next BBGA event is scheduled for this fall at the International Baking Industry Exposition in Las Vegas. It will be a lecture on Las Buenas Practicas de Panificación (The Best Practices of Bread Baking) and he will deliver it in Spanish, together with Juan Manuel Martinez, a talented and passionate artisan baker from Bogotá, Colombia, who taught a popular class at WheatStalk last year. Considering the growing number of Spanish-speakers employed in artisan bakeries across America, I suspect the event will be mobbed.
Didier and Juan Manuel have co-authored Pan, Sabor y Tradición, a bread book which will hopefully be soon translated into English and made available in this country, and together with Miguel Galdós, another master baker (or "bread boy" as they like to call themselves), he has founded El Club del Pan (The Bread Club). I especially like El Club del Pan's videos. Such is the power of images that even non-Spanish speakers might find them instructive. Check them out and some of the magic may rub off onto your baking hands. I certainly hope it will onto mine!

Monday, September 17, 2012

Kneading Conference West 2012

Don't you love it when you find yourself in a crowd of people and experience an overwhelming feeling of togetherness and belonging? I know I do although it doesn't happen to me very often because outside immediate circles of intimacy, love and friendship, I am usually an outsider looking in. Having now lived in the United States for as long as I have lived in France, I am truly bicultural. In practical terms it means that due to the twin sets of references I carry in my head and heart, I never completely blend in on either side of the Atlantic. Truth be told, I cherish (and maybe nurture) this internal divide: exile is very much my country of choice and I have come to rather enjoy the exquisite ache of nostalgia and longing, especially in today's connected world where the other side is only a click away.
Still I love to belong as much as the next person and at the Kneading Conference West, this  year as last year, I found myself both part of a larger whole and at one with it. Loosely defined, the Conference (co-sponsored in part by the Bread Bakers Guild of America) is a gathering of bakers (both home bakers and professionals), millers, growers and brewers all interested in bringing local grains back to their communities. Last year we mostly talked about reviving cultures which had thrived in the Pacific Northwest since the nineteenth century before agribusiness decided it would be more profitable for these grains to be grown on a massive scale in the Midwest. This year, we discussed moving forward and finding ways to sustain the renaissance of local grains overtime, be it wheat, barley, rye or spelt, to name only a few.
Having grown up on local food (my grandparents grew, raised and foraged for a large part of what we ate, not to mention the hunting for small game that went on in the fall in the nearby woods), I have a deep respect for terroir and man's connection to the land and I love it that there is a movement afoot in America away from industrial and processed food. I still remember my shock when we moved to New York in 1979 and I first saw baguettes at the supermarket. I picked one up from the bin where it stood, wrapped in plastic, among several other pale companions, I lifted it out. To my surprise and consternation, it bowed deeply forward and remained that way all the way home. Due to the then-prevalent preference for overmixing and fast fermentations, bread was generally mediocre in France at the time we moved, so it isn't as if I had left behind a continent of fragrant and crusty loaves. Still I had never seen such pliable bread and it was depressing. It took many years, the publication of Nancy Silverton's Breads of the La Bread Bakery and my discovery of levain before we had baguettes on the table again on a regular basis.
So the local theme is one which resonates with me but it wasn't until keynotes speakers Andrew Whitley of Bread Matters and Naomi Duguid, co-author (among many other books) of Flatbreads & Flavors: A Baker's Atlas - a book I own since 1997 and still always open with a sense of wonder - started talking about their experiences that it all coalesced in my mind. Nancy Silverton and many other talented bakers after her taught us traditional French methods of bread-baking focusing on gentle mixing and long fermentations. Such baking is mostly based on a type of flour that offers reasonably consistent results because it comes from a blend of grains chosen for their baking properties, that is to say commercial white flour.
If we want to use more local grains (and we do or we wouldn't have been attending the Conference), we must accept the fact that our bread may not turn out exactly the same day after day. To get as close as possible to the crumb and crust we like, we need to learn how to compensate for the variability built in local wheat. The good news, as Scott Mangold cheerfully put it during his excellent workshop on test baking local whole wheat flours, is that, in the process, we will become better bakers. But growing to love the taste and texture of these local breads as much as those of the white baguette we may still hold as a gold standard will require keeping an open mind and educating both ourselves, our families and our friends (in the case of the home baker) and our customers (in case of the professional baker). As we slowly incorporate more local whole grains into our baking, the payoff will be huge however in terms of flavor, diversity, nutrition and the environment.
The way I suddenly understood it, our new role, as bakers, is to build upon our knowledge of traditional French bread-baking to help strengthen and sustain our communities here in America. What could possibly induce a deeper sense of finally belonging in this French woman who emigrated from her native Paris years and years ago and now bakes in the Pacific Northwest?
Of course I am lucky to live in a part of the country where (although much remains to be done), grains are already being grown, milled and made accessible to local bakers and brewers. If such is not the case where you live but you have access to a spot where you can grow what you like, you may want to read Growing Small Grains in Your Garden by Bob Van Veldhuizen. "A summation of many years of agronomic research into growing grains in Alaska scaled down to the typical home garden," it might give you some ideas on ways to get your family to kick off the white flour habit, even if you only have a balcony and your crop yields one tiny loaf... Should you decide to embark on that particular project, you may also want to read William Alexander's 52 Loaves, the lively account of a home grower/miller/baker's odyssey.
This year as last year, the Conference took place on the charmingly bucolic grounds of Western Washington State University Mount Vernon Research and Extension Center. Chaired by Stephen Jones, the Center's Director, it offered many different lectures, classes and workshops, not to mention evening tastings of local beers and ciders and, on the very last afternoon, a tour of the Hedlin Family Farm, BreadFarm Bakery and Fairhaven Organic Flour Mill. I didn't do the tour but I took as many classes and attended as many lectures as possible and I will report here on what I saw and heard. So please stay tuned!

Related Farine posts: 
Andrew Whitley: Bread Matters (keynote address)
Naomi Duguid: Bread Over Time (keynote address)
Kneading Conference West 2011
Scott Mangold: Test Baking with Local Wheats for Home and Bakery
Finnish Barley Bread (ohrarieska) (a Naomi Duguid recipe)

Other related posts:
By breadsong : Kneading Conference West - Day 1, Day 2 & Day 3
By Floyd Mann (The Fresh Loaf): Kneading Conference West - Part 1Part 2
By Naomi Duguid: Notes from the Skagit Valley
By Rhona McAdam: Kneading with a k
By Teresa Greenway: Kneading Conference West - Part 1 & Part 2

After I throw in a couple of flatbread and cracker recipes, not to mention the formula for the powerfully seductive barley-cheese-and-aged cheddar bread baked at the Conference by Andrew Ross from a British recipe adapted by Hannah Warren, my hope is that you too will want to answer Naomi Duguid's call to bakers: "Go back to your home or bakery and add at least two products than contain whole grains to your repertoire as well as at least one item made largely with a grain other than wheat"... It may not sound like much but if we all do it and buy our grain locally, seeds of change will germinate in our communities and grow to make a real difference. 

Wednesday, July 4, 2012

WheatStalk 2012


(image courtesy of BBGA)
Just back from a bread-baking whirlwind in Chicago and still under the spell, with visions of perfect loaves dancing in my head...
If you have been reading Farine for a while, you may remember previous posts about classes or events organized or co-sponsored by the Bread Bakers' Guild of America (BBGA).  I try to attend as many of these gatherings as I possibly can: they are always interesting, informative and fun and they provide great opportunities to meet other bakers. With WheatStalk which took place last week at Kendall College in Chicago, the Guild (a non-profit organization whose core mission is education) has outdone itself, bringing together two hundred participants (professional bakers, home bakers, millers, farmers, scientists, industry suppliers, etc.), for three full days of  baking and learning.
There have been two other WheatStalk-like events in the Guild's history: Camp Bread 2005 and Camp Bread 2007 (both of which took place in California) and those who attended (I have met quite a few since I joined BBGA in 2008) still talk about them with awe in their voice and stars in their eyes.
By all accounts, WheatStalk 2012 was pretty much in the Camp Bread tradition except that it was held in the Midwest so that even more people could attend (some participants even came from Canada and Central America). La fine fleur (literally the finest flour, more aptly translated as the cream of the crop) of America's baking instructors was there to offer a wide array of hands-on classes (building a commercial brick oven, functional breads, easy rye breads, gluten-free breads, ancient grains the modern way, etc.), lectures (starting your own bakery, finding whole grain solutions for formula development, the science underlying bread baking, etc.) and demos (laminating with whole grains, bread showpieces and decorations, Team USA breads, etc.).
The level of energy, enthusiasm and good will was extraordinary. Master bakers attended classes alongside home bakers. Instructors switched sides, teaching one day, apprenticing the next, attesting a simple truth: "Dough makes us humble". We can tweak it, coax it, cajole it, browbeat it, pamper it. In the end, it has a mind of its own although it definitely listens to some more readily than to others. So yes, indeed, knowledge matters and practice, practice, practice...

Jeffrey Yankellow and Mike Zakowski presenting Team USA's breads
(photo courtesy of breadsong)
Participants had been requested to apply for their classes months ahead of time (giving their order of preference) and the organizers (who did a fantastic job of marshaling resources for the event) worked very hard to satisfy most requests. But even if all of one's wishes were granted, there were so many equally desirable labs, demos and lectures that everybody had to make hard choices. I had selected two lectures (Day 1) and two all-day labs (Day 2 and 3), which means that, inevitably, I missed out on seventeen other all-day labs, ten other demos and four other lectures, almost all of which I would have loved to attend. So much too learn, so little time!
WheatStalk started on Wednesday night June 27th with a baker's math review, taught by Jeff Yankellow, the current Chair of the Board of Directors for the Guild. The class was mostly intended for home bakers, especially those who like me are resolutely number-challenged (now I know that it wasn't a smart idea to spend most of my math classes in high school practicing writing with my left hand. It is a pretty cool skill and useful all right but except for making it easy to switch hands when scoring, I can't say it has helped me very much in my baking). I should have listened to my mom - who had been a math teacher... (Dr. Freud, where were you when I needed you?) when she said I would be sorry one day...
Jeff explained that baker's percentage is a tool:
  • Combined with a fundamental knowledge of bread baking, it enables the baker to make any bread he or she wishes without having to go look for a formula in a book
  • Since it is a common language among bakers and in the industry, it makes it possible to look at a formula and know right away what it is about
  • It provides an easy way to scale a batch of dough up or down
  • It makes it much easier to identify and troubleshoot problems. 
  • Those who have trouble envisioning a dough with a 100% flour ratio can just replace the word percentage by the word "part" and it all becomes clearer.
The following day, Thursday June 28th, was the hottest day of the week in Chicago: outside temperature reached 101° F/38°C. My thoughts often wandered to the backyard where the wood fire oven was being put together (and where it was so hot that plastic cups left in the sun actually melted) and to the labs where the ovens were doing a good job of roasting everything and everyone in sight. As luck would have it, it was lecture day for me so I got to spend it in the relatively cool sixth-floor auditorium.
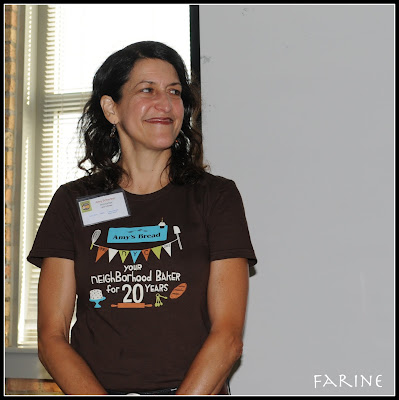
In the morning, Amy Scherber from Amy's Bread in New York City and Leslie Mackie from Macrina Bakery & Café in Seattle held forth on the subject of starting a bakery. Albeit living and working on either side of the country, they have a lot in common and while they made a few different choices over the years, their stories were fundamentally similar. They clearly get along famously too!
After a short presentation of their bakeries, they listed the twenty steps to follow to open a bakery or café on a small budget (they also made it clear that depending on the location, the "small budget" may in fact be quite large nowadays for an artisan baker looking to make it on his or her own).
The first step ("Dream a dream") is the most enjoyable (and presents the added benefit of costing nothing). All the others are more arduous and demanding (tip: if you have deep pockets, hire someone to do the ground work for you). The audience - among whom more than one self-described "baker trapped in the body of an accountant" (or a lawyer) - listened in rapt concentration and pored attentively over the printout of the forecast business model. In the end, once all the technical details and numbers were taken care of, the bakers' advice boiled down to this: if you want to open a bakery, you need a lot of endurance, energy and stamina, both physically and mentally. So if you are serious about it, prepare yourself: eat healthy foods and get exercise!
The afternoon lecture was devoted to food photography. It was taught by Eric Futran, a food and culinary photographer who started his career as a photojournalist and is currently the staff photographer for Kendall College. His delivery was fast, efficient and very entertaining. The class consisted in:
  • A two-hour presentation of the main trends in food photography and a close "reading"/deconstruction of various food shots borrowed either from books by well-known photographers or from Eric's own portfolio
  • A two-hour photoshoot of whatever we liked (he had brought some fruit, bread and vegetables as well as various backgrounds and a series of tripods). 

Sorry for the greenish screen.
I exposed on the slides because the room had been darkened and that's how it came out! 

Since the eye spontaneously moves from top to bottom and from left to right, you want to help it travel across the shot at a diagonal:
  • Tangents are really pleasing and angles are everything
  • Never center anything!
  • Light should come from behind (to create texture) 
  • But it must be reflected by a fill card or a piece of foil so that one can see through the shadow it creates towards the camera.
On the technical side, Eric recommended:
  • Shooting food on a tripod  (to reduce camera shake)
  • Or using a high ISO setting (useful tip in the field when no tripod is available)
  • Setting the white balance (the color temperature) to shade or cloudy when shooting bread (if the camera allows it). 
I didn't use a tripod for the two shots below but I bumped up the ISO. (At home I would definitely have used a tripod). Both were shot using the light coming in through the window. In the first picture, I left the white balance on automatic and forgot to use a fill card. For the second one, I set the white balance  to shade and I did use the fill card. Notice how much more light there is in the foreground in the second shot and how much more golden and inviting the bread looks. In the end though, color temperature is a matter of taste and style. I usually set the white balance on daylight when shooting at home but I will definitely experiment with the other settings.
The very same night, at the beer and cheese tasting the Guild had organized at a nearby brewpub, I started practicing what I had learned that day (even without a tripod or fill card). I set the white balance on automatic (an easy way out when there is a mix of natural and artificial light and you don't really know what color temperature to pick). Notice how the focus is on the beer and cheese and the bread is just a prop. Well, they always say a picture is worth a thousand words. What would you say was first and foremost on my mind when I took this one? Hint: it was deliciously refreshing!
Friday was my first all-day lab: four hours in the morning and four hours in the afternoon with a one-hour break for lunch if the bread allowed. I had chosen to attend the gluten-free baking lab, partly because I had zero experience in the matter and wanted to learn and partly because it was taught by Michel Suas, the President of the San Francisco Baking Institute (SFBI) and I knew SFBI had done extensive research on the subject over the past few years.
The class was brilliant: Michel started by having us mix and bake tiny batches of thirteen different gluten-free flours and one of all-purpose flour (which was the control). All of the flours were pre-soaked with the same amount of water, so that we would have an idea of the various absorption rates. Then they were mixed with cornstarch, xanthan gum, salt and yeast (adding more water if/as needed to obtain the same medium-soft consistency) and set to proof.

Next came the baking and the tasting.
The truth of the matter is that they all tasted pretty awful (or, at best, bland) but that was to be expected since we hadn't really made a bread, just pieces of dough. The flour that absorbed the most water was the oat and the one which absorbed the least the light millet. Some of these little "breads" were so sticky it was impossible to slice them and we had to tear them apart. All this taught us a great deal, much more than I have space here to write about (I hope to do it in a later post after I get my hands on some of the needed ingredients, not an easy task since I am spending most of the summer at our little camp on the river where baking supplies are mostly limited to all-purpose and whole wheat). 
In a nutshell, sorghum seems to be the way to go since it offers the closest texture to regular bread flour (plus it is cheap and has great nutritional value. Just remember never to sprout sorghum grains as they would turn poisonous). Teff is really good also (tasty and very nutritious but, alas, very expensive) and koda is the best rice flour to work with (the others tend to be gooey).
We proceeded to make seven gluten- (and sometimes egg-)free products: four breads, orange biscotti, a lemon poundcake and blueberry muffins. Of all of the breads, the poolish "baguette" below was the one with the best crumb structure.

"Baguette" made with a sorghum, koda rice and brown rice poolish
My second all-day lab, on Saturday, was Ancient Grains the Modern Way. The instructor was Frank Sally (with whom I had taken Artisan I and II at SFBI a few years ago). It was excellent and I will write about it in more details at a later time. Today I'll just share a few pointers:

Dough made with kamut levain
  • Don't go too wet on spelt as it gets soupy
  • For a same dough consistency, white kamut requires way more water than white spelt
  • You may want to add gluten to spelt as it doesn't have much of a push
  • Sorghum doesn't hold water very well: don't use sorghum flour dry (see tip below)
  • The best way to incorporate sorghum, barley, teff or millet flours into any dough is to soak the flour: using 100% flour and 100% water, pour water at 120°F/49°C (neither cold nor hot) over the flour and make a paste, let cool and use. It helps set the protein and the starch and makes the flour more stable
  • Make this soaker the morning of the mix (don't hold it overnight)
  • Sprouting ancient wheats like kamut, spelt, emmer or einkorn and baking them with levain is a good idea: it makes the bread more digestible, it unlocks the mineral contents of the grain and it has a sweet flavor.
We made seven breads on that day (kamut levain, kamut with wheat germ, sprouted spelt, spelt levain,   sorghum with kamut and pumpkin seeds, teff with sunflower seeds, millet with toasted pecans) and by the time the afternoon was over, I was ready to drop! But we did really well and most of these breads were  breads I would be interested in making at home (which means that some of them might appear on Farine sooner or later). The teff ciabatta was especially gorgeous.


Now WheatStalk is over but the fever and the fervor have not abated. I have been in touch with other participants and judging from their one-track conversation, their brain is still in full fermenting mode! I know mine is. I have so much to process and so much to try. I did bring back a few formulas but more importantly I came back with tools, tools which will help me grow as a baker and be more confident and avoid mistakes that I would have made otherwise. For this I am grateful to the Guild and to each and everyone of the staff and volunteers who made WheatStalk possible as well as to Kendall College, its faculty and students for hosting the event. Thank you all! 
 

Blog Designed by: Deanna @ Design Chicky