Home About Recipes Artisans Blog Notes Resources
Showing posts with label Figs. Show all posts

Saturday, October 12, 2013

Fig-Anise 50% Whole-Wheat Bread

This Fig-Anise 50% Whole-Wheat bread was developed with the help of baker Martin Philip during the Creating Signature Breads workshop at the Kneading Conference West 2013.


Ingredients

By percentages

By weights (for four loaves)
Method

  1. Using mixer on first speed, combine flours, water and levain until incorporated (reserve about 10% of the water for later adjustments if needed) 
  2. Sprinkle salt and yeast on top
  3. Give a 15 to 30 minute rest (we didn't have time to do a longer autolyse at the Kneading Conference but a longer one would have been better)
  4. Turn mixer back on to incorporate yeast and salt
  5. Check hydration: dough should feel supple. Adjust as necessary
  6. Mix 2 min on second speed until gluten is fully developed
  7. Put in anise seeds, soaked grains (don't strain them) and figs
  8. Mix to combine on first speed: dough will fall apart first, then knit itself together
  9. DDT: 78°F
  10. Fermentation: 3 hours with one fold at 45 min
  11. Scale at 560 g
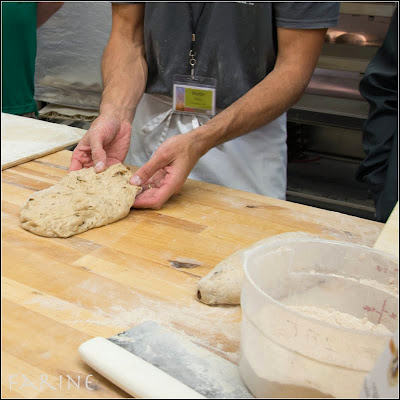
  12. Pre-shape as a loose boule (you have to be really gentle with this dough as it contains a lot of whole wheat and could get really dense if manipulated briskly)
  13. Shape as batards or tear-drops (to mimic shape of fig). If using a tear-drop shape, fold one end of the batard over itself as illustrated below
  14. Proof seam-up in floured bannetons or on floured couches for 45 min to one hour (use whole-wheat or whole-spelt flour)
  15. When loading on a peel, give each tear-drop loaf a slight curve to one side
  16. Bake for 32 to 35 min at 450° F, with steam
  17. Cool on a rack
  18. Enjoy!


For detailed information on various aspects of artisan bread baking, please visit King Arthur's YouTube channel: in this video in particular, from 6:38 min on, Martin Philip demonstrates how to shape a batard (in the first part of the video, master baker Jeffrey Hamelman shows how to shape both boules and baguettes).
For those of you who are using BreadStorm (including the free version), please click on this link to import the formula so that you can scale it up or down as desired.

Monday, December 28, 2009

Honey-& Goat Cheese-Filled Muffins

I have been a subscriber to Eating Well Magazine forever. I like its health and/or nutrition-related articles although I rarely cook or bake from the recipes. The January-February 2010 issue is different. For the first time in months, I found myself reaching for post-its and earmarking pages, especially from the Wake Up to Whole Grains feature article, written by Maria Speck. Speck was raised by a German father, to whom she attributes her yearning for whole grains, and by a Greek mother who taught her to love the flavors of her native country (hence the figs, the goat cheese and the honey). I love whole grains too and, maybe because I hail from the Mediterranean as well (through my mom whose grandma was a black-eyed Provençale with Italian forebears), I have a passion for figs and goat cheese. So I decided to try these whole-grain muffins. They are good! They keep two or three days at room temperature and freeze really well. If frozen, Speck recommends microwaving them (wrapped in a paper towel) for 30-45 seconds on High. Personally I don't really like them warm (I don't think the flavors come out as well) but I love them at room temp. My only modification was not to put in any sugar (Speck adds 3/4 cup packed dark or light brown sugar to the batter). To my taste, the muffins are plenty sweet without it but the Man thinks they could be a tad sweeter and he eats them spread with rhubarb jam. Since I don't have a sweet tooth, if it were not for him, I probably would have skipped the honey as well (although I do love the flavor). For all I know, the taste for sweets might be genetic: until his very last years, my dad didn't like sweets either and as for myself, even as a Parisian child, on the eagerly awaited occasions when my mom took us to the neighborhood bakery to purchase our afternoon snacks, my brothers always chose a "pain au chocolat" or a "pain aux raisins" (chocolate or raisins croissants) or a "chausson aux pommes" (apple-pastry) but I always went for a "pain de gruau" (a plain crusty mini-loaf). I even remember that when my tonsils were taken out (I must have been 7 or 8) and I had to eat soft food for a day or two, my mom splurged on 3/4 of a liter (that's how ice-cream was sold in Paris then, maybe still is) of vanilla ice-cream from nearby Boissier, a renowned "pâtissier, chocolatier et glacier" (pastry-shop & chocolate and ice-cream maker). I ate one spoonful, loved the feel of the cold gliding down my sore throat but had to stop eating as the sweetness and the richness literally made me gag. Since there were no freezers in those days, my whole family promptly had the ice-cream for lunch! To this day, I feel guilty for turning down a treat that my mom bought with such love and anticipated joy and that we could probably ill afford... Well, at least, I have been consistent with myself over the years. I still don't care for most ice-creams! Ingredients (for 12 muffins): 100 g crumbled soft goat cheese or reduced-fat cream cheese (Neufchâtel) (I used Trader Joe's plain fresh goat cheese, one of those sold in a package of three) 30 g honey grated zest of half a lemon 8 g vanilla extract, divided 317 g white whole wheat 5 g baking powder 3 g baking soda 1 pinch of salt 2 large eggs + 1 large egg white 260 g plain yogurt (Speck uses buttermilk but I didn't have any. If using thick Greek yogurt, such as Fage, you may need to dilute it with some milk. I used homemade yogurt and it was fine as it was) 50 g extra-virgin olive oil 107 g dried figs, chopped (I used Black Mission figs) chopped caramelized hazelnuts for topping (Speck uses turbinado or granulated sugar but I had a bit of leftover hazelnuts I had kept in the freezer from another recipe and I used that) Method:
  1. Preheat oven to 425ºF/218ºC. Line 12 regular muffin cups with paper liners or coat with cooking spray
  2. Thoroughly combine the cheese, honey, lemon zest and 1/4 teaspoon of the vanilla extract in a small bowl. Set aside
  3. Whisk flour, baking powder, baking soda and salt in a large bowl
  4. Lightly beat eggs and egg white in a medium bowl, add the sugar (if using) and the remaining vanilla extract and whisk until dissolved
  5. Gradually whisk in yogurt (or buttermilk) and oil until smooth
  6. Add wet ingredients to dry ingredients and stir until just combined. Do not overmix. Fold in the figs
  7. Spoon the batter into the prepared muffin cups. Add 1 generous teaspoon of the reserved cheese filling to the center of each muffin and cover with the remaining batter (the filling should not be visible). Sprinkle with finely chopped caramelized hazelnuts (or sugar if using)
  8. Bake the muffins until the edges start to brown and the top springs back when gently pressed (13 to 15 minutes, according to Speck. In my case, it was closer to 20 minutes)
  9. Let cool in the pan for 5 minutes before turning out onto a wire rack to cool.

Monday, June 15, 2009

Essential Sweet Perrin (Pear Bread)

Si vous préférez lire ce billet en français, cliquer ici

Those of you who have access to Maggie Glezer's excellent book, Artisan Baking Across America, where I got the recipe, will realize right away that this isn't the way the bread is supposed to look.
For those who have no way of checking it out, here is the way it is (or was) made at Essential Bakery in Seattle - the bakery which contributed the recipe to the book :

(photo scanned from the book, frame and text added by me)
I love their presentation too and I'll probably make the Sweet Perrin that way one day, especially around the holidays when it would make a lovely present to bring to someone's house. But for this once, I wanted to give the bread a pear shape.

Except for the shaping and the use of pureed canned pears in lieu of a jar of pear baby food (which would have required a trip to the supermarket), I pretty much followed the recipe as indicated.
When I make it again though, I may skip the cinnamon as we are not huge fans of that particular spice (maybe because the taste of cinnamon as we know it in the United States is more assertive than the one we grew up with in Europe).
Save this restriction, the bread is truly lovely. The raw pear bakes inside the bread and when you bite into it, it yields an explosion of sweet and fragrant juice in your mouth. The hazelnuts add a welcome crunch. The figs contribute a marvelous depth of flavor. The cracked rye gives the crumb a chewy texture and the white whole wheat and high-extraction flour make it tastier and more wholesome. A good bread for the Man to bring to the office as a snack, which is why I made it!
Ingredients:
For the pre-ferment
  • 175 g unbleached bread flour
  • 175 g water
  • 1 tiny pinch of instant yeast
For the soaker
  • 17 g cracked rye
  • 17 g water
For the final dough
  • 300 g hi-extraction flour or unbleached bread flour
  • 40 g white whole wheat flour 
  • 1/4 tsp instant yeast all of the pre-ferment all of the soaked rye
  • 120 g water (I had 34 g leftover)
  • 80 g pear baby food or pureed steamed or canned pears (if canned, preferably with no added sugar)
  • 12 g salt
  • 1/2 tsp cinnamon
  • 1/2 tsp allspice
  • 115 g very hard crisp pear such as Bosc or Anjou, peeled, cored and cut in 1/2-inch cubes
  • 60 g dried figs, stemmed and cut in 1/2-inch pieces (the recipe calls for Calimyrna figs but I used the regular Trader Joe's ones as it was all we had on hand)
  • 60 g hazelnuts (lightly toasted and skinned) (to toast the hazelnuts, put them in a small baking pan in a 350 F/177 F oven for about 15 minutes, then rub the warm nuts in a paper towel to remove the skins)


Method: (Glezer gives instructions for 3 different mixing methods, by hand, by stand mixer and by food processor. I used a mixer with a dough hook). This bread is made over 2 days.
  1. The day before, scale the yeast and the flour for the pre-ferment, add water and stir well. Cover and let ferment overnight or about 12 hours (Glezer says to use instant yeast and to mix it in water before adding it to the flour/water mixture but I wonder if that's not a typo as, from what I understood, only fresh and active dry yeast should be added to water. So I just proceeded as usual and mixed the instant yeast with the flour before adding the water)
  2. Also the day before, combine the cracked rye and the water in a small bowl until well combined , cover well with plastic wrap and let soak overnight for 12 hours
  3. The day of the baking, combine the flours and yeast in the mixing bowl, add the pre-ferment, soaked rye, water (I saved about 20%, some of which I managed to add later in the mixing and some of it I just couldn't use as the dough looked already very hydrated. Of course the raw pear made it even wetter. If I had used all the water indicated in the recipe, I probably wouldn't have been able to give the loaf the shape I wanted) and pear puree and mix just until smooth
  4. Cover with plastic wrap and let rest (autolyse) for 20 to 30 minutes
  5. Add the salt and the spices to the dough and knead on medium speed until very smooth (about 5 minutes)
  6. Remove the dough from the mixer and incorporate the figs and hazelnuts by hand until evenly distributed
  7. Incorporate the raw pear pieces (I did that last as the dough becomes very wet and pretty tricky to handle once you do it. Maybe the pear I used was too juicy even though it felt really hard to the touch)
  8. Place the dough in a bowl as least 3 times its size and cover tightly with plastic wrap. Let it ferment until airy and well expanded (but not yet doubled in bulk), about 3 hours
  9. Flour the surface of the dough and the worktable and turn the dough out
  10. Pre-shape lightly in a ball (Glezer says that at this point, you should cut the dough in half and make two loaves but I had drawn a rather large pear stencil, so I didn't divide the dough for fear that my stencil would end up being too big)
  11. Let the dough relax about 15 minutes
  12. Give it a pear shape (click here to see a photo tutorial of the shaping method)
  13. Let proof about 1 1/2 hour minutes in a large well-sealed clear plastic bag, or until the dough is well expanded but still springs back when gently pressed with a finger
  14. At least 45 minutes before the dough is fully proofed, arrange a rack onto the oven's second-to-top shelf and place a baking stone on it as well as a shallow metal pan on the shelf below
  15. Preheat the oven to 375 F/190 C at least 45 minutes before baking time
  16. Remove the loaf from the bag, and stencil it if/as desired
  17. Make small vertical cuts all around it
  18. Just before baking, pour a cup of water in the baking pan (taking care to protect your face and hands)
  19. Put the loaf in the oven, spray the oven walls with water to create more steam
  20. Bake until the bread is evenly browned, about 40 minutes, rotating it halfway into the bake
  21. Let cool on a rack.

The Sweet Perrin goes to Susan, from Wild Yeast, for Yeastpotting .


Blog Designed by: Deanna @ Design Chicky