Home About Recipes Artisans Blog Notes Resources
Showing posts with label Whole Rye. Show all posts

Thursday, February 27, 2014

Nonnettes de Dijon

I grew up with nonnettes although I don't recall that we ever had the "real" thing: my mom had four kids to feed and every single one of us loved nonnettes, so she bought the less expensive oblong ones that came in brightly colored cardboard boxes (to this day, I remember the glistening marmalade heart of the half-eaten one pictured on the lid). But even those were more money that our usual after-school snack of bread and chocolate (I know, we French kids had it rough!), so they were a rare treat.
As it happens, I forgot all about them for decades but last year, while in France, we stopped at an organic grocery store to buy some bread and as I was browsing the aisles leading to the bakery, I saw on a shelf a package of handcrafted-looking nonnettes that looked particularly appealing. I bought it and, believe me when I say this - as a person who famously doesn't really like sweets - I had a moment that was better than Proustian.
While Proust's Narrator recognizes the exact taste of the tea-dunked madeleine he knew in his childhood and embarks on a quest for Time lost, these nonnettes were so much more than the ones I knew growing up that I felt no longing for an elusive past, just a fierce determination not to part with the treat again. Since I couldn't very well go back to Biocoop and buy a truckload to ship home, I resolved to do the next best thing, which is find a recipe and make them myself.
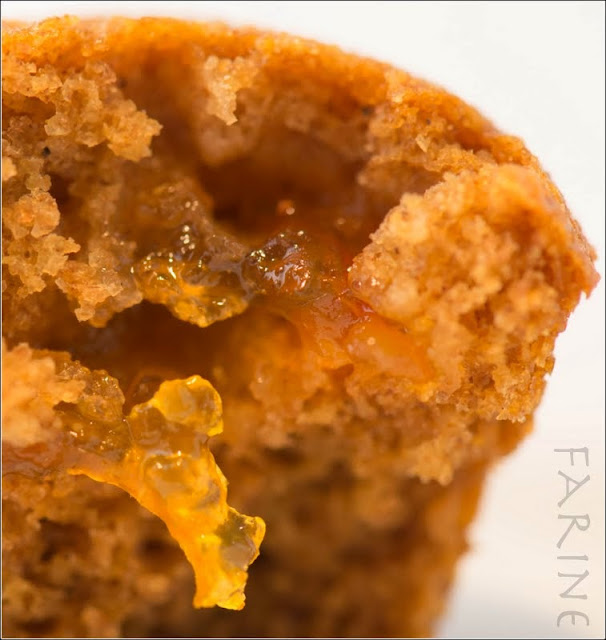
But first I should probably explain that nonnettes (literally "little nuns") are small gingerbread cakes that nuns used to make in the Middle Ages. Although the better-known ones come from Dijon in Burgundy (the nonnettes have nothing to do with mustard, by the way), I believe they are to be found in other regions of France as well. The oblong ones I knew were domed and lightly glazed and the best part of eating them was sinking your teeth into the glaze and feeling the dome collapse over the marmalade heart. I am telling you, there is no way Proust topped that with his (most likely soggy) madeleine.
If you google "nonnettes de Dijon images," you'll see several different variations. The little cakes are indeed often glazed and some are domed. The ones I bought last year were thick, round, flat and unglazed. I personally like the domed ones although I can do flat too and I prefer unglazed. They keep better.
Apparently I can also do hollow, albeit certainly not on purpose!
I asked baker and pastry chef Leslie Mackie, owner of Macrina Bakery in Seattle, why I was getting collapsed centers. She thought it had to do with the leavening and suggested I try using half baking powder half baking soda instead of all baking soda. She also recommended enclosing the marmalade inside the batter instead of putting it on top. So that's what I did and it worked! Thank you, Leslie!
But before I even attempted to bake nonnettes, I browsed through the many recipes online. My favorite one is this one, by blogger Edda Onorato. Edda's blog, Un déjeuner de soleil, is a feast for the eyes and I have known it to do a number on my tastebuds too. So I tend to trust her and I wasn't disappointed. Her recipe is solid.
I did adapt it a bit:
  • By changing the leavening (as explained above). Edda says that in the very old days, nonnettes were made with levain (which might have been the only leavening agent readily available to the nuns). The little cakes must have had a very different texture then and a different bite. I am not sure I would like them that way but I might give it a shot one day out of curiosity because after all, these nuns knew a thing or two
  • By using all whole-grain flours. I don't know much about the history of the nonnettes but, if I were the gambling kind, I'd be willing to bet that, in the Middle Ages, the nuns didn't go for white flour. Taste and texture are spot on with the whole-grain and then there is the satisfaction of knowing that the cakes are more nutritious. I have only used white whole wheat so far but next time I'll use some of the Sonora wheat I bought from Nan Kohler in Los Angeles. That flour is so aromatic that it will probably bring a whole new dimension to the cake
  • By lowering the amount of sugar a bit.
Edda recommends using a blend of cinnamon, coriander, nutmeg, anise and ginger. I use Penzey's Baking Spice (Ceylon cinnamon, Spanish anise, Grenadian mace and Guatemalan cardamom) which I like a lot,  probably because it is easy on the cinnamon. I could try with just anise, the only spice I ever use in pain d'épices or go for a touch of cardamom and pair it with some of that caramelized pear jam I made last year or try pairing nutmeg and blackberry jelly or... The possibilities are endless. Which goes to show that, for me, nonnettes are really not about nostalgia. Move over, madeleines, and make way. The future has arrived!

Ingredients
Yields 24 mini-muffin-sized and 16 regular-muffin-sized nonnettes (baked in mini-brioches paper molds)*


For those of you who are using BreadStorm (including the free version), please click on this link to import the formula.  For more on BreadStorm, you may want to read this post.

Method
  1. Turn on the oven to 320°F/160°C
  2. Scale flours, baking soda, baking powder and spices in a large bowl. Whisk until thoroughly blended
  3. Scale honey, sugar, butter and water in a small saucepan, bring to a simmer while stirring with a wooden spoon and turn off the heat
  4. Let the wet mixture cool for a few minutes while you grease (lightly) the mini-muffin pan and prepare 16 muffin-sized paper molds*
  5. Stir wet mixture into dry ingredients until blended (do not over mix)
  6. Pour a dollop of batter in each muffin hole (it shouldn't be more than one third full), place a small spoonful of orange marmalade on top and top with the rest of the batter (the muffin hole shouldn't be more than half full when you are done)
  7. Bake for 15 minutes
  8. Let cool on a rack for a few minutes, then unmold
  9. Enjoy!
Nonnettes keep extremely well in an airtight container. We took two dozens on a very long car trip this winter and the ones that remained were just as fresh and tasty when we arrived at destination as they were when we left. 


* After several batches, we decided that mini-muffin size is really best: perfect for a snack and easy to pack. I am buying another pan. The recipe should then yield 48 nonnettes.

Wednesday, February 5, 2014

The Breads a Baker Brings to Brunch: Larry Lowary's Ryes

Don't you totally love it when a baker friend comes over to eat? Chances are he or she will bring bread and when, as is the case with Larry Lowary (of Tree-Top Baking), he is in full off-season research and development mode and has just spent a couple of days feeding starters, mixing and baking, he might get a bit carried away and arrive at your house with such an array of loaves that you just want to fall at his feet and kiss them. Okay, I am getting a bit carried away myself right here but I was truly thrilled when I saw what was in the big brown paper bag he put on the counter. I knew immediately that I couldn't let him slice into any of these loaves without taking a few pictures first, so that you too can see what a baker bakes when he goes on a rye bender. My only regret is that I didn't take a picture of the bread basket Larry put on the table. It was truly a thing of beauty but by the time I was done with the photo shoot, we were so famished that I couldn't decently keep anyone waiting any longer. I guess we'll have to invite Larry back...

The breads Larry brought (in alphabetical order)

Chad Robertson's Danish Rye


Hanne Risgaard's Spelt Rye


Jeffrey Hamelman's 80% Rye


SFBI's Finnish Rye


In case you are interested in making any or all of these breads to taste them yourself, here are the websites or books where you can find the recipes or formulas:

Chad Robertson's Danish Rye Bread
http://www.foodarts.com/recipes/recipes/15988/danishstyle-rye-bread-rugbrt

Hanne Risgaard's Spelt Rye Bread
Hanne Risgaard, Home Baked: Nordic Recipes and Techniques for Organic Bread and Pastry, p. 134

Jeffrey Hamelman's 80% Sourdough Rye
Jeffrey Hamelman, Bread: A Baker's Book of Techniques and Recipes, p. 213

SFBI's Finnish Rye
http://sfbi.com/images/Finnish_Rye.pdf

Larry, thank you for sharing both your breads and your sources! You are not only a great baker but also (and even more importantly) a wonderful friend. We are privileged to have you in our lives.

Tuesday, February 26, 2013

Of bread and herons

I baked Hanne Risgaard's Real Rye Bread the other day and it seems to have come out fine although it didn't rise as high as it normally does. But it might have been because I had digressed from my baking routine. As usual I had soaked the cracked rye overnight and done all the mise en place (gotten everything scaled and prepped and at room temperature) the night before. I had mixed the dough in the morning around 10 and transfered it to the oiled pan but - and that isn't something we normally do when I start on a bread - we decided on the spur of the moment to go to Ikea on an errand we had been postponing for a while. Ikea isn't exactly next door. What to do? I weighed the pros and cons and projecting that the dough would have risen nicely by the time we came back, I determined that everything should and would be fine.
But just as we were leaving, I got spooked. With my mind's eyes, I saw the neglected dough climb over the edge of the pan, slither under the clear plastic film, crawl down the door of the cabinet to pool on the floor in a puddle that would morph from gooey-sticky to rock-hard by the time we got back. So I put the pan in the garage (where the temperature must have been around 50°F/10°C). That probably scared the dough out of its wits because when we came back five or six hours later (we got stuck in traffic), it hadn't moved at all. Not even a shiver...
It must have been about 5 PM when I brought it inside where the temperature was 65°F/18°C. Five hours or six later it still hadn't moved. At all. It looked petrified. I went to bed with a heavy heart. For a first foray back into baking in more than two months, it didn't look encouraging and I wasn't sure overnight proofing would help since we keep the thermostate on low during the night.
But, lo and behold, in the morning the dough had changed color: no longer grayish, it seemed to glow with the bloom of life and it had started to dome a bit in the middle. This time I watched it like a hawk. And watched. And watched. It took its own sweet time. At about 4 PM, when it looked like it wouldn't rise much further than up to 3/4 inch from the top, I pre-heated the oven and waited some more. Talk about a balancing act between hoping for a higher rise and making sure it didn't overproof.
At the time of this writing, I haven't sliced it open yet (it is best to wait at least 24 hours and preferably 48 to 72 before slicing into a fresh loaf of whole grain bread). Whole grain breads need to settle: they taste better when they dry out a bit. It makes sense, right? Moisture evaporates and flavor concentrates. With a bit of luck, the crumb will be okay... I wish I had taken pictures all along but I wasn't planning to blog this bread and also what's so exciting about a dough that plays dead for hours on end?

Four days after the bake
Not the prettiest crumb ever (see the lower part of the loaf which looks a bit dense and gummy) but not the worst either.
Moral of the story #1: rye dough can and will trick you. This one looked as lifeless as the mummified heron our two-year old golden retriever dragged in from the marshes and dropped proudly at my feet one winter, the very same day she fell through the ice and we thought she was a goner. It was her first visit to our little camp by the St-Lawrence River. We had adopted her a week earlier. She fought her way back onto the ice, shook herself and was as good as new, white teeth flashing in a wide smile and dripping tail wagging. The heron got flung back into the marshes when she wasn't looking.
The dough was so inert that I almost chucked it out too. The only thing that stopped me is the thought that waiting till morning would save me having to wash the pan before going to bed. Also that I really, really craved some naturally leavened whole rye bread. And finally that I knew we would soon be seeing our Danish cousins who live in Vancouver, BC, and that I wanted to bring them a little taste of home, however elusive the similarity of this bread with their native rugbrød.
Moral of the story # 2: any resemblance of unproofed rye dough to a wizened heron is entirely fortuitous and best taken with a grain of salt.

Sunday, February 17, 2013

Hanne Risgaard's Real Rye Bread

While I am not yet back in full baking mode, bread is slowly making its way back into my life (of course not baking was and still is made easier by the fact that our freezer was literally bursting at the seams when tragedy struck mid-December: we had been expecting our two teenage grandkids for their winter breaks and I had been baking up a storm).
This time around the first bread on the agenda is likely to be Hanne Risgaard's Real Rye Bread. There is something profoundly honest and straightforward about this bread. It isn't fancy and some may not consider it elegant (although I would argue the point.) But it does deliver in terms of taste, consistency, shelf life and versatility. Besides I find it deeply comforting as it brings back memories of light-filled summers spent in Denmark with beloved family members.
I have made it several times already, sometimes with my own rye starter, sometimes with the rye yogurt starter indicated in the book. I like both versions. For most people the yogurt starter is probably the easier way to go as you don't have to have a pre-existing starter on hand to try the bread (see below for the starter recipe).
You will find the real rye bread recipe on page 133 of Hanne Risgaard's gorgeous book, Home Baked: Nordic Recipes and Techniques for Organic Bread and Pastry. You will also find it a beautiful rendition of it online (with a list of ingredients and detailed instructions) at My Italian Smörgåsbord.
The ingredients listed make for a huge loaf (or two smaller ones). I don't find it to be a problem: it is a lovely bread to share, it freezes beautifully and, thinly sliced and dried out, either in a dehydrator or in an oven set at a low temperature, it makes lovely crisps which keep for months in an airtight container. Those crisps are the perfect foil for sardines, smoked salmon, pungent cheeses, etc. They are also handy and healthful in case of a snack attack!
Once I knew we both liked the bread and I was going to make it over and over, I started looking for a gallon-size pan (that's where the elegance comes in: I just love the sleek look of the loaf Hanne chose to illustrate her recipe). Thanks to my friend Larry Lowary who is an invaluable source of tips and advice, I found here a pan almost identical to the ones used in Denmark (except that the sides are not straight but slightly slanted). The price was right (I didn't get the lid which I didn't need) and I bought it. I have had no reason to regret it (my only advice would be to slightly grease the pan before placing the dough in it. The first couple of times the bread slid out like a breeze but with each later use the pan became a little bit more reluctant to let go).
Hanne says to leave the dough to ferment at room temperature for 24 hours before baking. I don't know how cold it is in Denmark where she bakes but here in the Pacific Northwest where the temperature inside our house usually hovers around 65°F/18°C, I have found six to ten hours to be enough. I tried letting it go twenty-four hours once just to see what happened and it was not a success. Which reminded me of the golden rule: rye doesn't like to wait!
So instead of following Hanne's proofing time suggestions, I heed her practical advice: bake the loaf when the dough almost reaches the top of the pan.

As I said, I love the book as a whole: I have already made the Pear and Sourdough Bread (p. 142) (I skipped the yeast though)...
...and the Pumpkin Seed Bread with Buttermilk (p. 136) (so tasty and fragrant, especially with the suggested addition of fennel seeds that it is close rival to the Real Rye one in our affections)...
...and there are plenty of other appealing breads that I plan to try and make. My only reservations would be that several of the non-rye levain-based recipes call for yeast (I don't see the point of adding yeast to levain except in a production environment with a tight schedule) and that it would be useful to see more crumb shots.
The photography is gorgeous however and guaranteed to make you want to start baking on the spot (which is maybe the reason why Hanne's real rye bread may be the one to finally pull me out of my baking funk).

The rye yogurt starter is fairly simple to make.

Ingredients (for 400 g mature starter, total)
Starter
  • 150 g water
  • 150 g organic plain yogurt
  • 200 g whole rye flour
Feeding
  • 150 g water
  • 200 g whole rye flour
Method
  • To start: mix all starter ingredients thoroughly and keep, tightly covered, in a warm place for 24 hours (Hanne recommends 86°F/30°C)
  • Feeding: After 24 hours, add water and flour, mix thoroughly and keep, tightly covered, in a warm place for another 24 hours 
Hanne's recipe uses all of the starter (and replaces it with 400 g of dough which she keeps in a fridge, slightly salted, for her next batch). She says that, when it has been refrigerated, it will need to spend 24 hours at room temperature to be ready for use again.
Hanne Risgaard's Real Rye Bread is going to Susan for this week's issue of Yeastspotting.

Monday, February 6, 2012

Hutzelbrot with dried cherries and cranberries

Besides the delightful taste of this bread, what I love about this Peter Reinhard recipe (from his book Whole Grain Breads: New Techniques, Extraordinary Flavor) is that it uses a mash and that the mash can be made in part with "old bread". To me there is already something deeply satisfying about pre-soaking whole grain flour and having the enzymes start working hours and hours before you even begin to mix your dough but when you can feed them your stale bread too, wow, it's just too good to pass up!
Reinhart uses (or suggests using, it's hard to figure out which) a mix of dried fruit for this bread, such as citron, apricots, figs, plums, cherries, cranberries, golden raisins). Even though I had pretty much everything on hand but the citron, I decided to focus the flavors a little more and go for the sweet dried cherries my friend Kim had brought from Wisconsin (each one like a burst of summer in the mouth, thank you, Kim!), paired with slightly tarter dried cranberries from Washington State. I also decided to soak the old bread in apple juice since I had some I needed to use up and it would nicely boost the fruit taste. The bread turned out crusty and surprisingly light.
It takes two days to make which is perfectly fine with me since most of the time the ingredients toil away all by themselves....


Ingredients (slightly adapted): makes 2 batards


For the soaked bread (altus)
  • 1/2 inch-bread cubes with crust left on soaked in hot organic apple juice or water and left at room temperature for at least 4 hours and preferably overnight. Use just enough liquid to saturate and soften the bread. Reinhart advises using rye bread but he says whole wheat is fine too. Squeeze out excess liquid before adding to the mash (I didn't weigh anything to start with, just used up all my stale bread and made a big bowl of actus. When required by the recipe, I took out the 170 g needed for the mash, weighed the rest, put it in a ziploc bag, labeled it and stored it in the freezer for next time)
For the mash
  • 300 g water
  • 64 g coarse whole wheat (I used flour from Cedar Isle Farm in Agassiz, British Columbia, which my friend Meeghen kindly brought me)
  • 64 g 75% sifted rye flour (I used flour from True Grain Bread on Vancouver Island, British Columbia, which Meeghen also brought me. Thank you, Meeghen, for giving me the opportunity to bake with these gorgeous flours!)
  • 1 g diastactic malt powder
  • 170 g altus
For the starter
  • 71 g whole wheat or rye starter
  • 213 g whole rye flour
  • 170 g water at room temperature (70°F/21°C)
For the dough
  • all of the starter (454 g)
  • all of the mash (397 g)
  • 99 g white whole wheat flour + 200 g (which I had to add because my dough was way too wet, possibly because I had pre-soaked the fruit which Reinhart doesn't say to do)
  • 99 g whole rye flour
  • 100 g sweet dried cherries (briefly pre-soaked, then drained)
  • 70 g dried cranberries (briefly pre-soaked, then drained)
  • 14 g salt (I didn't add to that amount even though I added more flour: I just tasted the dough and it seemed fine)
  • 7 g instant dry yeast
Method:

On Day 1
  1. Mix the mash ingredients (save for the altus) (using water heated to 165°F/74°C) making sure the flour is fully  hydrated and the end product resembles a thin pudding or gravy. Cover and keep warm (150°F/66°C) if possible for 3 hours or at least for 60 minutes. Reinhart suggests using the oven for that step (turning it repeatedly on and off if it doesn't have such a low setting) 
  2. After 3 hours, stir in the soaked bread and refrigerate until ready to use (you can also leave it overnight at room temperature) if you are planning to use it within the next 24 hours
  3. Mix all of the starter ingredients and knead with wet hands to form a ball of dough. Let it rest 5 minutes and knead again. The dough will be tacky. Allow it to double at room temperature (which can take up to 8 hours depending on the temperature). When fully developed, knead for a few seconds, cover tightly with plastic wrap and refrigerate overnight if necessary to coordinate timing with the mash. Remove from the refrigerator about 2 hours before mixing the final dough
On Day 2
  1. Using a metal scraper, chop the starter into 12 smaller pieces, sprinkling some extra flour over them to prevent them from sticking to each other
  2. If mixing by hand (which I did), combine starter and mash in a large bowl with the whole wheat and rye flour, cherries, cranberries, salt and yeast. Mix for about 2 minutes until all the ingredients are evenly integrated and distributed into the dough. The dough should be soft and slightly sticky. If not, add water or flour if needed (that's where I had to add the extra 200 g of white whole wheat flour as the dough was definitely not going to take shape otherwise)
  3. When dough feels soft and only slightly sticky, form it into a ball and let it rest for 5 minutes while you oil a container
  4. Knead it briefly again for one minute and make any final adjustments to water or flour. It should be malleable and tacky but no longer sticky
  5. Form into a ball again and place in prepared container, rolling to coat with oil
  6. Cover loosely and let rise at room temperature for about one hour or until it is at least 1 1/2 times its original size
  7. Transfer to a lightly floured surface and shape into two batards. Place the batards on a sheet pan lined with semolina-dusted parchment paper. Cover loosely with plastic wrap or a cloth towel and let rise at room temperature for 45 to 60 minutes, until 1 1/2 times their original size
  8. While the batards are proofing, preheat the oven to 425°F/218°C. When ready to bake, dust them with flour and score the loaves as desired using a sharp knife or blade
  9. Place them in the oven (with steam), lower the oven temperature to 375°F/191°C and bake for 25 minutes
  10. Rotate the loaves 180 degrees and continue baking for another 20 to 35 minutes or until the loaves are well-browned and make a hollow sound when thumped on the bottom
  11. Cool on a rack and wait at leasts 12 hours before slicing open.
Enjoy!


The Hutzelbrot with dried cherries and cranberries go to Susan for this week's issue of Yeastspotting.
 

Blog Designed by: Deanna @ Design Chicky