Home About Recipes Artisans Blog Notes Resources
Showing posts with label Hazelnuts. Show all posts

Friday, October 9, 2015

Hazelnut cookies

You know how sometimes you set out to make whipped cream and you go for it with such enthusiasm that you get butter? Well, the same thing just happened to me with hazelnuts.
I wanted to make Chocolate and Zucchini's excellent cauliflower soup with hazelnuts and turmeric which I have made several times in the past. It is the perfect soup for a fall evening. Fragrant, exotic and yet low-key: spices, chicken stock, one onion, a humble cauliflower and a handful of hazelnuts.
When we were kids, hazelnuts abounded in my grandparents's yard in Normandy and in memory of the halcyon days of childhood, I bring back a bag each time I travel to the Northwest. Why, when I lived there, I sometimes even treated myself to hazelnut meal. Which is probably why I have lost my grinding touch.
Anyway I was trying to grind some Northwest hazelnuts into a fine powder as per Clotilde's instructions when, pff! they turned to butter. And chunky butter at that. Not good for my soup!
I tried another batch and this time I got an approximation of what I was looking for. I didn't dare grind the hazelnuts as fine as I would have liked. Still, the soup worked out. But I was left with hazelnut butter.
Too fancy for a weekday breakfast. Instead I made cookies for my one and only, using some of the soft winter wheat flour I buy at my local farmers' market whenever it is available. Butter by mistake, cookies by design! It could have been worse.

Ingredients: (for 18 cookies)
  • 85 g chunky hazelnut butter (any other chunky nut butter would probably do)
  • 80 g Jammu soft winter wheat flour (from Coke Farm in San Juan Bautista). I asked the farmer's dad whom I see at the market every week what Jammu refers to and he said it was the place in India the wheat variety originates from. Any whole-wheat pastry flour would work though
  • 40 g honey
  • 6 g hazelnut oil (optional, I think)
  • 1 egg
  • 1/2 tsp baking soda
  • pinch of salt
Method:
  1. Put everything into a bowl
  2. Mix with electric mixer until combined
  3. Roll into a roll
  4. Refrigerate until firm
  5. Slice and bake in 310°F convection oven for 15 minutes.
Enjoy!


Friday, February 7, 2014

Chocolate Ciabatta with Dried Cherries and Roasted Hazelnuts


Related post: All About Ciabatta: notes from a class

Okay, so with Valentine's Day in mind, I test-baked a version of this festive ciabatta (inspired by the Breakfast Ciabatta with chocolate pieces and bits of candied orange that Didier Rosada demoed during the All about Ciabatta class). The chocolate and cherries combo is one of the Man's favorites and when you add roasted hazelnuts to the mix, well, you'd think he had died and gone to heaven from the blissful look on his face. Since ciabatta has become one of my favorite breads to make, I thought it would be just perfect for the occasion.
But I needed a test run because I wasn't sure of the percentage of cherries and hazelnuts to use. Good thing I did because, as it turned out, I didn't put in nearly enough of either that first time. Also I had been so concerned that the ciabattas might stick to the couche when proofing that I had used way too much flour (as can be seen from image below) and they came out looking more like rustic Yule logs than Valentine Day treats!
I had made four ciabattas. I brushed one of them clear of flour, which made it less Christmassy but gave it the sorry look of a legless and jaundiced platypus (minus the tail and the bill but you know what I mean)...
Nevertheless I resolutely sliced into it...
...and was rewarded by a wonderful fragrance of poolish, chocolate and roasted hazelnuts. I couldn't smell the cherries but I could glimpse a few of them and certainly taste them and I resolved right then and there to make another batch.
At that point I was called away from the kitchen by some urgent task or other and the next time I caught a glimpse of the second piece of ciabatta I had sliced for further evaluation (no self-sacrifice being to great for my Valentine), it had hugely shrunk in size and was actually walking towards me, firmly grasped in the right hand of said Valentine. Before I could react, he beamed at me: "I love this cake!"
Cake? Seriously? The Man has been living with me for more than for thirty years and eating my bread for almost as long and he still mistakes bread for cake? I replied sternly that not only what he was devouring wasn't a cake but that it was supposed to be his Valentine Day's breakfast surprise. He remarked that if it weren't a cake, it sure tasted like one and added judiciously that if it were a surprise, I shouldn't have left it lying around on the kitchen counter. He further offered that, if I let him proceed with his tasting,  he would gladly submit to a spot of amnesia and allow himself to be deliciously surprised on February 14th...
Since there is a (huge) lot to be said for regaling your Valentine with a treat you enjoy just as much as he does, I decided to forgive him his brief lapse of culinary judgment and proceed with the second test-bake. This time, I think I got the proportions right. The appearance is still rustic but nothing I can't live with. Of course I could always use more chocolate and more cherries. But then why not just make a cake? The Man wouldn't know the difference.

Formula

Yields four ciabattas, scaled raw at 500 g


For those of you who are using BreadStorm (including the free version), please click on this link to import the formula.  For more on BreadStorm, you may want to read this post.

Process

Note: This bread is made over 24 hours and requires a mixer equipped with a dough hook (such as a Kitchen Aid).

The night before the bake
  1. Mix the poolish, cover it loosely and let it ferment overnight (12 hours) at 73°F/23°C
  2. Roast the hazelnuts in a 350°F/177°C oven for about 20 minutes (I keep all nuts in the freezer which is probably why they need 20 minutes to turn brown. If yours are room temperature, they may not need more than 10 or 12 minutes) until they turn a rich brown color and let them cool on a kitchen towel. When they are cool to the touch,  rub them inside the kitchen towel until a good part of the skin has peeled off, then transfer them to a rimmed metal dish and break them roughly (I use the bottom of a heavy mug)
  3. Cut the butter in small pieces and reserve
  4. Scale the sugar and the honey
  5. If possible, keep above ingredients overnight at same temperature as the poolish but leave the eggs in the refrigerator
On baking day
Desired dough temperature (DDT): 73°F/23°C to 76°FF/24°C
(Depending on the room and the flour temperatures, you will need to use cooler or warmer water in the final dough to obtain the DDT at the end of the mixing process)
  1.  Half-an-hour before mixing time, take the eggs out of the refrigerator, scale them, beat them lightly and reserve
  2. Scale water 2 and bring to a boil
  3. Combine the dried cherries and chopped up hazelnuts, quick-soak them with the boiling water, drain and reserve the resulting tea (it will be brownish-looking and quite fragrant), letting it cool down to room temperature. This water remains your water 2 (I didn't top it off to make up for what the cherries and hazelnuts retained but you might have to if your flour is very thirsty)
  4. Scale the flour, yeast and salt. Whisk yeast and salt into the flour and reserve
  5. Place the poolish, the eggs and water 1 in the bowl of the mixer
  6. Add sugar and honey (if using 10% or less combined, it can be added at the beginning)
  7. Add the butter (if using 10% or less, it can be added at the beginning)
  8. Add the dry mix (flour + yeast + salt)
  9. Mix on first speed (on a spiral mixer) or speed 4 (on a Kitchen Aid) for 4 or 5 minutes
  10. Mix on second speed (on a spiral mixer) or speed 8 (on a Kitchen Aid) for 2-3 minutes
  11. Check gluten development. When gluten is 80% developed, add water 2 by increments on first speed (4 on Kitchen Aid) and mix for about 3 minutes
  12. Add the cherry-hazelnut mixture and the chocolate chips. Mix on first speed (4 on Kitchen Aid) until just incorporated
  13. Transfer into oiled dough tub, cover and let ferment at 73°F/23°C - 76°FF/24°C for 2 hours and 30 minutes
  14. Transfer the dough to a generously floured surface (see relevant video in All About Ciabatta: Notes from a Class), taking care not to let it fold over itself
  15. Divide and scale at 500 g (you should have four ciabattas (again please refer to the relevant video) (Note that in class, Didier scaled the breakfast ciabatta at 200 g and all the others at 400 g)
  16. Proof on floured linen, top down, for one hour
  17. Bake with steam on a baking stone in a 420°F - 216°C oven for 30 minutes (turning oven down to 400°F-204°C after 10 minutes, tenting with foil if over browning after 20 minutes and propping the oven door open (with a wooden spoon) for the last five minutes
  18. Cool on a rack
  19. Enjoy!
The crumb is rather darker than normal for an all-white flour ciabatta: that's because I used water 2 as a quick-soaking liquid for the cherries and hazelnuts. If you wanted a lighter crumb, you could throw out the soaking water but it would be a trade-off: you would lose a big part of the flavor.


Poolish in center, then clockwise: butter, honey, sugar and post-quick-soaking water 2


Don't you love the strands of gluten in the middle bubble?

Monday, August 26, 2013

Pear-Hazelnut Ciabatta

From looking at the above picture, you'd think this was just another ciabatta, right? Simply a different flavor combination than the one posted last week. And you'd be right of course, except that, as always, "l'essentiel est invisible pour les yeux" (what is essential remains invisible to the eyes, as the fox explains to the curious little boy in Le Petit Prince).
Indeed, beyond the listed ingredients, what got baked into this bread is friendship and love and the gratefulness that fills my heart for the support you have steadfastly afforded us since tragedy struck. Frankly I couldn't have made it so far so soon without your help. Each of your comments and emails has reached my heart and added a brick to the foundation on which healing may one day begin. Thank you!
The realization came to me as I was gathering what I needed for this bread: the stone-ground whole wheat flour with golden specks of bran came from a baker on Vancouver Island, the round and plump hazelnuts from a friend's farm in the Fraser Valley, the dried pears from a local friend who is rebuilding his home (as he will be without an oven for more than a year, he kindly brought me all -and I do mean all- his baking supplies). The levain was the distant progeny of the one sent to me last year by another friend on Orcas Island. The apron around my waist was a present from a friend in Maine.
I was  making the ciabatta for a friend from France who will be visiting next month: she lives above a bakery on a quiet street in a city near Paris. She has never eaten homemade bread in her life. 
As I stood thinking of her, weighing each ingredient in turn, I remembered the kindness and passion of the baker who had shared it with me and I suddenly realized that beyond the eagerly awaited guest and my baking friends, all of you were in the kitchen with me as well, still present eight and a half months later, still caring, still remembering Noah and still striving not only to show support but also to prevent further acts of random violence like the one which had devastated the Newtown families. I could never thank you enough. This ciabatta is dedicated to you.
It was inspired by the cool front which has hung over our valley for the past few days: mist rising from the river at dawn, odd leaves turning bright red, apples and pears hanging heavier in the gardens that line the trail, humming birds dancing at the feeders as if already gearing up for the long trip south. 
Cliff Mass, our beloved local meteorologist, says summer isn't over yet and I believe him. Still I have seen the writing on the landscape and distant memories of fall have come drifting back. The yellowing fruit against the old stonewall in my grandfather's orchard, the ripe hazelnuts falling off their husks under the thicket by the chicken coop, we kids filling our pockets before heading out for a day's adventures, the breath of a faraway and long-ago garden brought back by the smell of damp grass as I bend to pick up the paper from my Northwest driveway every morning. Threads of life woven together. Past and present. Love and loss. Being part of a larger whole, of a living tapestry. Separate, yet connected.
A comforting thought to go with the first bread of fall.


Pear-Hazelnut Ciabatta
The method is the same as the one I described in my previous post with minor changes.
  • The oatmeal I used was a leftover from breakfast the day before, it hadn't been cooked with baking in mind and was therefore a bit runnier than I would have liked. Had I made oatmeal specifically for this ciabatta, I would have reduced by half the amount of cooking water. As it is, I can't tell you how much water I used because I never measured it. I adjusted for the wet oatmeal by reducing the amount of water added to the dough in the final mix.
  • I soaked the pears only briefly (three minutes only and in boiling water) and used the soaking water (which smelled delicious) in the dough.
  • The hazelnuts I roasted and peeled, then ground coarsely in a flat bowl with the thich bottom of a small bottle of balsamic vinegar. The grinding was no hassle. But the peeling was rough: I had never truly appreciated before how convenient it was to have two hands when rubbing hazelnuts together. 
  • I didn't soak the hazelnuts but right before incorporating them into the dough, I gently hand-mixed them with the pears so that some of the wetness would rub onto them and they wouldn't be as likely to suck up water from the fermenting dough. Next time I might try and soak them briefly as they may have dried out the dough a bit.

Ingredients (for 3 ciabattas)
  • 450 g unbleached all-purpose flour
  • 150 g whole-wheat flour
  • 150 g wholegrain steel-cut oats, cooked, barely salted, unsweetened, at room temperature
  • Water 1: 300 g
  • Water 2: 75 g
  • 150 g dried pears, roughly chopped, soaked for three minutes in boiling water (unless they were super dry and hard, I wouldn't soak them any longer for fear of their turning to mush)
  • 80 g hazelnuts, roasted, peeled and coarsely ground
  • 150 g ripe liquid levain (100% hydration)
  • 150 g ripe poolish (75 g flour + 75 g water + a pinch of instant yeast)
  • 18 g fine sea salt
Method (the bread is made over two days)
The night before
  1. Feed the levain
  2. Prepare the poolish
  3. Roast, peel and chop the hazelnuts
Early on the day of the bake (at least two hours before mixing begins)
  • Roughly chop the pears and soak them to cover for three minutes in boiling water
  • Drain, saving the water
Mixing 
  1. Pour water 1 (including pear-soaking water) in bowl of mixer
  2. Add all-purpose flour, whole-wheat flour, oatmeal, levain and poolish
  3. Mix on low speed until incorporated
  4. Add the salt
  5. Mix on low speed until gluten is developed
  6. Add water 2 (slowly and in stages) and crank up speed one notch
  7. Mix briefly (just until the water is incorporated)
  8. Bring speed back down to low and add pears and hazelnuts
  9. Mix until incorporated
  10. Set dough to rise in oiled and covered pan
  • Dough temperature was 80°F/26°C and room temperature 72°F/22°C
  • I gave the dough two folds at 50 minute-intervals
  • Fermentation time was 4 hours, followed by 45-minutes proofing time (I am not sure why the dough fermented faster than last week. Maybe the sugar in the pears sped up the process?)
Dividing and Baking


As described for the teff ciabatta
  • Except that I set the oven to 410°F/210°C for the first 15 minutes
  • And lowered it to 400°F/204°C afterwards to prevent the crust from darkening too much (again because of the sugar in the pears)
  • I also tented the ciabattas with aluminum foil after the first 15 minutes
  • I used steam at the beginning and kept the oven door ajar for the last five minutes

Saturday, February 11, 2012

Morning Cuddle Bread with Oats, Plums and Hazelnuts

The anxiety of influence is most certainly a reality for some. After all, a whole book has been written on the subject (although the author probably didn't have the art of baking in mind) but I am happy to report I don't suffer from it. I love leisurely browsing through books and/or exploring online worlds and letting ideas wash over me, leaving behind precious little nuggets of inspiration. Sometimes - and that's the most fun - these nuggets combine to form something completely different.
That's how the morning cuddle bread came to be. A couple of weeks ago a British Columbia food podcast had pointed me towards an oatmeal, walnut and plum bread, which the Man pronounced to be a wonderful breakfast bread...

...and as I was contemplating what to bake for him for Valentine's Day, I remembered another fruit and nut bread I had once bookmarked in Les 20 meilleurs ouvriers de France et médaillés d'argent se dévoilent et vous offrent leurs recettes choisies, a book put together by l'Équipe de France de boulangerie (the French Baking Team) in the early 90's.  What I had liked most about it was its endearing shape (two entertwined pieces of dough) and its name, pain câlin du matin (literally morning cuddle bread).

Oven-roasted hazelnuts
The two recipes got reborn as one: from Chef Bruce (the British Columbia baker), I retained the idea of the plums (the Man is a huge plum fan!) and the nuts (but instead of the walnuts, I used the fragrant hazelnuts my friend Meeghen had brought me from her own orchard). I also stayed with the mix of wheat (whole-grain and all-purpose) and oatmeal (I love the tenderness of an oatmeal crumb). From the French recipe - by Gérald Biremont, "meilleur ouvrier de France" (best artisan baker in France) - I took the shape and the name. After all, what's more appropriate on Valentine's Day morning that a sweet little cuddle?
Interestingly both recipes call for a straight dough but I always prefer using a preferment: the bread keeps better, if nothing else, and I find it tastier too. So I reinterpreted the Canadian recipe to use both a poolish (made with only a speck or two of instant yeast) and some levain. It took its own sweet time to ferment but, hey, Valentine Day comes around only once a year. Besides the dough did all the work, leaving the cuddling to us...

Ingredients: (for 8 morning cuddle breads or 4 cuddle breads and a loaf)
For the poolish
  • 280 g all-purpose flour
  • 280 g water 
  • one tiny pinch of instant yeast (0.06 g)
For the final dough
  • 200 g mature white starter at 100% hydration
  • 320 g all-purpose flour
  • 150 g white whole wheat flour
  • 115 g old-fashioned oat flakes, coarsely ground in a food processor
  • 180 g water  (amount to be adjusted up or down depending on your flours, the humidity in the air, etc.)
  • 100 g oven-roasted hazelnuts, roughly peeled and chopped
  • 110 g dried plums, roughly chopped
  • 19 g salt
Method: (this bread is made over two days since the starter and the poolish both need to be fed the evening before and to ferment overnight)
  1. The night before, mix the poolish and feed the starter. Let both ferment overnight at room temperature (if very warm where you live, fermentation could be faster, which means you may need to adjust your schedule accordingly)
  2. On baking day, mix the flours, the starter, the poolish and the water until all the ingredients are well distributed and all flour is hydrated. Let rest for 20 minutes
  3. Add salt and mix on low speed until a soft pliable dough is formed (don't overmix)
  4. Add the plums and hazelnuts and mix gently (I find it easier to take the dough out of the mixer at this stage and mix in the fruit and nuts by hand)
  5. Set in an oiled container and let rise until at least doubled (it took close to 6 hours at 72°F/22°C)
  6. Divide in two pieces of roughly 850 g each
  7. If you want to make only cuddle breads, then divide each of these pieces in 8 and make 8 baguette-shaped cylinders. Twist them together by pairs. If you want 4 cuddle breads and one loaf, divide and shape accordingly
  8. Proof until doubled in size (in my case, it took one hour and a half at 72°F/22°C). Pre-heat oven to 400°F/204°C
  9. When ready bake for 15 minutes (with steam the first five minutes) then check the color and if necessary turn oven down a bit. Turn the breads 180° and bake another 15 minutes. They will be ready when they have a rich color and sound hollow when thumped on the bottom.
  10. Cool on a rack!
Enjoy!

The morning cuddle bread is going to Susan for Yeastspotting.

Wednesday, October 12, 2011

Whole Wheat & Hazelnut Breadsticks

My hand is still (a bit) sore and my levains are still asleep, so I am not back in baking mode yet but I have been meaning to share my hazelnut version of Martha Rose Shulman's whole wheat and walnut breadstick recipe for a while. Now is as good a time as any, especially since it is hazelnut season and maybe you are lucky enough to have hazelnut trees in your garden.
I have tried it with levain instead of yeast (not as crisp) or with rye and spelt replacing some of the whole wheat (too assertive). I have also made it with walnuts as originally intended but as long as we have hazelnuts on hand, I always came back to this one which is our favorite.
I like to make it before traveling as the sticks' elongated shape makes them ideal for the side pockets of our backpacks and with some cheese (even plain cheese sticks) and an apple or a handful of dried apricots, they make a wholesome snack on the go.
They are very good both with regular whole wheat and with white whole wheat.
Ingredients (for 24 breadsticks):

  • 425 g whole wheat flour (white or regular) (I use freshly milled)
  • 200 g unbleached all-purpose flour
  • 52 g finely ground hazelnuts (or hazelnut meal) (if using whole hazelnuts, roast them for 10 minutes in a 350°F/177°C oven, let them cool down a bit, then rub them in a kitchen towel to remove as much of the skins as possible before grinding)
  • 50 g hazelnut oil (a mild olive oil can be used instead)
  • 13 g sea salt
  • 3 g instant dry yeast
  • 314 g lukewarm water
  • 5 g honey or maple syrup (optional)
Method:
Please refer to the original recipe as I have followed it to the letter with excellent results.
These Whole Wheat & Hazelnut Breadsticks are going to Susan's Wild Yeast for this week's issue of Yeastspotting.

Monday, September 26, 2011

Local Loaf (Hazelnut Cider Barley Bread)

Do you sometimes wish you could eat the landscape? I do. Like babies, I need to taste the world to apprehend it. If that means I am stuck at a pretty archaic stage of personality development, well, so be it! I will readily grant you that I am the oral type. My grandfather probably had a lot to do with it: he had had two sons, one of whom, my uncle, had tragically died of tuberculosis at age 19. My father gave him three grandsons and one granddaughter. My grandfather had never had a little girl in his life before. He fell hard for me.
To be closer to us (we lived in Paris), he and my grandmother moved from Southwestern France (where they were born and had lived all their lives) to Normandy. We went and visited them every weekend, all year-round and in all kinds of weather. Which means that they saw a great deal of us and often while my brothers were playing war games in the wonderfully half-tamed garden, he took me walking. He had made a little wooden basket for me and when we were not looking for eggs in the chicken coop, we wandered the nearby woods and meadows. But we never walked just for exercise or leisure.
Our neighbor, the farmer, had given us access to the land across the road where he pastured his cows and there was a wood at the end of the bramble-hedged lane that went up the hill: I learned to gather baby dandelions (so utterly delicious in a salad that I still yearn for them almost six decades later) and button-mushrooms in the fields, chanterelles and boleti in the forest, blackberries, wild apples, hazelnuts and walnuts on the way back. I can still recall the puckering taste of sloes and the black stain the walnuts left on my hands. And then of course, there were the fruit and vegetables my grandfather grew, the chickens and the rabbits that he raised and the ducks we bought from the farmer, not to mention the milk we went to get every evening in metal milk pans.
The only thing I didn't really care for was the bread which we bought from a baker who made his rounds in an old van. On the baker's days off, my grandfather (who by then was already over 80) rode his Solex (a motorized bicycle) three miles away to another village to get it. It wasn't good either (I guess I was born and raised at the time bread in France took a precipitous turn for the worse).
Well, these days are long gone but for the past couple of months, they were somehow brought back as I wandered the lanes around our new home enjoying the sun (yes, summer can be gorgeous in the Northwest) and picking blackberries. The blackberries were nothing like the ones I remembered from my childhood though. For a start they were generally sweeter (maybe because August had been so sunny) but also, of course, this being America, they were twice the size. But I filled buckets after buckets. I also ate a lot of them.
Walking, eating and picking and fighting my way out of countless thorny grips, I was listening to a French recorded book on my iPod. That book is one of my favorites. I have read it (in print) over and over to the point that I can often guess what is coming at any given moment. It was written in the early years of the 20th century and the action (such as it is) takes place mostly in and around Paris. The writing is gorgeously descriptive and listening to its music along these brambly lanes in the Pacific Northwest had the strange effect of knitting together the past and the present for me. The cadences of the language and the fragrance of the blackberries slowly wove themselves into a new whole and that's when I knew with absolute certainty that moving here had been the right call.
Just as I can recall with uncanny precision the exact taste of my childhood, I started to yearn for the taste of the landscape around our new home. We joined a CSA where, wonderfully, part and parcel of the weekly share is the freedom to go to the fields and pick the greens, herbs and flowers we want (out came the little wooden basket which I had cherished but not used all these years). We visit farmers' markets around our home and recently, as you know if you read my previous post, I went to the Kneading Conference West 2011 where I met local bakers, farmers and millers. I bought local organic all-purpose flour from Fairhaven Mill. Having attended Leslie Mackie and Andrew Ross' inspiring presentation on baking with barley, I also purchased local organic barley flour.
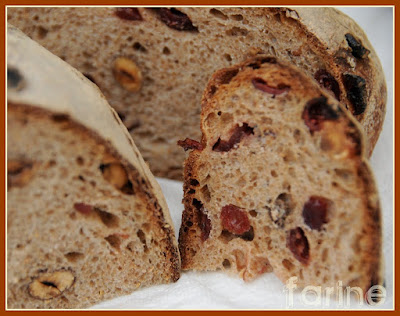
I was at the farmers' market the other day when the sight of gorgeous hazelnuts gave me the idea of baking the flavors of the surrounding landscape into what I love best, bread. I purchased some hazelnuts as well as a quart of honeycrisp unpasteurized cider and I went home. I had previously bought delicately flavored blackberry honey from a local beekeeper who sells through the CSA but I decided against caramelizing the hazelnuts with it. I didn't want a sweet bread. I wanted a clean-tasting loaf where the soul of the levain would soar to the accompanying music of the roasted hazelnuts and the tang of the cider. I wanted a bread, not a dessert. And that's what I got.
The fermented taste is mysterious and almost inebriating in its complexity. The flavors of the barley and the cider do not really shine through but they definitely contribute to the whole as by themselves, wheat and hazelnuts would never have yielded such aromas.
I imagine there are endless variations on the theme of the local loaf and I might look for others as the seasons change. I'd love to know which ones you would come up with to define your own landscape if you felt so inclined and didn't mind sharing.
Meanwhile I am sitting by the fire staring at the rain which has finally come and thinking of the many ways in which my corner of the Pacific Northwest reminds me of Normandy. As for the blackberry honey, it is incomparably delicious on a slice of the landscape...
Ingredients (for 2 loaves):
  • 585 g all-purpose flour
  • 60 g barley flour
  • 387 g water
  • 97 g unpasteurized honeycrisp cider (*see note below)
  • 194 g liquid levain (at 100% hydration)
  • 100 g hazelnuts (roasted for 10 minutes, rubbed together to remove skins and roughly chopped)
  • 13 g sea salt
  • * Note: what this farmer calls cider is basically apple juice. It has no alcoholic contents whatsoever. What I did though was to keep it unopened in the refrigerator for a week before using it. By then it had reached the stage where, with the boost of the levain fermentation during the slow rising of the dough, it started fermenting in earnest. At least that's how I explain the slightly boozy taste of this bread. Maybe a scientist would see it differently...
Method:
  1. Mix flours and water until combined and let rest for 45 minutes (autolyse)
  2. Add levain and salt and mix until medium soft consistency is achieved
  3. Add cider and mix until absorbed (I had to put the dough into the mixer at that stage and mix on high for a couple of minutes until the dough came off the sides of the bowl)
  4. Add the hazelnuts and mix on slow for a few minutes until combined
  5. Set the dough to ferment for as long as it takes for it to stop springing back quickly when poked with a finger
  6. Divide the dough in two, pre-shape as boules, shape and score as desired (I did one boule, one batard)
  7. Pre-heat oven to 470°F/243°C
  8. When loaves are fully proofed (the dough no longer springs back quickly when poked), bake at 470°F/243°C with steam for 10 minutes, lower temperature to 450°F/232°C, bake another 10 minutes, turn the loaves around if necessary and bake another 12 to 15 minutes or until their internal temperature reaches about 210°F/99°C
  9. Cool on a rack.
The Local Loaf is going to Susan's Wild Yeast for this week's issue of Yeastspotting.

Thursday, September 16, 2010

Cranberry-Hazelnut Whole Wheat Crisps

I just discovered my true self and as sad as it is to admit it, the truth is that, deep down, I am just a copy cat! My friends Larry and Gerry from Tree-Top Baking make fantastic fruit and nut crisps. Since they live and work on Whidbey Island, too far away from us to make resupplying easy (which is too bad because they also make a sprouted wheat bread which is to die for, not to mention excellent buckwheat batons and many other great breads), no sooner was I done baking the Hazelnut-Cranberry Whole Wheat Bread that I decided to imitate them and make my own fruit and nut crisps. Larry's crisps (sorry, I didn't take a picture and they are long gone) are thinner because he machine-slices the bread. Having no such equipment at my disposal, I waited for the bread to be two days old (which was no mean feat as it meant hiding it from the rest of the family) and used a well-sharpened knife. The crisps came out crunchy and fragrant with an intense hazelnut flavor. They were quite a treat. To make crisps, just slice a loaf of bread as thin as possible and set the slices to bake in a 300° F/149° C oven. Bake 10 minutes then flip over and bake another 10 minutes (your oven may be hotter or cooler than the one I used and you might need to adjust temperature and baking time accordingly). After 20 minutes, I flipped the crisps a second time, gave them two more minutes and took them out. Then I set them on a rack to cool and watched them disappear. The Cranberry-Hazelnut Whole Crisps go to Susan's Wild Yeast for Yeastspotting.

Wednesday, September 15, 2010

Cranberry-Hazelnut Whole Wheat Bread

I don't know how advanced the season is in other parts of the country but here in the Pacific Northwest, fall is most certainly on its way. The leaves are starting to turn and the nights are wonderfully crisp (although to be honest, they are also sometimes extremely wet!).
This being North America, cranberries - which had been temporarily shunned for their summery cousins - are back in our thoughts, bringing with them a craving for other fall fruit and nuts. When I was a child, my brothers and Ì spent every Sunday at my grandparents' house in Normandy, playing hide-and-see in the old barn where my grandfather used to raise ducks, feeding wheat berries to the chickens, petting the bunnies which (sadly but unbeknownst to us at that time) would later turn into delicious "civets" (fragrant rabbit stews which my grandmother would serve with buckwheat crepes) and, in the fall, filling our pockets with hazelnuts. Since no cranberries were to be had in France when I was growing up, I pretty much discovered them when I moved to this country and never thought of pairing them with hazelnuts until I visited Boulangerie La Rémy in Quebec last June. Even though visions of cranberries and hazelnuts have been episodically dancing in my head ever since, it took an email from Eric at the Fresh Loaf for me to actually accept the fact that summer is over and give it this bread a shot. I have almost none of my usual baking tools here at my kids' house, no books, no baskets (I used towel-lined colanders) not even a little strainer to dust the loaves with flour (which explains their rather floury look as I ended up using too much flour and having to wipe it off). But I have a 2007 issue of The Baking Sheet newsletter which features whole grain recipes and I have levain, thanks to my friends Gerry and Larry from Tree-Top Baking (a small bakery located on Whidbey Island which makes superior bread and delicious pastries). Again thanks to Gerry and Larry, I also have a blend of freshly milled whole grain flours in my usual proportion of 45% wheat, 45% spelt and 10% rye to feed my adopted levain. There are a few great natural food markets around here where I can pretty much find in bulk whatever grain or flour I want. But I opted for wheat, figuring that spelt's delicate flavor would be masked by the robust taste of the toasted hazelnuts and that rye and hazelnuts would fight for dominance instead of complementing each other.Since I really like to use whole grains whenever possible, I went for a 65% whole wheat dough. The resulting bread is very flavorful and, hopefully, quite nutritious. We all loved it. We actually packed some to take with us on a hike and found it to be the perfect accompaniment to a hard cheese at the end of a long trail in the deep forest. We munched on it while sitting on a fallen tree trunk and watching the sun play on the pebbles at the bottom of a little lake. Pure bliss!
(The following recipe is loosely based on the Walnut Currant Bread featured in The Baking Sheet, Vol. XVIII, no. 1, Winter 2007) Ingredients For the levain 114 g whole wheat flour 114 g water, at cool temperature 30 g firm levain (hydration: 65%) (I used whole-grain levain as explained above but if all you have is liquid levain, you can use it instead. Just adjust the water amount accordingly) For the final dough all of the levain 340 g whole wheat flour 241 g unbleached all-purpose flour 455 g water, at cool temperature 14 g salt 125 g dried cranberries (mine were slightly sweetened) 100 g hazelnuts (roasted in the oven and peeled by rubbing them together in a kitchen towel), cooled
Method (this bread is made over two days) The night before baking day Combine flour, water and levain, mix well, cover and leave to ferment overnight (or for up to 12 hours) On baking day
  1. Combine all of the levain with the remaining flours and the water and mix (since I don't have a mixer here at my kids' house, I mixed by hand) until the flours are thoroughly hydrated
  2. Cover the bowl and let rest for 20 minutes (autolyse)
  3. Add the salt and mix briefly or until the dough is smooth and cohesive (I used the stretch and fold method of hand mixing)
  4. Cover the bowl and let rest for 30 minutes
  5. Turn the dough out onto a well-floured surface and, wetting or flouring your hands (depending on the dough consistency), lightly pat it into a rectangle
  6. Sprinkle the cranberries over it and using a metal bench knife, fold it like a business letter over the cranberries
  7. Pat the dough out into a rectangle again, sealing in the cranberries and sprinkle with the roasted hazelnuts
  8. Using a metal bench knife, fold the dough again as a business letter but this time in the opposite direction to seal the hazelnuts in
  9. Put the dough back in the bowl and let it rest, covered for another 30 minutes
  10. After 30 minutes, take the dough out and give it another business letter fold on a well-floured surface
  11. Brush the extra flour off and return to the bowl and repeat the rising and folding twice more
  12. After 4 folds and 2 ½ hours of rising time, heavily flour two bannetons or colanders lined with linen towels
  13. Turn the dough from the bowl onto a lightly floured surface and divide in two (since I had different size colanders, I divided the dough roughly in two thirds and one third)
  14. Pre-shape into rounds, let rest covered 10 minutes and shape into balls
  15. Be careful not to tighten the balls too much or the nuts and berries will tear the surface of the skin of the dough
  16. Turn the loaves upside down into the prepared bannetons or colanders, cover them well and let them rise for 2 to 2 ½ hour
  17. About half-an-hour before the loaves are ready to bake, preheat the oven to 450° F/232° C with a baking stone in it (having no baking stone here, I preheated the oven with a thick metal baking sheet on the middle shelf and a metal pan on the bottom)
  18. Flip the loaves out of the bannetons onto a piece of parchment paper, gently brush off the excess flour (preferably with a pastry brush if available), slash in desired pattern and use a peel (I used another baking sheet) to load them into the oven
  19. Pour a cup of cold water in the prepared metal pan and close the oven door
  20. After 20 minutes, turn the loaves around and continue baking for another 20 minutes, removing the metal pan if there is any leftover water
  21. After 40 minutes' total baking time, turn off the oven and leaving the oven door slightly ajar (I used a wooden spoon to prevent it from closing completely), let the loaves dry out for about 10 minutes
  22. Take them out of the oven and set them on a rack to cool.
The Cranberry-Hazelnut Whole Wheat Bread goes to Susan's Wild Yeast for Yeastspotting.

Thursday, December 10, 2009

Looking for a reasonably healthful holiday treat?

Well, look no further. This little brioche might just do the trick! It is rich in chocolate, dried cherries and hazelnuts but rather low on fat and sugar, completely butter-free and made with a healthy proportion of white whole wheat... To top it all, it doesn't contain a single speck of commercial yeast. What's not to like? Of course it doesn't compare to a pan d'oro but, for health reasons, who would eat (or make for that matter) a pan d'oro more than a few times a year? My family likes to munch on something chocolatey while watching the kids open their presents. This year, I think I'll make this brioche (but I'll double the proportions). The idea comes from a slim French book entitled Les Pains des Quatre-Saisons, an appealing compilation of bread recipes (sometimes with accompanying memories) contributed by readers of an organic gardening magazine. I took some liberties with the recipe to adapt it both to our taste and to the family health requirements. Ingredients (for one smallish brioche): For the dough 150 g unbleached all-purpose flour 100 g white whole wheat flour 20 g agave syrup 1 egg, beaten + 1 other, beaten as well for the wash 50 g milk (you might need more according to how thirsty your flour is), at room temperature 50 g roasted hazelnut oil (the hazelnut oil contributes nicely to the taste but, if not available, a neutral vegetable oil - not canola - will do), at room temperature (soft butter is used in the original recipe) 40 g mature white starter 1 pinch of salt For the garnish 60 g hazelnuts, roasted and skinned, chopped 50 g dried cherries, quick-soaked in warm milk and drained 50 g good quality dark chocolate chips, chopped
Method:
  1. Pour the flour in a large bowl
  2. Make a well in the center and pour in: milk, salt, agave syrup, egg, starter
  3. Mix well, adding milk as necessary
  4. When incorporated and gluten is starting to develop, progressively add the oil
  5. Continue mixing until smooth and flexible (but the dough should be rather firm)
  6. Ferment in a tightly covered bowl until doubled in volume (in my case, it took 12 hours @ 68ºF/20ºC)
  7. When the dough is ready, preheat the oven to 400ºF/204ºC, making sure there is an empty cast-iron (or other metal) pan at the bottom and a baking stone (if available) on the middle rack
  8. With a rolling pin, flatten the dough into a rectangle (0.20"/0.5 cm thick), spread the garnish on the rectangle, taking care to stay away from the edges
  9. Roll the dough tight, as you would a jelly roll and pinch the ends closed
  10. Shape as desired and set on a parchment-covered baking sheet, brush with the egg wash and let rise another 40 minutes inside a tightly closed plastic bag
  11. Pour 1 cup of water in waiting cast-iron (or metal) pan and slide the brioche into the oven
  12. Spray the oven once with water and close the door
  13. After 20 minutes, rotate the brioche
  14. Bake another 30 minutes and cool on wire rack.
Raisins (soaked in rum or not) could be used instead of cherries, white chocolate instead of dark and, if opting for raisins, you might want to use walnuts instead of hazelnuts and to spice up the whole thing with some cinnamon. You can also use only all-purpose flour and replace the agave syrup by sugar (which was in the original recipe). However you end up making it, enjoy!
 

Blog Designed by: Deanna @ Design Chicky