Home About Recipes Artisans Blog Notes Resources
Showing posts with label Didier Rosada. Show all posts

Monday, February 24, 2014

Ancient Grain Ciabatta

Related posts:
All About Ciabatta: notes from a class
Chocolate Ciabatta with Dried Cherries and Roasted Hazelnuts
Of Bread and Bridges: a baking weekend in San Antonio

As mentioned in All About Ciabatta, we made several different ciabattas during the class last May. The formulas have all been posted on the Bread Bakers' Guild of America's website but they are only available to BBGA members. We are authorized to post the ones we make at home provided we also post the following note (and I quote): "The mission of The Bread Bakers Guild of America is to shape the knowledge and skills of the artisan baking community through education.  Guild members have access to many other innovative professional formulas, both online and in the Guild’s magazine, Bread Lines. For more information about membership, please visit www.bbga.org."
I have been a Guild member for over five years now and, between you and me, I never regretted joining. Not only do I look forward to getting the magazine every quarter but I enjoy having access to the archives, to a zillion tested formulas, to the lively online forum, to the classes taught by the Guild, etc. BBGA describes itself on its website as "an independent and creative group of professional bakers, farmers, millers, suppliers, educators, students, home bakers, technical experts, and bakery owners and managers." But to me, it is a big family centered around the craft of making bread and I really like it. And just so that you know, nobody is twisting my arm or promising me a free membership!
That being said, eighty-five dollars a year - for an individual - isn't exactly peanuts and while BBGA isn't in the money-making business (it is an educational non-profit and mostly run by volunteers), only you can say if joining it is worth your while...
Now on to ciabatta. Why make this particular one? Well, we both happen to love teff (and to have some in the pantry) and while I am not a huge fan of amaranth, I have some on hand which is desperately calling for attention. Besides, we saw amaranth plants at the Botanical Garden in Montreal a few years back and I can't resist the idea of baking some of these colors into our diet (never mind the fact that, when all is said and done, amaranth flour is made from the seed, not the flower and it is, well, flour-colored)...


Ingredients

For those of you who are using BreadStorm (including the free version), please click on this link to import the formula.  For more on BreadStorm, you may want to read this post.

Tips
A bit of care needs to be taken with this ciabatta because the protein in ancient flours is soluble in water and has no gluten, which means in practical terms:
  • A shorter mixing time
  • A very low fermentation tolerance: if the oven isn't ready when the dough is, put it in the fridge for 20 to 30 minutes
  • Variable water absorption: you may need to add water until you get the right consistency.
  • A possible fold: if you find that the dough is very extensible and has no elasticity, then you will need to do one fold

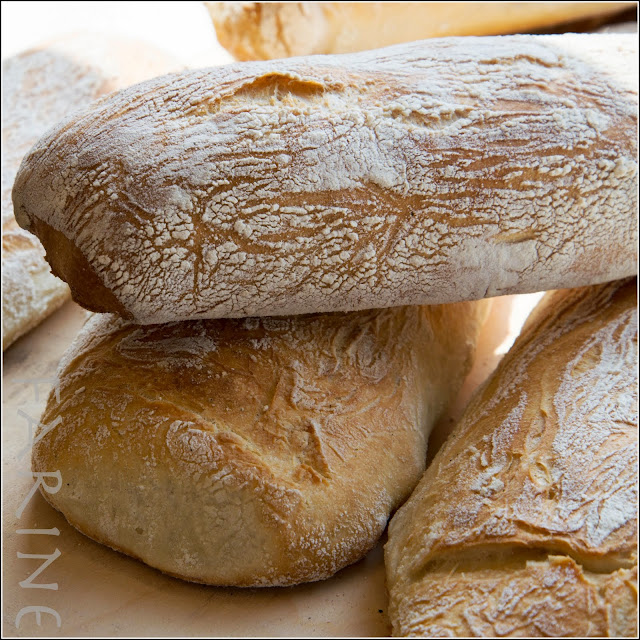
Ancient grain ciabatta dough as it came out of the mixer during class
 Method

The night before the bake
  1. Mix the amaranth poolish, cover it loosely and let it ferment overnight (12 hours) at 73°F/23°C
  2. Mix the teff sponge, cover it loosely and let it ferment overnight (12 hours) at 73°F/23°C
On baking day
Desired dough temperature (DDT): 73°F/23°C to 76°FF/24°C
(Depending on the room and the flour temperatures, you will need to use cooler or warmer water in the final dough to obtain the DDT at the end of the mixing process)
  1. Scale the flour, yeast and salt. Whisk yeast and salt into the flour and reserve
  2. Place the poolish, the sponge, the dry mix (flour + yeast + salt) and water 1 in the bowl of the mixer
  3. Mix on first speed (on a spiral mixer) or speed 4 (on a Kitchen Aid) for 4 or 5 minutes
  4. Mix on second speed (on a spiral mixer) or speed 8 (on a Kitchen Aid) for 2-3 minutes
  5. Check gluten development. When gluten is 80% developed, add water 2 by increments on first speed (4 on Kitchen Aid) and mix for about 3 minutes
  6. Transfer to oiled dough tub, cover and let ferment at 73°F/23°C - 76°FF/24°C for 2 hours and 30 minutes
  7. Transfer the dough to a generously floured surface (see relevant video in All About Ciabatta: Notes from a Class), taking care not to let it fold over itself and going easy with the stretching as the dough will be fragile
  8. Divide and scale at 500 g (you should have four ciabattas)
  9. Proof on floured linen, top down, for one hour (or 30 to 40 minutes if room temperature is warm)
  10. Dust with a mixture of teff, amaranth and white flours
  11. Bake with steam on a baking stone in a 420°F - 216°C oven for 30 minutes (turning oven down to 400°F-204°C after 10 minutes, tenting with foil if over browning after 20 minutes and propping the oven door open (with a wooden spoon) for the last five minutes
  12. Cool on a rack
  13. Enjoy!
During the class, someone asked Didier about changing the percentage of ancient grain in the formula and here is what he said in response: "Twenty to twenty-five percent total ancient grain compared to total flour is optimal for flavor, structure and volume."

Friday, February 7, 2014

Chocolate Ciabatta with Dried Cherries and Roasted Hazelnuts


Related post: All About Ciabatta: notes from a class

Okay, so with Valentine's Day in mind, I test-baked a version of this festive ciabatta (inspired by the Breakfast Ciabatta with chocolate pieces and bits of candied orange that Didier Rosada demoed during the All about Ciabatta class). The chocolate and cherries combo is one of the Man's favorites and when you add roasted hazelnuts to the mix, well, you'd think he had died and gone to heaven from the blissful look on his face. Since ciabatta has become one of my favorite breads to make, I thought it would be just perfect for the occasion.
But I needed a test run because I wasn't sure of the percentage of cherries and hazelnuts to use. Good thing I did because, as it turned out, I didn't put in nearly enough of either that first time. Also I had been so concerned that the ciabattas might stick to the couche when proofing that I had used way too much flour (as can be seen from image below) and they came out looking more like rustic Yule logs than Valentine Day treats!
I had made four ciabattas. I brushed one of them clear of flour, which made it less Christmassy but gave it the sorry look of a legless and jaundiced platypus (minus the tail and the bill but you know what I mean)...
Nevertheless I resolutely sliced into it...
...and was rewarded by a wonderful fragrance of poolish, chocolate and roasted hazelnuts. I couldn't smell the cherries but I could glimpse a few of them and certainly taste them and I resolved right then and there to make another batch.
At that point I was called away from the kitchen by some urgent task or other and the next time I caught a glimpse of the second piece of ciabatta I had sliced for further evaluation (no self-sacrifice being to great for my Valentine), it had hugely shrunk in size and was actually walking towards me, firmly grasped in the right hand of said Valentine. Before I could react, he beamed at me: "I love this cake!"
Cake? Seriously? The Man has been living with me for more than for thirty years and eating my bread for almost as long and he still mistakes bread for cake? I replied sternly that not only what he was devouring wasn't a cake but that it was supposed to be his Valentine Day's breakfast surprise. He remarked that if it weren't a cake, it sure tasted like one and added judiciously that if it were a surprise, I shouldn't have left it lying around on the kitchen counter. He further offered that, if I let him proceed with his tasting,  he would gladly submit to a spot of amnesia and allow himself to be deliciously surprised on February 14th...
Since there is a (huge) lot to be said for regaling your Valentine with a treat you enjoy just as much as he does, I decided to forgive him his brief lapse of culinary judgment and proceed with the second test-bake. This time, I think I got the proportions right. The appearance is still rustic but nothing I can't live with. Of course I could always use more chocolate and more cherries. But then why not just make a cake? The Man wouldn't know the difference.

Formula

Yields four ciabattas, scaled raw at 500 g


For those of you who are using BreadStorm (including the free version), please click on this link to import the formula.  For more on BreadStorm, you may want to read this post.

Process

Note: This bread is made over 24 hours and requires a mixer equipped with a dough hook (such as a Kitchen Aid).

The night before the bake
  1. Mix the poolish, cover it loosely and let it ferment overnight (12 hours) at 73°F/23°C
  2. Roast the hazelnuts in a 350°F/177°C oven for about 20 minutes (I keep all nuts in the freezer which is probably why they need 20 minutes to turn brown. If yours are room temperature, they may not need more than 10 or 12 minutes) until they turn a rich brown color and let them cool on a kitchen towel. When they are cool to the touch,  rub them inside the kitchen towel until a good part of the skin has peeled off, then transfer them to a rimmed metal dish and break them roughly (I use the bottom of a heavy mug)
  3. Cut the butter in small pieces and reserve
  4. Scale the sugar and the honey
  5. If possible, keep above ingredients overnight at same temperature as the poolish but leave the eggs in the refrigerator
On baking day
Desired dough temperature (DDT): 73°F/23°C to 76°FF/24°C
(Depending on the room and the flour temperatures, you will need to use cooler or warmer water in the final dough to obtain the DDT at the end of the mixing process)
  1.  Half-an-hour before mixing time, take the eggs out of the refrigerator, scale them, beat them lightly and reserve
  2. Scale water 2 and bring to a boil
  3. Combine the dried cherries and chopped up hazelnuts, quick-soak them with the boiling water, drain and reserve the resulting tea (it will be brownish-looking and quite fragrant), letting it cool down to room temperature. This water remains your water 2 (I didn't top it off to make up for what the cherries and hazelnuts retained but you might have to if your flour is very thirsty)
  4. Scale the flour, yeast and salt. Whisk yeast and salt into the flour and reserve
  5. Place the poolish, the eggs and water 1 in the bowl of the mixer
  6. Add sugar and honey (if using 10% or less combined, it can be added at the beginning)
  7. Add the butter (if using 10% or less, it can be added at the beginning)
  8. Add the dry mix (flour + yeast + salt)
  9. Mix on first speed (on a spiral mixer) or speed 4 (on a Kitchen Aid) for 4 or 5 minutes
  10. Mix on second speed (on a spiral mixer) or speed 8 (on a Kitchen Aid) for 2-3 minutes
  11. Check gluten development. When gluten is 80% developed, add water 2 by increments on first speed (4 on Kitchen Aid) and mix for about 3 minutes
  12. Add the cherry-hazelnut mixture and the chocolate chips. Mix on first speed (4 on Kitchen Aid) until just incorporated
  13. Transfer into oiled dough tub, cover and let ferment at 73°F/23°C - 76°FF/24°C for 2 hours and 30 minutes
  14. Transfer the dough to a generously floured surface (see relevant video in All About Ciabatta: Notes from a Class), taking care not to let it fold over itself
  15. Divide and scale at 500 g (you should have four ciabattas (again please refer to the relevant video) (Note that in class, Didier scaled the breakfast ciabatta at 200 g and all the others at 400 g)
  16. Proof on floured linen, top down, for one hour
  17. Bake with steam on a baking stone in a 420°F - 216°C oven for 30 minutes (turning oven down to 400°F-204°C after 10 minutes, tenting with foil if over browning after 20 minutes and propping the oven door open (with a wooden spoon) for the last five minutes
  18. Cool on a rack
  19. Enjoy!
The crumb is rather darker than normal for an all-white flour ciabatta: that's because I used water 2 as a quick-soaking liquid for the cherries and hazelnuts. If you wanted a lighter crumb, you could throw out the soaking water but it would be a trade-off: you would lose a big part of the flavor.


Poolish in center, then clockwise: butter, honey, sugar and post-quick-soaking water 2


Don't you love the strands of gluten in the middle bubble?

All About Ciabatta: notes from a class

Ever since last May when I attended All About Ciabatta, a Bread Bakers' Guild of America's (BBGA) class taught by Master Baker Didier Rosada (see Of Bread and Bridges: A Baking Weekend in San Antonio), I have been meaning to share what I learned as well as some photos and videos but most annoyingly, life intervened, notably in the shape of a shattered wrist, and I didn't get around to it. Since I owe an eternal debt of gratitude to the Italian bakers who invented ciabattas (the only bread I was able to tackle one-handed last summer because it requires no shaping) and to Didier for teaching me how to make it without fuss or fear, I am more than happy to pick up the slack today. As my indulgent mom used to say, better late than never! Except where otherwise indicated, all the information below comes from the notes I took during the class. 

Tools
  • All the doughs were mixed using a spiral mixer
  • At home, I use a 6-quart mixer with a dough hook
Flour
  • The bread flour used during the class was hard red winter wheat (11%-11.5% protein)
Preferments: a recap

What's a preferment?
"A preferment is a dough or batter prepared prior to mixing the final dough and composed of a portion of the total formula's water, yeast (natural or commercial) and sometimes salt. The dough (or batter) is allowed to ferment for a controlled period of time and then added to the final dough."
From Didier Rosada, Your Guide to Preferments, an online article I recommend reading for a better understanding of the various preferments and their applications

Old dough
Old dough can be used as a preferment for ciabatta. A good average is 40 to 50% of total flour. Using old dough is an easy way to have a quick preferment. But old dough has already been mixed fully once, which means it should be added at the end of the mixing time (so that it doesn’t get mixed again). Which is NOT the case for biga.

Biga
Biga is a very stiff preferment which came originally from Italy. If you choose biga, use 1% of yeast and let the biga ferment for 18 hours at 60°F. Remember to watch the water percentage in the final dough: hydration may need to be adjusted. If necessary, you can keep biga at 45°F (just up the yeast a little bit). As a preferment, it is more strongly flavored and more acidic than poolish.

Poolish
Poolish was invented by Polish bakers and brought to France by Austrians. A transition between sourdough and commercial yeast, it is one of the first preferments made with the latter. It has a sweet nutty flavor profile. A poolish is ready when it shows lots of bubbles and crevices and offers some resistance.

The amount of yeast to use in the poolish depends on the length of the fermentation. In the table below, please note that "total flour" refers to the total flour used in the poolish.
If you choose to let your poolish ferment overnight, always add to it 0.1% salt (1 g of salt for 1000 g of flour) as it will help you control the fermentation much better.
For reasons of personal convenience, I have always let my poolish ferment overnight. Ever since I took Didier's class, I have been systematically using in it 0.1% yeast and 0.1% salt and I am delighted with the results: no more overripe and defeated poolish!

Sponge
Sponge was invented by the British. Hydrated at 60%, it ferments overnight at the same temperature as the poolish.

Gluten development
  • When the gluten is 100% developed, the gluten window is transparent. The finer the veins on the window, the more developed the gluten
  • Always relate dough temperature to gluten development: if your recipe calls for full development of the gluten, use a lower water temperature
  • Adequate dough consistency, gluten development and dough temperature will give the process a good start. If careful thought isn't given to all three, troubleshooting will be necessary 

Ciabatta: a historical perspective
  • In the old days, Italian wheat was very weak and a very stiff preferment was needed to reinforce the dough. Accordingly ciabatta dough was traditionally leavened with biga, then set to ferment overnight at low temperature. A long fermentation at low temperature produced acidity which made the dough stronger. One can still see biga cellars in old Italian bakeries
  • Most of the wheat in Italy now comes from France and Germany and is low in protein (10 to 10.5%). It is stronger than the old Italian wheat, which means that biga is no longer the preferment of choice for ciabatta: it makes the dough too strong
  • Even though today's Italian bakers still call most preferments biga, they generally use poolish in their ciabatta. (In the United States, the term biga is often preferred for marketing reasons: it sounds more romantic than old dough!)
  • Today in Italy, ciabatta is often made with straight dough and therefore less flavorful
Ciabatta: basic concept
  • Today's preferment of choice: a poolish using 30% of the total flour in the recipe
  • Ciabattas require no shaping although some people like to give the dough a fold to make it fluffier
  • Ciabattas are proofed top down on floured linen
  • They are baked flour side up without any scoring
  • Do NOT dimple the top of the ciabatta
Double hydration technique
  • The baker adds enough water at the beginning to get the consistency of baguette dough; develops gluten to about 80%; then adds rest of water (always in increments)
  • The dough no longer sticks to the sides of the bowl when mixing is done
Retarding ciabattas: tips
  • Retarding is only for convenience. Longer in the cooler doesn’t necessarily mean better. You will never get as complex a flavor as with a room temperature fermentation
  • If you plan to retard your ciabatta, choose a stiffer preferment (for instance a biga or a sponge), increase the amount of yeast in the preferment, shorten the preferment fermentation time (5 to 6 hours instead of overnight) and increase the amount of preferment in the final dough
  • Use the double hydration technique (see above)
  • Use olive oil
  • Increase mixing time to give the dough more strength: mix to improved (gluten at 90%) before adding the second water
  • Shorten the first fermentation before putting the dough in the retarder: 30 minutes, one fold, then into the retarder. Next day: take the dough out, divide it, proof and bake (right out of the retarder) OR: take the dough out, wait for one hour, then dump it on the  table, wait 30 minutes then divide and bake
 Miscellaneous tips
  • Always adding a bit of salt to a preferment is a safety: it will slightly penalize  the flavor of said preferment but it will ensure that it works
  • It is important not to put too much water at the beginning of the mixing: start at 68-70% if the formula calls for no oil (65% or a bit less if using oil)
  • Always put the liquid ingredients in the bowl first
  • Always add yeast and salt to the flour. Especially important if using cold water, so that the yeast doesn't come in contact with the cold water
  • Be very careful when dumping ciabatta dough on bench for scaling, you want to avoid any accidental folding
  • When scaling ciabatta, add scraps on top. Since ciabatta proofs wrong side up, the scraps won’t show in the final product (see photo immediately below)

  • You can add 10% natural starter to the formula for added flavor and longer shelf life
  • Steam is very important as ciabatta will always turn out better with steam. But only at the beginning of the bake. It is actually important to vent the oven towards the end of the baking because ciabatta can get soggy (in my house, I use the handle of a wooden spoon to keep the oven door ajar for the last five minutes of baking)
  • If the dough is too cold when done, increase the fermentation time
  • Milk makes ciabatta a bit more tender
Videos

Mixing ciabatta dough
(The sound is quite poor at the beginning but the video is still worth watching because it gives you an idea of the soft consistency and high gluten development Didier was looking for in that particular dough.)

Folding ciabatta dough
(For very wet doughs: soupy consistency and underdeveloped gluten)

"Shaping" ciabatta

Another ciabatta "shaping" (or rather, dividing) video

Ciabatta: loading the oven


What we made

We made nine different ciabatta doughs during the class, covering various techniques, preferments and grains. For all, except the first one, Didier used the double hydration technique.
  • Ciabatta with poolish (short-mix technique): the dough is mixed until all the ingredients are just incorporated and the gluten is developed by a series of folds during fermentation. This technique is the most traditional
  • Ciabatta for retardingwith sponge: allows for more flexibility in the baker's production schedule 
  • Ciabatta with biga: this version uses the most traditional preferment
  • Ciabatta with poolish: more modern version
  • Multigrain ciabatta with whole wheat poolish and multigrain soaker: higher nutritional value
  • Ancient grain ciabatta (with teff sponge and amaranth poolish): a functional bread*
  • Ciabatta integrale (with sponge and cracked wheat soaker): 20% of the bread flour is replaced with whole wheat flour and a soaker is added for higher nutritional value
  • Ciabatta with whole wheat poolish and flax soaker: a functional bread
  • Breakfast ciabatta with poolish and chocolate pieces: plain yummy!
* The functional movement started in Japan: it centers on the idea that certain foods can improve the functioning of the body (ex: oats help control cholesteral, flax seeds add omega 3, etc.) and help prevent or cure diseases.


When time came to taste the ciabattas we made, we were hard put to choose and opinions differed wildly. For what it's worth, my three favorites were the plain one with poolish (which I found more delicately flavored and more interesting than the biga one), the functional one with whole wheat poolish and flax soaker and the one with candied orange and chocolate pieces.

Related Posts:
Ancient Grain Ciabatta (coming up)
Chocolate ciabatta with dried cherries and roasted hazelnuts

Thursday, May 23, 2013

Of bread and bridges: a baking weekend in San Antonio

The Bread Bakers Guild of America (BBGA) held another of its outstanding regional events this past weekend in San Antonio, Texas, and I was lucky enough to be able to attend it. The topic was "All About Ciabatta." I already knew the instructor, Didier Rosada, for having taken a couple of memorable classes with him at the San Francisco Baking Institute, a few years back.
I had seen how simple mixtures of flour, salt, yeast and water morph under his care into voluptuously silky and bubbling organisms that almost seem to purr as they spring to life. I knew him for a natural born teacher whose knowledge of dough chemistry and physics and all things bread is encyclopedic.  I fondly remembered his sunny Southwestern-France accent and his easy laughter, not to mention his gift for languages (Didier switches effortlessly from English to French to Spanish and back) and I knew the class was going to be a unique experience. I wasn't disappointed.
We did indeed learn all about ciabatta and made several different ones, using various preferments and methods. My two favorites were probably the poolish-based one with double hydration (the first one I will try to make when I get back home) and the power ciabatta (loaded with "good for you" nutrients) which we loosely shaped and baked into twists. I am usually not a huge fan of commercial yeast: I like the taste of levain, especially when it is both mild and complex but the class convinced that with proper pre-fermentation one can indeed make wondrously tasty breads using instant yeast. The Man's pick was the breakfast ciabatta, also poolish-based and studded with dark chocolate chunks and pieces of candied orange peel. The formula includes eggs and butter, everything he loves and is supposed to eat only exceptionally. Luckily his birthday is right around the corner...
We had arrived one day early to take in the sights, mostly the Alamo, the cathedral, the Mexican market and the River Walk. Coming from 58°F and overcast skies in Seattle however, the 97°F Texas weather was a bit of a shock. We baked in more way than one all weekend and didn't get to see or do all we had planned but we still fell under the spell of the city, its winding river and its many bridges.
Although we took back with us the best ciabattas of our lives, I am under no illusion that I will be able to emulate Didier's talent anytime soon, if ever. But I'll certainly do my best to apply what he taught us and share it on this blog. I just need to find out first how much time and energy I will have for baking and blogging once my treatment for breast cancer starts in earnest (we are still waiting for some test results), and get organized.
Didier's next BBGA event is scheduled for this fall at the International Baking Industry Exposition in Las Vegas. It will be a lecture on Las Buenas Practicas de Panificación (The Best Practices of Bread Baking) and he will deliver it in Spanish, together with Juan Manuel Martinez, a talented and passionate artisan baker from Bogotá, Colombia, who taught a popular class at WheatStalk last year. Considering the growing number of Spanish-speakers employed in artisan bakeries across America, I suspect the event will be mobbed.
Didier and Juan Manuel have co-authored Pan, Sabor y Tradición, a bread book which will hopefully be soon translated into English and made available in this country, and together with Miguel Galdós, another master baker (or "bread boy" as they like to call themselves), he has founded El Club del Pan (The Bread Club). I especially like El Club del Pan's videos. Such is the power of images that even non-Spanish speakers might find them instructive. Check them out and some of the magic may rub off onto your baking hands. I certainly hope it will onto mine!

Wednesday, December 5, 2012

Larry's Sprouted Spelt: A Felicitous Case of Mistaken Identity

As is often the case with the best things in life, it all started with a mistake. Larry Lowary of Tree-Top Baking on Whidbey Island, WA, was stirring the grain he was soaking for his weekly bake of sprouted wheat bread (a customers' favorite) when he noticed that the berries were already germinating when they should have been barely waking up. He checked the bag and realized he had sprouted spelt instead of wheat (spelt sprouts much faster). It was too late to go back, so he ground the grain, mixed the dough and baked. Other than the fact that it tended to crumble a bit under the knife,  he thought the bread had turned out pretty well and as I happened to be visiting the next day, he kindly gave me a loaf to take home.
Eager to have a taste, I sliced it open that very night and was somewhat surprised not to find it as tasty as I thought it would be. Spelt is one of my favorite grains and I expected more depth. But my disappointment turned to wonder when I had another slice at breakfast the next morning. The flavor had set in (the crumb had probably dried out just enough to concentrate the taste) and the bread was all I had been looking forward to and more. I immediately begged Larry to please make the same mistake again and invite me to come and watch.
Not that I hadn't already seen sprouted berries turned into loaves... When I took Whole Grains at SFBI with Didier Rosada a few years ago, Keith Giusto came and demonstrated the making of his popular Power Bread (which involved sprouted wheat, required the addition of almonds and walnuts and was marvelously sinful). We also made a simple sprouted whole wheat pan bread. The latter recipe is the one which Larry had adapted for use at his bakery. I had never made it at home since I took the class because I didn't own a grinder until very recently. A refresher's course was therefore most welcome.
Between one thing and another (notably a very busy market season on Larry's side and school vacation and grandchildren on mine), a few months elapsed between the day Larry made his propitious mistake and the day I finally boarded the ferry to watch him make it again. It had been early summer then. Now it was early fall. But the boat ride and the island were as lovely as ever...


When I arrived at the bakery, Larry was ready for me. The only things he had done ahead of time were to soak the grain in water for 26 hours (stirring every eight hours or so) and to mix the sponge (which had to ferment overnight). For good measure, he had sprouted spelt AND wheat (he had soaked the wheat for two days), so that we could see how spelt compared. From the photo below, it is clear that it performed very well in terms of rise and plumpness. But even though spelt is probably my favorite by a tiny margin, I also love the taste and texture of sprouted wheat. Something happens during sprouting which not only greatly boosts the nutritional value of the grain but also maximizes its flavor. Heady stuff for a bread lover!

The process

Mixing raisins and water in the food processor

Rinsing and draining the sprouted grain

Grinding up the grain

Combining sponge, salt and ground-up grains and starting to mix

Mixing, checking gluten development and taking dough temperature

Fermenting and folding

Done!


Dividing, pre-shaping and shaping


Proofed

Baking


Finished!

The Formula (an SFBI original, as adapted by Larry)

Ingredients
Sponge
  • Flour - 100 %
  • Water - 85 %
  • Instant dry yeast - 1.5 %
  • Salt - 2 %
  • Malt - 2 %
Final dough
  • Sprouted spelt - 80 %
  • Whole Spelt Flour - 20 %
  • Water - 5.25 %
  • Gluten (optional) - 2 %
  • Instant dry yeast - 1 %
  • Salt - 1.65 %
  • Raisins, soaked and puréed - 8 %
  • Honey - 4 %
  • Canola oil - 2 %
  • Sponge - 15 %
Method
  • The original formula called for raisin juice concentrate which is both very difficult to find and super expensive. Larry's solution is to add warm water to raisins in the food processor and make a slurry. It works just fine. The bread can probably be made without it but as Larry explained, raisins have mold-inhibiting properties. They have been used for years to prolong bread's shelf-life
  • It is best to sprout more than needed as sprouted grain can be kept in the freezer (scale the quantity you need in ziploc bags and take it out as needed 24 hours ahead of time)
  • If whole spelt flour isn't available, white spelt can be used instead. The crumb will look a little bit lighter
  • If the sprouted grain has been kept in the fridge, use hot water
  • The sponge can be made up to four days ahead and kept in the fridge
  • The water percentage is very low because the sprouted grain is soaking wet. In case you need or want to drain the grain ahead of time, you will need to adjust the water amount
  • Mix ground-up sprouted grain with all of the liquids for two or three minutes on first speed, then add all the dry ingredients and mix again on first speed until desired dough consistency is reached (4 to 5 minutes)
  • Then mix on second speed for 5 to 7 minutes
  • Desired dough temperature: 80°F/27°C
  • Ferment for one hour
  • Scale at 800 g
  • Pre-shape as hard as possible in a tight roll
  • Shape as a tight batard
  • Proof for about one hour at 85°F/29°C
  • Bake for 50 minutes at 400°F/204°C (or lower depending on your oven as the raisin slurry and the honey put the dough at risk of burning at high heat)
  • You know that the bread is done when the sides are brown and no longer pliable
  • Enjoy!
Thank you, Larry, for being such a patient instructor and a wonderful source of information and inspiration, not to mention a very dear friend! I am currently sprouting some spelt and hope to be able to bake tomorrow. I'll report on the experience as soon as I get a chance and post the ingredient amounts for just two loaves.
 

Blog Designed by: Deanna @ Design Chicky