Home About Recipes Artisans Blog Notes Resources
Showing posts with label Firm Starter. Show all posts

Thursday, April 24, 2014

Prairie Loaf (adapted from Jeffrey Hamelman's Pain au levain)

Believe it or not, I recently flew from Chicago to Seattle with a pocketful of starter and nothing happened! Granted, the starter was firm to start with (60% hydration) and it had been fed within an inch of its life just before I left for the airport, so it was sluggish and sated. Still, it sat tucked snugly against me in my vest pocket for two flights and what seemed like the longest layover ever (I was flying on a free ticket, so I can't really complain) and I was worried that it might get so warm it would decide to peek out and/or maybe let its presence known with a cheerful bang. I guess I still have painful memories of the long-ago day my apple levain exploded and had to be scraped off the ceiling and the windows of our enclosed porch. Now that must have been one nasty blow-up. Not that anybody was home to witness it but when we came back, we found the lid of the dough bucket on the floor near the door... Anyway, as I said, nothing happened this time. First thing I did upon getting home was unwrap the starter. Far from being active, it appeared stunned. I fed it and when I woke up the next morning, it had inflated to three times its original size. One day later, it looked like it never fled the coop.
It smelled so wonderfully lactic I couldn't bear to throw away the surplus. So I decided to bake with it.
I picked a very simple formula, Jeffrey Hamelman's Pain au levain (Sourdough bread) from the second edition of his book Bread: A Baker's Book of Techniques and Recipes and adapted it a bit. I don't usually bake or eat mostly white breads but I just had to taste my Chicago levain and by using no other flour than all-purpose (except for a smidgen of rye), I was hoping we would be able to savor it in all its glory. I am glad to say it worked (thank you, Jeffrey!). The bread has zero acidity and a delicate lactic aroma. It smells like the first breeze of spring over the prairie. Not that I ever saw the prairie or what's left of it but I am blessed -or cursed, depending on the occasion- with a vivid sensory imagination and the starter is from the Midwest after all. Since the prairie is what I saw with my mind's eyes when I inhaled the breath of the proofed dough, I couldn't resist stenciling one of the loaves with flowers and calling it the Prairie Loaf. And when that loaf came out of the oven in full bloom, I knew I had to bring it to my favorite plant whisperer, the friend who helps make our CSA such a happy place (thank you, Rita!). I shaped the other loaf as a bâtard in memory of the long rustic loaves my eighty-year old grandfather used to go get from the nearest village on his Solex motorized bicycle.
Baking on an impulse is fun but it has its drawbacks, one of which being that you have to adapt to what you have on hand. After feeding the starter, all I had left was about 160 g of mature levain. You know me, I am hopeless at math. With a calculator, I could have figured out the relative weights of the other ingredients but it would have taken a while and I knew I didn't have to because I could count on BreadStorm (the software I am using for my bread formulas) to do it for me.
Using the drop-down scaling menu, I entered the amount of flour in the levain (which I calculated by dividing 160 g by 175 then multiplying by 100) and in a flash, the weights of the other ingredients were recalculated and I was ready to mix. Sweet! Thank you, Jacqueline and Dado Colussi for having thought up this amazing software, and, Dado, a thousand thanks for this beautiful starter! And as you probably guessed, dear readers, there is a Meet the Bakers Dado and Jacqueline Colussi in this blog's near future. Thank you for your patience!
Ingredients
Method (this bread is made over two days and yields two smallish loaves)

  1. Build the levain the night before
  2. On the day of the bake, mix levain, water and flours until incorporated and all the flour is hydrated (I mixed by hand)
  3. Let this shaggy dough stand, covered, for 30 to 60 minutes
  4. Add the salt and mix until the dough is cohesive and supple, adding water if necessary to obtain a medium consistency
  5. Transfer to oiled container and cover
  6. Do two folds at 50-minute intervals
  7. Let ferment for another hour and place in the refrigerator for up to 24 hours (it might become acidic if you wait any longer)
  8. Pull the dough out when ready to shape and proof
  9. Divide in two and shape as desired
  10. Proof until ready (the length of the proofing depends largely on the room temperature. A loaf is ready to go in the oven when a small indentation lingers when you palpate it gently with one finger)
  11. Bake for 35 to 40 minutes in pre-heated 450°F/232°C oven, applying steam at the beginning
  12. Cool on a wire rack
  13. Enjoy!

Thursday, July 26, 2012

Gérard Rubaud and the Three-Speed Levain


Gérard's regular levain, fermented on second speed, initially (left) and six hours later (right)
What baker hasn't wished his or her levain would ferment a little faster so that mixing can start? Gérard who runs a one-man show on a very tight schedule has devised a method that gives him more control on how fast or how slowly his levain will develop.
He doesn't advocate using this method all the time as he isn't sure of what actually happens within the levain when it ferments faster: does it develop undesirable acids or aromas? He hasn't been able to tell just from tasting the resulting bread. Still he finds it a handy tool to have as it makes for more flexibility.
As for me, when we did the experience described below, since we didn't bake with any of these three pieces of levain, I can't vouch for the taste but I can tell you one thing: the levain fermented on third speed had aromas which were heady enough to make a grown woman swoon. Plus it ended up so round and fluffy I wished I could have used it that night as a pillow. Forget about cloud nine! I'll take cloud three anytime...

Three-speed levain demo


Pictures taken before the start of the experiment
#3 may look a bit bigger than #2 to start with but it is an optical effect. 
All three levains weigh exactly the same.
  • Shortly before 8:00 AM, Gérard feeds his regular levain and scales off three 1,650 g pieces which he calls #1, #2 and #3 respectively. Please note that he keeps his levain at 57% hydration and always salts it
  • He rounds the three pieces gently
  • At 8:20 AM, he places #1 in a plastic box, loosely covered, and puts the box on its side (to make later comparisons easier) (this is first speed)
  • He places #2 next to #1 and loosely covers it with a sheet of clear plastic (this is second speed)
  • He places #3 next to #2 on a clear sheet of plastic which he loosely wraps around it (this is third speed). 
  • When wrapping the levain for third speed, it is important to leave it room to expand as its volume will triple
  • The three levains are then left to ferment side-by-side at room temperature (about 78°F) for about six hours
  • At 2:20 PM, Gérard uncovers the three levains simultaneously
  • Significant differences in sizes can be observed between them, ranging from #1 (the smallest) to #3 (the largest)


  • #3 has obviously reached a more advanced stage of fermentation (Gérard's theory is that wild yeast cell counts shoot up when the levain is completely sheltered from ambient air)
  • #3's fluffiness makes it much easier to incorporate into an autolysed dough: there is no risk that some pieces of it might remain firm and unincorporated
  • For the sake of the side-by-side photo comparisons, Gérard has made all three levains into boules today but when he actually uses the third speed in a production setting, he shapes the levain into a long sausage before wrapping it. The fermentation is even faster that way.
Gérard says he uses second speed routinely and third speed only when he really needs to rescue his production schedule. 

Other Gérard Rubaud stories may be found on this page.

Thursday, September 23, 2010

Pain campagnard (Country Bread)

I don't know about you but I have a hard time following a recipe or, for that matter, reading it properly before starting baking from it. Having none of my bread books with me here in the Northwest, I had checked The Bread Bible by Beth Hensperger out of the local public library and settled on Beth's Pain campagnard which she describes as "a superb bread similar to the earthly wheat-rye loaves once made at harvest time in the French countryside". It called for a yeast-based sponge but I planned to use levain. It also called for all-purpose flour and dark rye flour, both of which I had. So no problem! I just hadn't noticed that it also called for wheat berries (which I didn't have) and that these wheat berries would have to be soaked... So I made the sponge 24 hours ahead of time as instructed. It smelled delicious when I uncovered it on Day 2 and I was looking forward to mixing the dough when I read : "Cover the wheat berries with boiling water. Cover with plastic wrap and let soak 4 hours at room temperature". My spirit sank until I remembered that I had some farro berries (a variety of spelt). So I soaked these instead but meanwhile the sponge which had looked quite ready when I first started was truly asking to be put to work and I had to let it sit until the berries were plump enough and, believe me, it took more than 4 hours for them not to be al dente. Since farro is way more tender than wheat, it would take even longer with the wheat berries and I would seriously advise boiling them instead of just soaking them. But that's besides the point which is to read a recipe attentively before starting. How many times have I read/heard that? And do you think I ever changed my ways? No. I am a speedy reader and have always been. Not that I took a class like Woody Allen who did learn speed reading, read War and Peace in 20 minutes and when asked about it, said: "It involved Russia". I do enjoy what I read and I recall it vividly but as far as recipes are concerned, I tend to zoom in on some words, start thinking of different techniques which could be put to use and consistently overlook some of the ingredients. The bread still came out pretty tasty and pleasantly chewy thanks to the farro but more sour than I would have liked. Is it due to the fact that the sponge was levain-based instead of yeast-based? Probably in part. But the sponge was definitely more sour when the soaker was finally ready that it had been when I initially uncovered it. On the other hand as I was mixing the dough and looking for some indication of how much water to use, I couldn't believe my eyes and had to read the list of ingredients closely three times to ascertain that there had been an editing mistake and that water had indeed been omitted from the final dough. If you have the book and want to try the recipe, make sure to add it back in!
Ingredients (This bread is made over 2 days) For the sponge 50 g firm levain (40% whole-grain) 225 g water 180 g whole grain mix, freshly milled (45% wheat, 45% spelt, 10% rye) (Beth uses whole-wheat) For the soaker 50 g farro, spelt or wheat berries, whole boiling water to cover For the final dough 6 g instant dry yeast 50 g dark rye flour 320 g all-purpose flour, unbleached 16 g salt 66 g water (from soaking the berries) + enough to get medium soft dough consistency Method
  1. On Day 1, mix levain, water and flour until a smooth batter is formed. It will be very sticky. Cover with plastic wrap and let stand at room temperature until doubled in bulk, 12 to 24 hours
  2. Also on Day 1, pour boiling water over the farro (or spelt or wheat) berries to cover, cover tightly and let stand for 4 hours (or more) at room temperature (Beth has you doing this on baking day but I think the soaker needs a bit more time)
  3. On Day 2, stir down the sponge with a wooden sponge
  4. Mix the flours with the yeast
  5. Drain the berries and add the water, the combined flours, the berries and the salt to the sponge (an other option is to add the salt after an initial mix and a 20-minute resting period and to add the berries after the dough has been completely mixed. That's what I'll do next time as it makes more sense)
  6. Mix until well combined (I mixed by hand using a series of stretches and folds)
  7. Turn the dough out onto a lightly floured work surface and do another series of stretches and folds, dipping your hands in water if necessary to keep the dough moist
  8. Place the dough in a large oiled bowl and let it rise at room temperature until doubled in bulks (2 to 3 hours), giving the dough three folds over the first 90 minutes
  9. When the dough is ready, turn it out onto a lightly floured work surface and gently deflate it. Divide into two equal portions using a metal dough scraper
  10. Pre-shape each of them as a ball and let rest, covered for 10 to 15 minutes
  11. Shape the two loaves into balls and place seam-side down on a half-sheet covered with a semolina-dusted piece of parchment paper (or place seam-side up in well-floured proofind baskets). Since I didn't have any baskets on hand, I just placed the loaves on parchment paper)
  12. Cover loosely and let proof (rise) at room temperature until doubled in bulk (1 to 1 1/2 hour)
  13. Thirty minutes before baking, preheat the oven to 450° F/232° C after placing in it a baking stone (on middle shelf) and a metal oven dish (on the lowest shelf)
  14. Turn the loaves onto a peel, seam-side down, dust them with flour (an optional step) and score as desired
  15. Place in the oven and immediately pour a cup of water into the preheated metal pan
  16. Bake for 20 minutes, rotate the loaves and bake another twenty minutes
  17. After 40 minutes, turn off the oven and leaving the loaves inside, open the door slightly
  18. Ten minutes later, take the loaves out and place them on a rack to cool.
Align Center
The Pain campagnard goes to Susan's Wild Yeast for Yeastspotting.

Thursday, September 16, 2010

Cranberry-Hazelnut Whole Wheat Crisps

I just discovered my true self and as sad as it is to admit it, the truth is that, deep down, I am just a copy cat! My friends Larry and Gerry from Tree-Top Baking make fantastic fruit and nut crisps. Since they live and work on Whidbey Island, too far away from us to make resupplying easy (which is too bad because they also make a sprouted wheat bread which is to die for, not to mention excellent buckwheat batons and many other great breads), no sooner was I done baking the Hazelnut-Cranberry Whole Wheat Bread that I decided to imitate them and make my own fruit and nut crisps. Larry's crisps (sorry, I didn't take a picture and they are long gone) are thinner because he machine-slices the bread. Having no such equipment at my disposal, I waited for the bread to be two days old (which was no mean feat as it meant hiding it from the rest of the family) and used a well-sharpened knife. The crisps came out crunchy and fragrant with an intense hazelnut flavor. They were quite a treat. To make crisps, just slice a loaf of bread as thin as possible and set the slices to bake in a 300° F/149° C oven. Bake 10 minutes then flip over and bake another 10 minutes (your oven may be hotter or cooler than the one I used and you might need to adjust temperature and baking time accordingly). After 20 minutes, I flipped the crisps a second time, gave them two more minutes and took them out. Then I set them on a rack to cool and watched them disappear. The Cranberry-Hazelnut Whole Crisps go to Susan's Wild Yeast for Yeastspotting.

Wednesday, August 18, 2010

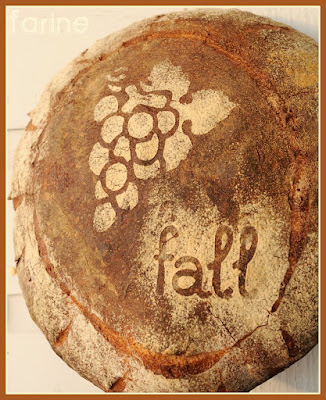
Stenciled Miche

I know it's been a while since I promised to do a post on stenciling. Sorry it took me so long! Time-wise I often bite more than I can chew, especially in the summer where I always think I'll finally get to whatever I couldn't do during the rest of the year and of course I never do. Oh, well! Better that than being idle and bored, I guess... Anyway the kids and grandkids are gone, we have a couple of quiet days left here on the river and the time for stencils has come!
Stenciling isn't really difficult and it is a lot of fun as it makes it possible to vary and personalize the appearance of your loaves almost endlessly. If you know how to draw, you can make your own designs, you can also download an image or reproduce one you find in a book. Once you have the design, you transfer it to construction or other sturdy paper and you cut it out, just as I did for this one which I used for the Essential Sweet Perrin:
But I mostly use store-bought stencils which I find at arts & crafts stores such as Michael's or JoAnn:
Sometimes I use cut-out shapes, as can be seen above in the blog's title banner:
Or I use ornaments, for instance this one (found at Michael's)...
...or even decorative odds and ends as with the Lovebird Loaf
I got the stencil below at Ikea. I think it was part of a cupcake decorating kit...
For the above miche, I used a stencil I bought in France in the kids' section of a big stationery store. It came in a set of six and there were many more to choose from...
...but they were almost twice as expensive as the ones available in the US (sturdier too but that's not really necessary), so I only got the fruit set.
If nothing else is available, I just use my hand as in the Double Apple Bread!
And then of course, if you want to write on your bread, you also need a set of letters. I own three or four different alphabets and I am always on the lookout for more as they are more fragile than the stencils and the letters get lost more easily. I buy them in the scrapbook section of arts & crafts stores.
When I was at SFBI last fall, the instructor who teaches German breads told me he always stenciled his breads in the last twenty minutes or so of baking: he takes the loaves out of the oven, sprays them very lightly with water, does the stenciling and puts them back to finish baking. I do my stenciling just before sliding the loaves in the oven as I find them easier to handle when they are not hot. I do keep his technique in mind though and it has happened once or twice that my stencil got kind of washed out in the oven, either because of the amount of steam or because I hadn't scored the bread in the right places and the dough moved differently from what I had expected. So I took the bread out, redid the stenciling and finished the baking. It worked very nicely. But for this miche, I just used my regular method.
What I do is that I wait until the proofing (the second rise) is done and the oven is ready for baking...
Then I gently transfer the dough (which is upside down in the basket) to a sheet-pan lined with semolina-dusted parchment paper, so that is now right side up. I put the stencil where I want it. Here I put it off-center and high up as I knew I needed space to write something.
Then I dust the open part of the stencil all over with flour using a small sugar shaker (make sure you use one with tiny tiny holes) ...
I remove the stencil very gently (sometimes it sticks a bit and you don't want to pull hard) and here we are...
Then I select the spot where I am going to write (and it's best to pick the word ahead of time as some words take up a lot of room and you don't want your letters to start climbing down the sides of your loaf). In this instance, I chose a very short word to go with the grapes. I know we still have one month of summer left but, hey, for I figured, why not go for it and stencil my way to fall. At least this year I won't be dragging behind as I am wont to do. ;-)
Here comes the trickiest part as the letters tend to stick quite a lot (they are made for scrapbooks after all) and it is easy to mess up when you remove them (if you do, just brush off the flour, use the tiniest amount of water to freshen up the surface of the dough and start again), so if you don't have dainty fingers (I don't), it's best to use tweezers. I use these (which come from my old computer toolkit from the days when I still had a desktop and needed to open it up now and then). It has little edges which make it easier to grasp and hold the letters but I imagine regular tweezers would work too.
And that's all there is to it. You just need to remember not to spray water directly on your bread when you put it in the oven. When baking a stenciled bread, it's usually best to do the steaming from below using a small pan heated up with the oven in which you pour a cup of cold, hot or boiling water (every baker has his/her own opinion as to what the temperature of the water should be. I normally use cold water but for this recipe, I followed the author's advice and used hot. Actually she says to bring the water to a boil but it was too complicated, not to mention dangerous, considering my innate clumsiness. So I used hot water from the tap). Note that some kinds of bread do not stencil well or at all. I have never seen a stencil on a ciabatta for instance as wet dough just absorbs the flour and the design vanishes.
Now I wasn't going to post the recipe for this bread as the post was really about stenciling and miche has never been my favorite bread but it was my first time making this particular recipe which I found in the revised and updated Amy's Bread by Amy Scherber and Toy Kim Dupree and the miche came out so delicious that I know I will make it over and over from now on. Its taste reminded me once again that the bigger the bread the more intense the flavor. My firm levain is naturally very tasty since it is fed a mixture of freshly milled grains which still smell like the wind over the fields they come from but some recipes showcase it more than others. This one enhances its complex and rustic fragrance in a way that almost brought tears to my eyes, such was the wave of nostalgia that suddenly swept over me.This is truly a bread from my childhood, from before I even knew how to say "bread" in my own language. For me at least, it is the perfect French peasant bread and so here is the recipe with heartfelt thanks to Amy for bringing me this Proustian moment.
Ingredients:
57 g very warm water (105 to 115º F/41 to 46ºC)
1/2 tsp active dry yeast (I used 2 g of instant yeast instead)
600 g cool water (75 to 78ºF/24 to 26ºC)
165 g firm levain (I used my regular wheat-spelt-rye levain which has an hydration rate of 60%)
635 g organic unbleached flour
200 g organic rye flour (I milled my own right before mixing)
18.5 g salt
medium cornmeal or semolina, for sprinkling
Method: (as adapted from the book)
  1. Combine the very warm water and the active dry yeast in a measuring cup and stir to dissolve the yeast. Let stand for 3 minutes (since I was using instant yeast, I skipped that part and added the yeast directly to the flour. I added the corresponding amount of water to the dough)
  2. In the bowl of an electric mixer fitted with a dough hook, combine the cool water and the levain and mix on medium-low speed for 90 seconds to break up the levain
  3. Add the flours and salt and mix on medium-low speed for 2 minutes, then scrape down the sides of the bowl, increase the speed to medium and continue mixing for another 5 minutes (since my mixer only has one speed, which is pretty low, I just kept going)
  4. Turn off the mixer, cover the bowl and let the dough rest for 10 minutes
  5. Mix again for 2 minutes at medium-low speed. The dough will not be fully developed at this point, which is what you want (in other words you stop short of a window-pane)
  6. Put the dough in an oiled bowl large enough to allow it to almost double, cover it with oiled plastic wrap and allow it to rise for 30 minutes at the end of which it will be slightly puffy and very sticky
  7. Moisten your hands with cool water or a little oil and give the dough a turn by gently folding it from the sides to the middle to de-gas it, then turn it over so that the smooth bottom side is up, cover it and let it rise again for 30 minutes
  8. Turn it again and let it rise a third time for 30 minutes. The consistency of the dough will be still soft but it should now be stronger and feel slightly springy
  9. While the dough is rising the third time, generously flour a banneton or a towel-lined colander. The dough will stick to any unfloured areas, so be sure every inch is heavily coated with flour
  10. Pour the dough out onto a lightly floured work surface and gently shape it in a round ball, keeping your hands floured or moistened so that they don't stick to the dough. Try not to tear the skin of the dough
  11. Place the ball seam side up in the prepared banneton or colander, cover it with the oiled plastic wrap again and let it rise until it has almost doubled. This will take an hour or more depending on the temperature of the dough
  12. Thirty minutes before baking, preheat the oven t 480ºF/249ºC (with a baking stone on the second lowest shelf and an empty metal bowl on the shelf below)
  13. Sprinkle a parchment-lined half-sheet pan with cornmeal or semolina flour. When the miche is ready, remove the plastic wrap and carefully turn it upside down on the pan.
  14. Stencil the top of the miche as desired, then score the dough (for this miche, I scored in a circle around the stenciled top, then vertically all around on the sides)
  15. Open the oven and slide the miche onto the baking stone, still on its paper
  16. Quickly pour 1 cup of hot water in the metal bowl and close the oven door
  17. After 3 minutes, add another half-cup of water
  18. Check the loaf after 20 minutes, rotate it if necessary (a must for me as my oven is much hotter in the back than in the front) and remove the metal bowl from the oven, to make sure there is no residual moisture in the oven
  19. Reduce the oven temperature to 450ºF/232ºC and bake for a total of 50 to 55 minutes, until the loaf is very dark in color and sounds hollow when tapped on the bottom. The inside temperature should register at least 210ºF/99ºC
  20. Place on a wire rack and cool completely before cutting into it (it is actually best to wait 12 to 24 hours if possible as the flavor really increases as the bread rests).
  21. Enjoy!
This miche goes to Susan, from Wild Yeast for Yeastpotting.

Monday, July 26, 2010

The Meteorite

About 350 millions years ago, a 1.2-mile wide meteorite weighing 15 billions tons and traveling at the speed of 6 miles per second impacted the area we now know as Charlevoix County in Central Quebec, completely altering its geography and disrupting climate patterns the world around.
While not quite as portentous, the reintroduction of good bread to Charlevoix County (see
The Gift of Bread
) at the beginning of the 21st century was seen as a major event, deserving to be heralded by a groundbreaking loaf. The bakers at
Boulangerie La Rémy
accordingly devised a daring recipe and, for maximum impact, decided to call their signature bread, the meteorite.
Boasting a 100% hydration rate and calling for a minimum of two folds and very high baking temperatures (500º F/260º C), the meteorite is made with all-purpose flour milled at Moulin de la Rémy and it is quite tasty, thanks to the addition of firm levain to the straight dough. Since the grain milled at the mill comes from La Malbaie, no bread can rightfully claim to be more local than this one and the customers love it.
The day I visited the bakery was damp and overcast. The meteorites had already been taken out of the oven (they go in first thing in the morning) and Hubert, the baker, wasn't really happy with the way they had turned out. He would have liked to see the crumb a bit more open. I should have remembered this cautionary tale when I tried my luck at the meteorites myself. The day was stiflingly hot and humid and even though the air conditioner unit was humming steadily in our little camp by the river, there was no escaping the fact that conditions were not optimal for baking. Never one to be deterred, I forged ahead.
Well, one thing is for sure. The breads did look like foreign objects from outer space (or the way I imagine a meteorite looks before entering the atmosphere) when they were done proofing.
And when they were done baking, well, they didn't look much like the meteorites from the bakery. I am not sure what they looked like with their ruddy cheeks, maybe prehistoric renditions of planets in the solar system?
The two little loaves actually came out okay. The aesthetic appeal of the larger one was certainly more difficult to grasp. Let's put it this way: it did look a bit like a meteorite after all, but a meteorite after impact, especially with its blackened bumps all over. The fact is that, probably egged on by the fierce heat outside, my little camp oven (usually very timid and barely hot enough to bake bread) gave it its all. The big loaf went in after the little ones came out and even though I had lowered the temperature, it still got scorched a bit (it actually looks worse in the picture than it did in reality).
The funny part is that even though the breads baked for about 40-45 minutes and their internal temperature exceeded 210ºF/99º C (which is pretty high for a - mostly - yeasted bread), the crumb was a bit gummy. I should have turned off the oven and left the loaves to dry out inside with the door ajar.
As it turned out however, the gumminess was no big deal. We had a cookout with friends and what I did is open up the meteorite horizontally and set it to toast lightly on the barbecue. It took up a delicious smoky flavor from the Italian sausages which were grilling underneath and we enjoyed it very much. Our friends took home what was left of it.
I had fun making it but it took a huge leap of faith to believe that what was basically at the beginning a very soupy dough would actually turn into bread! The folds are what did it of course and I greatly enjoyed feeling the dough strengthen after each one. So if you like baking on the edge, go for it! You'll have a ball!
Ingredients (for one big loaf and two little ones)
1 kg unbleached all-purpose flour (I used flour stone-ground at
The Mill on the Rémy
)
1 liter of water
21 g salt (Baker Hubert uses 26g)
120 g firm starter (mine is 40% whole-grain)
6 g instant yeast (Hubert uses 12 g fresh yeast)
Method (my interpretation of what Hubert does at the bakery)
  1. Place flour, yeast and water in the bowl of the mixer
  2. Mix well and let rest for 20 minutes (autolyse)
  3. Add the levain (cut up in small pieces). Mix until incorporated
  4. Add the salt and let rest for 15 minutes
  5. Mix briefly
  6. If necessary mix again briefly after another 15-minute resting period. Repeat if necessary.
  7. Transfer to an oiled container and cover
  8. Proof at 75º F/24ºC for one hour
  9. Give the dough one fold (north-south), wait a few minutes and give it another (east-west).
  10. Repeat the folds as necessary until the dough feels strong enough (I did four but Hubert gets away with two)
  11. Let the dough rest 15 minutes and divide as desired with no pre-shaping
  12. Let proof upside down on a floured couche for a maximum of 30 minutes
  13. Turn the loaves before sliding them into a very hot oven (500 ºF/260ºC), directly on a preheated baking stone (at the bakery, the ovens are so tightly built that no steam is necessary. The breads generate their own steam. I did steam mine, which might be the reason the crumb turned out wetter than it should)
  14. Bake for 45 minutes.
The Meteorite is expected to re-enter the atmosphere on Susan's Wild Yeast blog just in time for this week's Yeastpotting.
For all practical info regarding the mill and/or the bakery, please refer to the Moulin de la Rémy's website.

Tuesday, April 20, 2010

JT's 85x3

This bread with an improbable name is the one which won its creator John Tredgold (aka JT) a spot on Bread Team USA 2010, so you'd better believe it's good. It is in fact awesome, so much so that it will become a fixture in my house on baking days. You should have seen the speed at which it was wolfed down by my grandchildren when I brought the loaves over. Everyone went back for seconds and thirds, from the 3-year old twins to their teenage brother and sister. Of course the older kids were completely unaware when devouring it that they were ingesting the very same healthful whole grains as the ones they scorn when listed on the wrapper of a supermarket sliced loaf. Nothing like a deliciously crunchy crust and a complex taste to make you forget your dearest principles!
The 85x3 gets its matchless aromas from a high-extraction flour as well as from the use of three different preferments, a biga, a poolish and a levain. The biga and the levain are made with 100% high-extraction flour while the poolish uses regular bread flour.
JT used Artisan Old Country Organic Type 85 malted Wheat Flour (ash content: 0.85%) from Central Milling. I didn't have access to that flour, so I used La Milanaise's "farine tamisée" which contains just a tad more bran. La Milanaise flours are not sold retail in this country. I got mine from a friend who owns a bakery. If you don't have access to a high-extraction flour, a reasonable substitute would be to use 80% organic white flour and 20% whole wheat flour.
I didn't have raw wheat germ, so I left it out of the recipe. Also because it was cool in my house (much cooler than in the bakery at Semifreddi's), the poolish and the biga took their own sweet time to ferment and I ended up mixing the final dough too late in the day to contemplate baking before night. So I left the dough at room temperature (about 64 F/18C) for one hour, folded it once and put it in the fridge (on the top shelf where it is a tad less cold). The following morning, I took it out, gave it a fold and let it come back to room temperature (one hour and a half to two hours) before dividing, shaping, etc.
JT's original formula can be be found here. The recipe below is my interpretation.
Ingredients: (for 2 bâtards, 1 fendu, 2 crowns and 1 boule)
Biga 190 g high-extraction flour 114 g water 0.003 g salt (a tiny tiny pinch, basically a few grains) 0.003 g instant yeast (a tiny tiny pinch too) Poolish 190 g organic white flour 209 g water 0.003 g salt 0.003 g instant yeast Levain (mine was 40% whole-grain, mostly wheat and spelt with a little bit of rye) 380 g high-extraction flour 209 g water 190 g firm starter Final dough 631 g high-extraction flour 353 g organic white flour 761 g water (I used slightly less water than JT, probably because my flours were less thirsty than the ones he used) 34 g salt 0.17 g instant yeast 305 g biga 400 g poolish 780 g levain
Method (this bread is made over two days)
  1. Mix the biga, the poolish and the levain and leave them to ferment at room temperature for 10 to 12 hours
  2. When the preferments are ready, mix flour, poolish and 80% of the water in the bowl of the mixer until the flour is completely hydrated and let rest for 30 minutes (autolyse)
  3. Add the biga, the levain, the yeast, the salt and remaining wateras needed and mix until the dough starts to develop strength, then add more water until medium soft consistency is reached (JT says: "A second water addition is used for this mix. I tend to prefer this style of mixing. Instead of holding back say 5-10% of the water and dribbling it into the bowl when you feel comfortable. I like to create the final dough and on the last minute throw all the water in one go. The dough will start to shred and start 'swimming'. Do not panic and add flour! It’s a bit like accelerating through a skid, Don't put your foot on the brake")
  4. Transfer the dough to an oiled container, cover it tightly
  5. Give it a fold after one hour then put the container in the fridge overnight
  6. In the morning, take the dough out of the fridge and give it a fold
  7. Let it come back to low room temperature and divide by 500 g, preshaping as cylinders or boules according to the desired shapes
  8. Shape and let proof, covered, for one to one and a half hour
  9. Pre-heat the oven to 470 F/243 C one hour before baking (my oven doesn't heat very well. A lower temperature setting might work just fine in your oven), taking care to put it in a baking stone and, underneath, a heavy metal pan for steaming (mine contains barbecue stones which we bought solely for steaming purposes)
  10. Dust with flour and score as desired (as can be seen from the above pictures, deep scoring and angled surface scoring yield very different "ears" in the final loaves)
  11. Pour a cup of water over the barbecue stones in the steam tray, lower the oven temperature to 450 F/232 C and bake for 40 minutes
  12. JT recommends turning off the heat after 30 minutes and leaving the bread an additional 15 minutes in the oven with the door ajar. I will try that next time as I found the crumb a little bit moist when I first sliced open one of the cooled loaves.
Related post: Meet the Baker: John Tredgold
JT's 85x3 goes to Susan, from Wild Yeast for Yeastpotting.
 

Blog Designed by: Deanna @ Design Chicky